Building Beautiful Command Line Interfaces with Python
building a command line interface using python..
Before we dive in building the command line application, lets take a quick peek at Command Line.
Command Line programs has been with us since the creation of computer programs and are built on commands. A command line program is a program that operates from the command line or from a shell.
While Command line interface is a user interface that is navigated by typing commands at terminals, shells or consoles, instead of using the mouse. The console is a display mode for which the entire monitor screen shows only text, no images and GUI objects.
According to Wikipedia:
The CLI was the primary means of interaction with most computer systems on computer terminals in the mid-1960s, and continued to be used throughout the 1970s and 1980s on OpenVMS, Unix systems and personal computer systems including MS-DOS, CP/M and Apple DOS. The interface is usually implemented with a command line shell, which is a program that accepts commands as text input and converts commands into appropriate operating system functions.
Why Python?
Python is usually regarded as a glue code language, because of it’s flexibility and works well with existing programs. Most Python codes are written as scripts and command-line interfaces (CLI).
Building these command-line interfaces and tools is extremely powerful because it makes it possible to automate almost anything you want.
We are in the age of beautiful and interactive interfaces, UI and UX matters alot. We need to add these things to Command Lines and people have been able to achieve it and its officially used by popular companies like Heroku.
There are tons of Python libraries and modules to help build a command line app from parsing arguments and options to flagging to full blown CLI “frameworks” which do things like colorized output, progress bars, sending email and so on.
With these modules, you can create a beautiful and interactive command line interfaces like Heroku and Node programs like Vue-init or NPM-init.

In order to build something beautiful vue init cli easily, I’d recommend using Python-inquirer which is a port of Inquirer.js to Python.
Unfortunately, Python-inquirer doesn’t work on Windows due to the use of blessings — a python package for command line which imports _curses and fcntl modules that is only available on Unix like systems. Well, some awesome developers were able to port _curses to Windows but not fcntl . An alternative fcntl in windows is the win32api .
However, after serious googling I bumped into a python module I did a full fix on and called it PyInquirer which is an alternative to python-inquirer and the good thing is, it works on all platforms including Windows. Huraaaay!

Basics in Command Line Interface with Python
Now lets take a little peek at command line interface and building one in Python.
A command-line interface (CLI) usually starts with the name of the executable. You just enter it’s name in the console and you access the main entry point of the script, an example is pip.
There are parameters you need to pass to the script depending how they are developed and they can either be:
- Arguments: This is a required parameter that’s passed to the script. If you don’t provide it, the CLI will run into an error. For instance,
djangois the argument in this command:pip install django. - Options: As the name implies, its is an optional parameter which usually comes in a name and a value pair such as
pip install django --cache-dir ./my-cache-dir. The--cache-diris an option param and the value./my-cache-dirshould be uses as the cache directory. - Flags: This is special option parameter that tells the script to enable or disable a certain behaviour. The most common one is probably
--help.
With complex CLIs like the Heroku Toolbelt, you’ll be able access some commands that are all grouped under the main entry point . They are usually regarded as commands or sub-commands.
Let’s now look how to build smart and beautiful CLI with different python packages.
Argparse
Argparse is the default python module for creating command lines programs. It provides all the features you need to build a simple CLI.
import argparse
parser = argparse.ArgumentParser(description='Add some integers.')
parser.add_argument('integers', metavar='N', type=int, nargs='+',
                    help='interger list')
parser.add_argument('--sum', action='store_const',
                    const=sum, default=max,
                    help='sum the integers (default: find the max)')
args = parser.parse_args()
print(args.sum(args.integers))
This performs a simple addition operation. The argparse.ArgumentParser lets you add a description to your programs while the parser.add_argument lets you add a command. The parser.parse_args() returns arguments given and they usually comes in name-value pairs.
For instance, you can access integers arguments given using args.integers. In the above scripts, --sum is an optional argument while N is a positional argument.
Click
With Click, you can build CLI easily compared to Argparse. Click solves the same problem argparse solves, but uses a slightly different approach to do so. It uses the concept of decorators. This needs commands to be functions that can be wrapped using decorators.
# cli.py
import click

@click.command()
def main():
    click.echo("This is a CLI built with Click ✨")

if __name__ == "__main__":
    main()
You can add argument and option like below:
# cli.py
import click

@click.command()
@click.argument('name')
@click.option('--greeting', '-g')
def main(name, greeting):
    click.echo("{}, {}".format(greeting, name))

if __name__ == "__main__":
    main()
If you run the above scripts, you should get:
$ python cli.py --greeting <greeting> Oyetoke
Hey, Oyetoke
Putting everything together, I was able to build a simple CLI to query books on Google Books.
For more info, you can dig deep on Click from the official documentation
Docopt
Docopt is a lightweight python package for creating command line interface easily by parsing POSIC-style or Markdown usage instructions. Docopt uses conventions that have been used for years in formatting help messages and man page for describing a command line interface. An interface description in docopt is such a help message, but formalized.
Docopt is very concerned about how the required docstring is formatted at the top of your file. The top element in your docstring after the name of your tool must be “Usage,” and it should list the ways you expect your command to be called.
The second element that should follow in your docstring should be “Options,” and this should provide more information about the options and arguments you identified in “Usage.” The content of your docstring becomes the content of your help text.
PyInquirer
PyInquirer is a module for interactive command line user interfaces. The packages we’ve seen above haven’t implemented the “beauty interfaces” we want. So lets take a look at how to use PyInquirer.
Like Inquirer.js, PyInquirer is structured into two simple steps:
- You define a list of questions and pass them to prompt
- Prompt returns a list of answers
from __future__ import print_function, unicode_literals
from PyInquirer import prompt
from pprint import pprint
questions = [
    {
        'type': 'input',
        'name': 'first_name',
        'message': 'What\'s your first name',
     }
]
answers = prompt(questions)
pprint(answers)
An interactive example
The result:
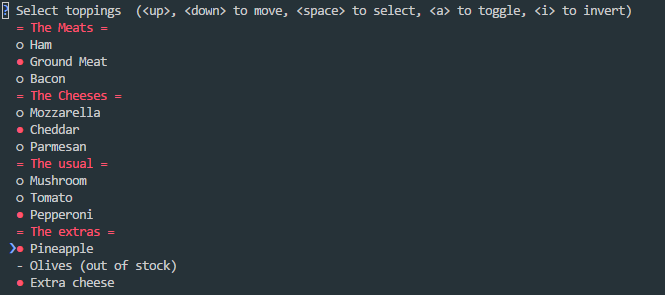
Lets examine some part of this script.
style = style_from_dict({
Token.Separator: '#cc5454',
Token.QuestionMark: '#673ab7 bold',
Token.Selected: '#cc5454',  # default
Token.Pointer: '#673ab7 bold',
Token.Instruction: '',  # default
Token.Answer: '#f44336 bold',
Token.Question: '',
})
The style_from_dict is used to define custom styles you want for your interface. The Token is just like a component and it has some other components under it.
We’ve seen the questions list in the earlier example and it is passed into the prompt for processing.
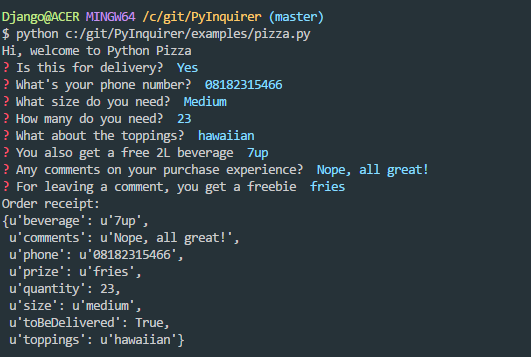
An example of interactive CLI you can create with this is:
results:
PyFiglet
Pyfiglet is a python module for converting strings into ASCII Text with arts fonts. Pyfiglet is a full port of FIGlet (http://www.figlet.org/) into pure python.
from pyfiglet import Figlet
f = Figlet(font='slant')
print f.renderText('text to render')
result:

Clint
Clint is incorporated with everything you need in creating a CLI. It supports colors, awesome nest-able indentation context manager, supports custom email-style quotes, has an awesome Column printer with optional auto-expanding columns and so on.

Cool right? I know.
Other Python CLI Tools
Cement: Its a full fledge CLI framework. Cement provides a light-weight and fully featured foundation to build anything from single file scripts to complex and intricately designed applications.
Cliff: Cliff is a framework for building command-line programs. It uses setuptools entry points to provide subcommands, output formatters, and other extensions.
Plac: Plac is a simple wrapper over the Python standard library argparse, which hides most of its complexity by using a declarative interface: the argument parser is inferred rather than written down by imperatively
EmailCLI
Adding everything together, I wrote a simple cli for sending mails through SendGrid. So to use the script below, go get your API Key from SendGrid.
Installation
pip install sendgrid click PyInquirer pyfiglet pyconfigstore coloram termcolor six
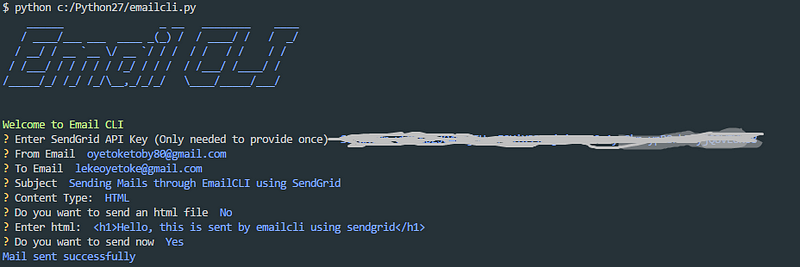
That’s it.