
JavaScript is one of the most popular programming languages in the world, and is now widely used also outside of the browser. The rise of Node.js in the last few years unlocked back-end development – once the domain of Java, Ruby, Python, PHP, and more traditional server-side languages.
The JavaScript Handbook follows the 80/20 rule: learn 80% of JavaScript in 20% of the time.
Learn all you need to know about JavaScript!
Note: you can get a PDF, ePub, or Mobi version of this handbook for easier reference, or for reading on your Kindle or tablet.
Table of Contents
- ECMAscript
- ES6
- ES2016
- ES2017
- ES2018
- Coding Style
- Lexical Structure
- Variables
- Types
- Expressions
- Prototypal Inheritance
- Classes
- Exceptions
- Semicolons
- Quotes
- Template Literals
- Functions
- Arrow Functions
- Closures
- Arrays
- Loops
- Events
- The Event Loop
- Asynchronous Programming and Callbacks
- Promises
- Async and Await
- Loops and Scope
- Timers
- This
- Strict Mode
- Immediately-Invoked Function Expressions (IFFE’s)
- Math Operators
- The Math Object
- ES modules
- CommonJS
- Glossary
Introduction
JavaScript is one of the most popular programming languages in the world. Created 20 years ago, it’s gone a very long way since its humble beginnings.
Being the first, and the only scripting language that was supported natively by web browsers, it simply stuck.
In the beginnings, it was not nearly as powerful as it is today, and it was mainly used for fancy animations ? and the marvel known at the time as Dynamic HTML (DHTML).
With the growing needs that the web platform demands, JavaScript had the responsibility to grow as well, to accommodate the needs of one of the most widely used ecosystems of the world.
Many things were introduced in the platform, with browser APIs, but the language grew quite a lot as well.
JavaScript is now widely also used outside the browser. The rise of Node.js in the last few years unlocked back-end development, once the domain of Java, Ruby, Python, PHP, and more traditional server-side languages.
JavaScript is now also the language powering databases and many more applications. It’s even possible to develop embedded applications, mobile apps, TV sets apps and much more. What started as a tiny language inside the browser is now the most popular language in the world.
A basic definition of JavaScript
JavaScript is a programming language that is:
- High level: It provides abstractions that allow you to ignore the details of the machine where it’s running. It manages memory automatically with a garbage collector, so you can focus on the code instead of managing memory locations, and provides many constructs which allow you to deal with highly powerful variables and objects.
- Dynamic: As opposed to static programming languages, a dynamic language executes at runtime many of the things that a static language does at compile time. This has pros and cons, and it gives us powerful features like dynamic typing, late binding, reflection, functional programming, object runtime alteration, closures and much more.
- Dynamically typed: A variable does not enforce a type. You can reassign any type to a variable, for example assigning an integer to a variable that holds a string.
- Weakly typed: As opposed to strong typing, weakly (or loosely) typed languages do not enforce the type of an object. This allows more flexibility but denies us type safety and type checking (something that TypeScript and Flow aim to improve)
- Interpreted: It’s commonly known as an interpreted language, which means that it does not need a compilation stage before a program can run, as opposed to C, Java or Go for example. In practice, browsers do compile JavaScript before executing it, for performance reasons, but this is transparent to you as there is no additional step involved.
- Multi-paradigm: The language does not enforce any particular programming paradigm, unlike Java for example which forces the use of object-oriented programming, or C that forces imperative programming.
You can write JavaScript using an object-oriented paradigm, using prototypes and the new (as of ES6) classes syntax. You can write JavaScript in functional programming style, with its first-class functions, or even in an imperative style (C-like).
In case you’re wondering, JavaScript has nothing to do with Java, it’s an unfortunate name choice but we have to live with it.
JavaScript versions
Let me introduce the term ECMAScript here. We have a complete guide dedicated to ECMAScript where you can dive into it more, but to start with, you just need to know that ECMAScript (also called ES) is the name of the JavaScript standard.
JavaScript is an implementation of that standard. That’s why you’ll hear about ES6, ES2015, ES2016, ES2017, ES2018 and so on.
For a very long time, the version of JavaScript that all browsers ran was ECMAScript 3. Version 4 was canceled due to feature creep (they were trying to add too many things at once). While ES5 was a huge version for JavaScript, ES2015, also called ES6, was huge as well.
Since then, the ones in charge decided to release one version per year, to avoid having too much time idle between releases, and have a faster feedback loop.
Currently, the latest approved JavaScript version is ES2017.
ECMASCRIPT
Whenever you read about JavaScript you’ll inevitably see one of these terms:
- ES3
- ES5
- ES6
- ES7
- ES8
- ES2015
- ES2016
- ES2017
- ECMAScript 2017
- ECMAScript 2016
- ECMAScript 2015
What do they mean?
They are all referring to a standard, called ECMAScript.
ECMAScript is the standard upon which JavaScript is based, and it’s often abbreviated to ES.
Beside JavaScript, other languages implement(ed) ECMAScript, including:
- ActionScript (the Flash scripting language), which is losing popularity since Flash will be officially discontinued in 2020.
- JScript (the Microsoft scripting dialect), since at the time JavaScript was supported only by Netscape and the browser wars were at their peak, Microsoft had to build its own version for Internet Explorer
But of course, JavaScript is the most popular and widely used implementation of ES.
Why this odd name? Ecma International is a Swiss standards association who is in charge of defining international standards.
When JavaScript was created, it was presented by Netscape and Sun Microsystems to Ecma and they gave it the name ECMA-262 alias ECMAScript.
This press release by Netscape and Sun Microsystems (the maker of Java) might help figure out the name choice, which might include legal and branding issues by Microsoft which was in the committee, according to Wikipedia.
After IE9, Microsoft stopped branding its ES support in browsers as JScript and started calling it JavaScript (at least, I could not find references to it any more).
So as of 201x, the only popular language supporting the ECMAScript spec is JavaScript.
Current ECMAScript version
The current ECMAScript version is ES2017, AKA ES8. It was released in June 2017.
When is the next version coming out?
Historically, JavaScript editions have been standardized during the summer, so we can expect ECMAScript 2019 (named ES2019 or ES10) to be released in summer 2019, but this is just speculation.
What is TC39
TC39 is the committee that evolves JavaScript.
The members of TC39 are companies involved in JavaScript and browser vendors, including Mozilla, Google, Facebook, Apple, Microsoft, Intel, PayPal, SalesForce and others.
Every standard version proposal must go through various stages, which are explained here.
ES Versions
I found it puzzling why sometimes an ES version is referenced by edition number and sometimes by year.
Before ES2015, ECMAScript specifications were commonly called by their edition. So ES5 is the official name for the ECMAScript specification update published in 2009.
Why does this happen? During the process that led to ES2015, the name was changed from ES6 to ES2015, but since this was done late, people still referenced it as ES6, and the community has not left the edition naming behind – the world is still calling ES releases by edition number.
This table should clear things up a bit:

ES.Next is a name that always indicates the next version of JavaScript.
At the time of writing, ES9 has been released, and ES.Next is ES10
The ES6 improvements
ECMAScript 2015, also known as ES6, is a fundamental version of the ECMAScript standard.
Published 4 years after the latest standard revision, ECMAScript 5.1, it also marked the switch from edition number to year number.
So it should not be named ES6 (although everyone calls it as such) but ES2015 instead.
ES5 was 10 years in the making, from 1999 to 2009, and as such it was also a fundamental and very important revision of the language. But now so much time has passed that it’s not worth discussing how pre-ES5 code worked.
Since this long time passed between ES5.1 and ES6, the release is full of important new features and major changes in suggested best practices in developing JavaScript programs. To understand how fundamental ES2015 is, just keep in mind that with this version, the specification document went from 250 pages to ~600.
The most important changes in ES2015 include:
- Arrow functions
- Promises
- Generators
letandconst- Classes
- Modules
- Multiline strings
- Template literals
- Default parameters
- The spread operator|
- Destructuring assignments
- Enhanced object literals
- The for..of loop
- Map and Set
I’ll cover each of them in a dedicated section here in this guide. So let’s get started.
Arrow Functions
Arrow functions have changed how most JavaScript code looks (and works).
Visually, it’s a simple and welcome change, from:
const foo = function foo() {
  //...
}
to
const foo = () => {
  //...
}
And if the function body is a one-liner, just:
const foo = () => doSomething()Also, if you have a single parameter, you could write:
const foo = param => doSomething(param)This is not a breaking change, as regular functions will continue to work just as before.
A new this scope
The this scope with arrow functions is inherited from the context.
With regular functions, this always refers to the nearest function, while with arrow functions this problem is removed, and you won’t need to write var that = this ever again.
Promises
Promises allow us to eliminate the famous “callback hell”, although they introduce a bit more complexity (which has been solved in ES2017 with async, a higher level construct).
Promises have been used by JavaScript developers well before ES2015, with many different library implementations (for example, jQuery, q, deferred.js, vow…). The standard created a common ground across the differences.
By using promises, you can rewrite this code
setTimeout(function() {
  console.log('I promised to run after 1s')
  setTimeout(function() {
    console.log('I promised to run after 2s')
  }, 1000)
}, 1000)
as
const wait = () => new Promise((resolve, reject) => {
  setTimeout(resolve, 1000)
})
wait().then(() => {
console.log('I promised to run after 1s')
return wait()
})
.then(() => console.log('I promised to run after 2s'))Generators
Generators are a special kind of function with the ability to pause themselves, and resume later, allowing other code to run in the meantime.
The code decides that it has to wait, so it lets other code “in the queue” run, and keeps the right to resume its operations “when the thing it’s waiting for” is done.
All this is done with a single, simple keyword: yield. When a generator contains that keyword, the execution is halted.
A generator can contain many yield keywords, thus halting itself multiple times, and it’s identified by the *function keyword, which is not to be confused with the pointer dereference operator used in lower level programming languages such as C, C++ or Go.
Generators enable whole new paradigms of programming in JavaScript, allowing:
- 2-way communication while a generator is running
- long-lived while loops which do not freeze your program
Here is an example of a generator which explains how it all works.
function *calculator(input) {
    var doubleThat = 2 * (yield (input / 2))
    var another = yield (doubleThat)
    return (input * doubleThat * another)
}
We initialize it with
const calc = calculator(10)Then we start the iterator on our generator:
calc.next()This first iteration starts the iterator. The code returns this object:
{
  done: false
  value: 5
}
What happens is: the code runs the function, with input = 10as it was passed in the generator constructor. It runs until it reaches the yield, and returns the content of yield: input / 2 = 5. So we get a value of 5, and the indication that the iteration is not done (the function is just paused).
In the second iteration we pass the value 7:
calc.next(7)and what we get back is:
{
  done: false
  value: 14
}
7 was placed as the value of doubleThat.
Important: you might think that
input / 2is the argument, but that’s just the return value of the first iteration. We now skip that, and use the new input value,7, and multiply it by 2.
We then reach the second yield, and that returns doubleThat, so the returned value is 14.
In the next, and last, iteration, we pass in 100
calc.next(100)and in return we get
{
  done: true
  value: 14000
}
As the iteration is done (no more yield keywords found), we just return (input * doubleThat * another) which amounts to 10 * 14 * 100.
let and const
var is traditionally function scoped.
let is a new variable declaration which is block scoped.
This means that declaring let variables in a for loop, inside an if or in a plain block is not going to let that variable «escape» the block, while vars are hoisted up to the function definition.
const is just like let, but immutable.
In JavaScript moving forward, you’ll see little to no var declarations any more, just let and const.
const in particular, maybe surprisingly, is very widely used nowadays with immutability being very popular.
Classes
Traditionally JavaScript was the only mainstream language with prototype-based inheritance. Programmers switching to JavaScript from class-based languages found it puzzling, but ES2015 introduced classes, which are just syntactic sugar over the inner working of JavaScript, but change how we build JavaScript programs.
Now, inheritance is very easy and resembles other object-oriented programming languages:
class Person {
  constructor(name) {
    this.name = name
  }
hello() {
return 'Hello, I am ' + this.name + '.'
}
}class Actor extends Person {
hello() {
return super.hello() + ' I am an actor.'
}
}var tomCruise = new Actor('Tom Cruise')
tomCruise.hello()The above program prints “Hello, I am Tom Cruise. I am an actor.”
Classes do not have explicit class variable declarations, but you must initialize any variable in the constructor.
Constructor
Classes have a special method called constructor which is called when a class is initialized via new.
Super
The parent class can be referenced using super().
Getters and setters
A getter for a property can be declared as
class Person {
  get fullName() {
    return `${this.firstName} ${this.lastName}`
  }
}
Setters are written in the same way:
class Person {
  set age(years) {
    this.theAge = years
  }
}
Modules
Before ES2015, there were at least 3 major competing module standards, which fragmented the community:
- AMD
- RequireJS
- CommonJS
ES2015 standardized these into a common format.
Importing modules
Importing is done via the import ... from ... construct:
import * from 'mymodule'
import React from 'react'
import { React, Component } from 'react'
import React as MyLibrary from 'react'
Exporting modules
You can write modules and export anything to other modules using the export keyword:
export var foo = 2
export function bar() { /* ... */ }
Template Literals
Template literals are a new syntax to create strings:
const aString = `A string`They provide a way to embed expressions into strings, effectively interpolating the values, by using the ${a_variable} syntax:
const var = 'test'
const string = `something ${var}` //something test
You can perform more complex expressions as well:
const string = `something ${1 + 2 + 3}`
const string2 = `something ${foo() ? 'x' : 'y' }`
and strings can span over multiple lines:
const string3 = `Hey
this
string
is awesome!`Compare how we used to do multiline strings pre-ES2015:
var str = 'One\n' +
'Two\n' +
'Three'
Default parameters
Functions now support default parameters:
const foo = function(index = 0, testing = true) { /* ... */ }
foo()
The spread operator
You can expand an array, an object or a string using the spread operator ....
Let’s start with an array example. Given the following:
const a = [1, 2, 3]You can create a new array using
const b = [...a, 4, 5, 6]You can also create a copy of an array using
const c = [...a]This works for objects as well. Clone an object with:
const newObj = { ...oldObj }Using strings, the spread operator creates an array with each char in the string:
const hey = 'hey'
const arrayized = [...hey] // ['h', 'e', 'y']
This operator has some pretty useful applications. The most important one is the ability to use an array as function argument in a very simple way:
const f = (foo, bar) => {}
const a = [1, 2]
f(...a)
In the past you could do this using f.apply(null, a) but that’s not as nice and readable.
Destructuring assignments
Given an object, you can extract just some values and put them into named variables:
const person = {
  firstName: 'Tom',
  lastName: 'Cruise',
  actor: true,
  age: 54, //made up
}
const {firstName: name, age} = personname and age contain the desired values.
The syntax also works on arrays:
const a = [1,2,3,4,5]
[first, second, , , fifth] = a
Enhanced Object Literals
In ES2015 Object Literals gained superpowers.
Simpler syntax to include variables
Instead of doing
const something = 'y'
const x = {
  something: something
}
you can do
const something = 'y'
const x = {
  something
}
Prototype
A prototype can be specified with
const anObject = { y: 'y' }
const x = {
  __proto__: anObject
}
super()
const anObject = { y: 'y', test: () => 'zoo' }
const x = {
  __proto__: anObject,
  test() {
    return super.test() + 'x'
  }
}
x.test() //zoox
Dynamic properties
const x = {
  ['a' + '_' + 'b']: 'z'
}
x.a_b //z
For-of loop
ES5 back in 2009 introduced forEach() loops. While nice, they offered no way to break, like for loops always did.
ES2015 introduced the for-of loop, which combines the conciseness of forEach with the ability to break:
//iterate over the value
for (const v of ['a', 'b', 'c']) {
  console.log(v);
}
//get the index as well, using `entries()`
for (const [i, v] of ['a', 'b', 'c'].entries()) {
console.log(i, v);
}Map and Set
Map and Set (and their respective garbage collected WeakMap and WeakSet) are the official implementations of two very popular data structures (introduced later on).
The ES2016 improvements
ES7, officially known as ECMAScript 2016, was finalized in June 2016.
Compared to ES6, ES7 is a tiny release for JavaScript, containing just two features:
- Array.prototype.includes
- Exponentiation Operator
Array.prototype.includes()
This feature introduces a more readable syntax for checking if an array contains an element.
With ES6 and lower, to check if an array contained an element you had to use indexOf, which checks the index in the array, and returns -1 if the element is not there.
Since -1 is evaluated as a true value, you could not do for example
if (![1,2].indexOf(3)) {
  console.log('Not found')
}
With this feature introduced in ES7 we can do
if (![1,2].includes(3)) {
  console.log('Not found')
}
Exponentiation Operator
The exponentiation operator ** is the equivalent of Math.pow(), but brought into the language instead of being a library function.
Math.pow(4, 2) == 4 ** 2This feature is a nice addition for Math intensive JavaScript applications.
The ** operator is standardized across many languages including Python, Ruby, MATLAB, Lua, Perl and many others.
The ES2017 improvements
ECMAScript 2017, edition 8 of the ECMA-262 Standard (also commonly called ES2017 or ES8), was finalized in June 2017.
Compared to ES6, ES8 is a tiny release for JavaScript, but still it introduces very useful features:
- String padding
- Object.values
- Object.entries
- Object.getOwnPropertyDescriptors()
- Trailing commas in function parameter lists and calls
- Async functions
- Shared memory and atomics
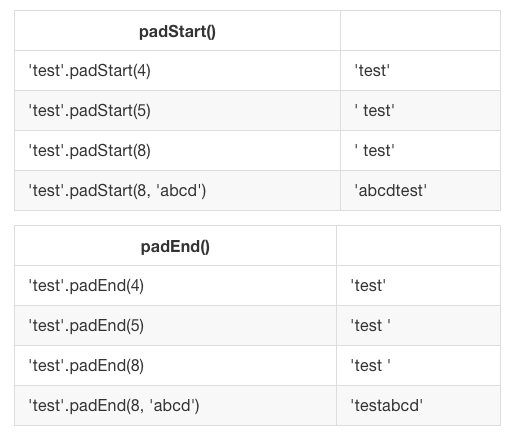
String padding
The purpose of string padding is to add characters to a string, so it reaches a specific length.
ES2017 introduces two String methods: padStart() and padEnd().
padStart(targetLength [, padString])
padEnd(targetLength [, padString])
Sample usage:
Object.values()
This method returns an array containing all the object own property values.
Usage:
const person = { name: 'Fred', age: 87 }
Object.values(person) // ['Fred', 87]
Object.values() also works with arrays:
const people = ['Fred', 'Tony']
Object.values(people) // ['Fred', 'Tony']
Object.entries()
This method returns an array containing all the object own properties, as an array of [key, value] pairs.
Usage:
const person = { name: 'Fred', age: 87 }
Object.entries(person) // [['name', 'Fred'], ['age', 87]]
Object.entries() also works with arrays:
const people = ['Fred', 'Tony']
Object.entries(people) // [['0', 'Fred'], ['1', 'Tony']]
getOwnPropertyDescriptors()
This method returns all own (non-inherited) property descriptors of an object.
Any object in JavaScript has a set of properties, and each of these properties has a descriptor.
A descriptor is a set of attributes of a property, and it’s composed by a subset of the following:
- value: the value of the property
- writable: true the property can be changed
- get: a getter function for the property, called when the property is read
- set: a setter function for the property, called when the property is set to a value
- configurable: if false, the property cannot be removed nor any attribute can be changed, except its value
- enumerable: true if the property is enumerable
Object.getOwnPropertyDescriptors(obj) accepts an object, and returns an object with the set of descriptors.
In what way is this useful?
ES2015 gave us Object.assign(), which copies all enumerable own properties from one or more objects, and returns a new object.
However there is a problem with that, because it does not correctly copy properties with non-default attributes.
If an object for example just has a setter, it’s not correctly copied to a new object using Object.assign().
For example, with
const person1 = {
    set name(newName) {
        console.log(newName)
    }
}
This won’t work:
const person2 = {}
Object.assign(person2, person1)
But this will work:
const person3 = {}
Object.defineProperties(person3,
  Object.getOwnPropertyDescriptors(person1))
As you can see with a simple console test:
person1.name = 'x'
"x"
person2.name = 'x'person3.name = 'x'
"x"person2 misses the setter, as it was not copied over.
The same limitation goes for shallow cloning objects with Object.create().
Trailing commas
This feature allows to have trailing commas in function declarations, and in functions calls:
const doSomething = (var1, var2,) => {
  //...
}
doSomething('test2', 'test2',)This change will encourage developers to stop the ugly “comma at the start of the line” habit.
Async functions
ES2017 introduced the concept of async functions, and it’s the most important change introduced in this ECMAScript edition.
Async functions are a combination of promises and generators to reduce the boilerplate around promises, and the “don’t break the chain” limitation of chaining promises.
Why they are useful
It’s a higher level abstraction over promises.
When Promises were introduced in ES2015, they were meant to solve a problem with asynchronous code, and they did. But over the 2 years that separated ES2015 and ES2017, it was clear that promises could not be the final solution.
Promises were introduced to solve the famous callback hell problem, but they introduced complexity of their own, and syntax complexity. They were good primitives around which a better syntax could be exposed to the developers: enter async functions.
A quick example
Code making use of asynchronous functions can be written as
function doSomethingAsync() {
    return new Promise((resolve) => {
        setTimeout(() => resolve('I did something'), 3000)
    })
}
async function doSomething() {
console.log(await doSomethingAsync())
}console.log('Before')
doSomething()
console.log('After')The above code will print the following to the browser console:
Before
After
I did something //after 3s
Multiple async functions in series
Async functions can be chained very easily, and the syntax is much more readable than with plain promises:
function promiseToDoSomething() {
    return new Promise((resolve)=>{
        setTimeout(() => resolve('I did something'), 10000)
    })
}
async function watchOverSomeoneDoingSomething() {
const something = await promiseToDoSomething()
return something + ' and I watched'
}async function watchOverSomeoneWatchingSomeoneDoingSomething() {
const something = await watchOverSomeoneDoingSomething()
return something + ' and I watched as well'
}watchOverSomeoneWatchingSomeoneDoingSomething().then((res) => {
console.log(res)
})Shared Memory and Atomics
WebWorkers are used to create multithreaded programs in the browser.
They offer a messaging protocol via events. Since ES2017, you can create a shared memory array between web workers and their creator, using a SharedArrayBuffer.
Since we don’t know how much time writing to a shared memory portion takes to propagate, Atomics are a way to enforce that when reading a value and any kind of writing operation is completed.
More detail on this can be found in the spec proposal, which has since been implemented.
The ES2018 improvements
ES2018 is the latest version of the ECMAScript standard.
What are the new things introduced in it?
Rest/Spread Properties
ES6 introduced the concept of a rest element when working with array destructuring:
const numbers = [1, 2, 3, 4, 5]
[first, second, ...others] = numbers
and spread elements:
const numbers = [1, 2, 3, 4, 5]
const sum = (a, b, c, d, e) => a + b + c + d + e
const sum = sum(...numbers)
ES2018 introduces the same but for objects.
Rest properties:
const { first, second, ...others } = { first: 1, second: 2, third: 3, fourth: 4, fifth: 5 }first // 1
second // 2
others // { third: 3, fourth: 4, fifth: 5 }Spread properties allow to create a new object by combining the properties of the object passed after the spread operator:
const items = { first, second, ...others }
items //{ first: 1, second: 2, third: 3, fourth: 4, fifth: 5 }
Asynchronous iteration
The new construct for-await-of allows you to use an async iterable object as the loop iteration:
for await (const line of readLines(filePath)) {
  console.log(line)
}
Since this uses await, you can use it only inside async functions, like a normal await (see async/await)
Promise.prototype.finally()
When a promise is fulfilled, successfully it calls the then()methods, one after another.
If something fails during this, the then() methods are jumped and the catch() method is executed.
finally() allow you to run some code regardless of the successful or unsuccessful execution of the promise:
fetch('file.json')
  .then(data => data.json())
  .catch(error => console.error(error))
  .finally(() => console.log('finished'))
Regular Expression improvements
RegExp lookbehind assertions: match a string depending on what precedes it.
This is a lookahead: you use ?= to match a string that’s followed by a specific substring:
/Roger(?=Waters)//Roger(?= Waters)/.test('Roger is my dog') //false
/Roger(?= Waters)/.test('Roger is my dog and Roger Waters is a famous musician') //true?! performs the inverse operation, matching if a string is not followed by a specific substring:
/Roger(?!Waters)//Roger(?! Waters)/.test('Roger is my dog') //true
/Roger(?! Waters)/.test('Roger Waters is a famous musician') //falseLookaheads use the ?= symbol. They were already available.
Lookbehinds, a new feature, use ?<=.
/(?<=Roger) Waters//(?<=Roger) Waters/.test('Pink Waters is my dog') //false
/(?<=Roger) Waters/.test('Roger is my dog and Roger Waters is a famous musician') //trueA lookbehind is negated using ?<!:
/(?<!Roger) Waters//(?<!Roger) Waters/.test('Pink Waters is my dog') //true
/(?<!Roger) Waters/.test('Roger is my dog and Roger Waters is a famous musician') //falseUnicode property escapes \p{…} and \P{…}
In a regular expression pattern you can use \d to match any digit, \s to match any character that’s not a white space, \w to match any alphanumeric character, and so on.
This new feature extends this concept to all Unicode characters introducing \p{} and is negation \P{}.
Any unicode character has a set of properties. For example, Scriptdetermines the language family, ASCII is a boolean that’s true for ASCII characters, and so on. You can put this property in the graph parentheses, and the regex will check for that to be true:
/^\p{ASCII}+$/u.test('abc')   //✅
/^\p{ASCII}+$/u.test('ABC@')  //✅
/^\p{ASCII}+$/u.test('ABC?') //❌
ASCII_Hex_Digit is another boolean property, that checks if the string only contains valid hexadecimal digits:
/^\p{ASCII_Hex_Digit}+$/u.test('0123456789ABCDEF') //✅
/^\p{ASCII_Hex_Digit}+$/u.test('h')                //❌
There are many other boolean properties, which you just check by adding their name in the graph parentheses, including Uppercase, Lowercase, White_Space, Alphabetic, Emoji and more:
/^\p{Lowercase}$/u.test('h') //✅
/^\p{Uppercase}$/u.test('H') //✅
/^\p{Emoji}+$/u.test('H') //❌
/^\p{Emoji}+$/u.test('??') //✅In addition to those binary properties, you can check any of the unicode character properties to match a specific value. In this example, I check if the string is written in the Greek or Latin alphabet:
/^\p{Script=Greek}+$/u.test('ελληνικά') //✅
/^\p{Script=Latin}+$/u.test('hey') //✅
Read more about all the properties you can use directly on the proposal.
Named capturing groups
In ES2018 a capturing group can be assigned to a name, rather than just being assigned a slot in the resulting array:
const re = /(?<year>\d{4})-(?<month>\d{2})-(?<day>\d{2})/
const result = re.exec('2015-01-02')
// result.groups.year === '2015';
// result.groups.month === '01';
// result.groups.day === '02';The 's’ flag for regular expressions
The s flag, short for single line, causes the . to match new line characters as well. Without it, the dot matches regular characters but not the new line:
/hi.welcome/.test('hi\nwelcome') // false
/hi.welcome/s.test('hi\nwelcome') // true
Coding Style
JavaScript Coding Style is the set of conventions used when using JavaScript.
Coding style is an agreement with yourself and your team, to keep consistency on a project.
An if you don’t have a team, it’s an agreement with yourself, to always keep your code up to your standards.
Having fixed rules on your code writing format helps a lot in order to have more readable and manageable code.
Popular Style Guides
There are a quite a few of them around, here are the 2 most common ones in the JavaScript world:
It’s up to you to follow one of those, or create your own style guide.
Be consistent with the project you work on
Even if you prefer a set of styles, when working on a project you should use that project’s style.
An Open Source project on GitHub might follow a set of rules, another project you work on with a team might follow an entirely different one.
Prettier is an awesome tool that enforces code formatting, so you should use it.
The preferences used in this handbook
We always use the latest ES version. Use Babel if old browser support is necessary.
- Indentation: use spaces instead of tabs, indent using 2 spaces.
- Semicolons: don’t use semicolons.
- Line length: try to cut lines at 80 chars, if possible.
- Inline Comments: use inline comments in your code. Use block comments only to document.
- No dead code: Don’t leave old code commented, “just in case” it will be useful later. Keep only the code you need now, version control/your notes app is meant for this.
- Only comment when useful: Don’t add comments that don’t help understand what the code is doing. If the code is self-explanatory through the use of good variable and function naming, and JSDoc function comments, don’t add a comment.
- Variable declarations: always declare variables to avoid polluting the global object. Never use
var. Default toconst, and only useletif you reassign the variable. - Constants: declare all constants in CAPS. Use
_to separate words in aVARIABLE_NAME. - Functions: use arrow functions unless you have a specific reason to use regular functions, like in object methods or constructors, due to how
thisworks. Declare them as const, and use implicit returns if possible. Feel free to use nested functions to hide helper functions to the rest of the code.
const test = (a, b) => a + bconst another = a => a + 2- Names: function names, variable names and method names always start with a lowercase letter (unless you identify them as private, read below), and are camelCased. Only constructor functions and class names should start capitalized. If you use a framework that requires specific conventions, change your habits accordingly. File names should all be lowercase, with words separated by
-. - Statement-specific formats and rules:
if
if (condition) {
  statements
}
if (condition) {
statements
} else {
statements
}if (condition) {
statements
} else if (condition) {
statements
} else {
statements
}for: Always initialize the length in the initialization to cache it, don’t insert it in the condition. Avoid using for in except with used in conjunction with .hasOwnProperty(). Prefer for of:
for (initialization; condition; update) {
  statements
}
while
while (condition) {
  statements
}
do
do {
  statements
} while (condition);
switch
switch (expression) {
  case expression:
    statements
  default:
    statements
}
try
try {
  statements
} catch (variable) {
  statements
}
try {
statements
} catch (variable) {
statements
} finally {
statements
}- Whitespace: use whitespace wisely to improve readability: put a whitespace after a keyword followed by a
(; before & after a binary operation (+,-,/,*,&&..); inside the for statement, after each;to separate each part of the statement; after each,. - New lines: use new lines to separate blocks of code that perform logically related operations.
- Quotes favor single quotes
'instead of double quotes". Double quotes are a standard in HTML attributes, so using single quotes helps remove problems when dealing with HTML strings. Use template literals when appropriate instead of variable interpolation.
Lexical Struture
Now we’ll take a deep dive into the building blocks of JavaScript: unicode, semicolons, white space, case sensitivity, comments, literals, identifiers and reserved words
Unicode
JavaScript is written in Unicode. This means you can use Emojis as variable names. ? ? ? But more importantly, you can write identifiers in any language, for example Japanese or Chinese, with some rules.
Semicolons
JavaScript has a very C-like syntax, and you might see lots of code samples that feature semicolons at the end of each line.
Semicolons aren’t mandatory, and JavaScript does not have any problems with code that does not use them. Lately many developers, especially those coming from languages that do not have semicolons, started avoiding using them.
You just need to avoid doing strange things like typing statements on multiple lines
return
variable
Or starting a line with parentheses ([ or () and you’ll be safe 99.9% of the times (and your linter will warn you).
It’s up to personal preference, and lately I have decided to never add useless semicolons, so within this article you’ll never see them.
White space
JavaScript does not consider white space meaningful. Spaces and line breaks can be added in any fashion you might like, even though this is in theory.
In practice, you will most likely keep a well defined style and adhere to what people commonly use, and enforce this using a linter or a style tool such as Prettier.
For example, I like to always indent with 2 characters.
Case sensitive
JavaScript is case sensitive. A variable named something is different from Something.
The same goes for any identifier.
Comments
You can use two kind of comments in JavaScript:
/* *///The first can span over multiple lines and needs to be closed.
The second comments everything that’s on its right, on the current line.
Literals and Identifiers
We define as literal a value that is written in the source code, for example a number, a string, a boolean or also more advanced constructs, like Object Literals or Array Literals:
5
'Test'
true
['a', 'b']
{color: 'red', shape: 'Rectangle'}
An identifier is a sequence of characters that can be used to identify a variable, a function, an object. It can start with a letter, the dollar sign $ or an underscore _, and it can contain digits. Using Unicode, a letter can be any allowed char, for example an emoji ?.
Test
test
TEST
_test
Test1
$test
The dollar sign is commonly used to reference DOM elements.
Reserved words
You can’t use as identifiers any of the following words because they are reserved by the language.
break
do
instanceof
typeof
case
else
new
var
catch
finally
return
void
continue
for
switch
while
debugger
function
this
with
default
if
throw
delete
in
try
class
enum
extends
super
const
export
import
implements
let
private
public
interface
package
protected
static
yield
Variables
A variable is a literal assigned to an identifier, so you can reference and use it later in the program. We’ll learn how to declare one with JavaScript.
Introduction to JavaScript Variables
A variable is a literal assigned to an identifier, so you can reference and use it later in the program.
Variables in JavaScript do not have any type attached. Once you assign a specific literal type to a variable, you can later reassign the variable to host any other type, without type errors or any issue.
This is why JavaScript is sometimes referenced as “untyped”.
A variable must be declared before you can use it. There are 3 ways to do it: using var, let or const. Those 3 ways differ in how you can interact with the variable later on.
Using var
Until ES2015, var was the only construct available for defining variables.
var a = 0If you forget to add var you will be assigning a value to an undeclared variable, and the results could vary.
In modern environments, with strict mode enabled, you will get an error. In older environments (or with strict mode disabled) this will simply initialize the variable and assign it to the global object.
If you don’t initialize the variable when you declare it, it will have the undefined value until you assign a value to it.
var a //typeof a === 'undefined'You can redeclare the variable many times, overriding it:
var a = 1
var a = 2
You can also declare multiple variables at once in the same statement:
var a = 1, b = 2The scope is the portion of code where the variable is visible.
A variable initialized with var outside of any function is assigned to the global object, has a global scope and is visible everywhere. A variable initialized with var inside a function is assigned to that function, it’s local and is visible only inside it, just like a function parameter.
Any variable defined into a function with the same name of a global variable takes precedence over the global variable, shadowing it.
It’s important to understand that a block (identified by a pair of curly braces) does not define a new scope. A new scope is only created when a function is created, because var does not have block scope, but function scope.
Inside a function, any variable defined in it is visible throughout all the function code, even if the variable is declared at the end of the function it can still be referenced in the beginning, because JavaScript before executing the code actually moves all variables on top (something that is called hoisting). To avoid confusion, always declare variables at the beginning of a function.
Using let
let is a new feature introduced in ES2015 and it’s essentially a block scoped version of var. Its scope is limited to the block, statement or expression where it’s defined, and all the contained inner blocks.
Modern JavaScript developers might choose to only use let and completely discard the use of var.
If
letseems an obscure term, just readlet color = 'red'as let the color be red and all has much more sense.
Defining let outside of any function – contrary to var – does not create a global variable.
Using const
Variables declared with var or let can be changed later on in the program, and reassigned. A once a const is initialized, its value can never be changed again, and it can’t be reassigned to a different value.
const a = 'test'We can’t assign a different literal to the a const. We can however mutate a if it’s an object that provides methods that mutate its contents.
const does not provide immutability, just makes sure that the reference can’t be changed.
const has block scope, same as let.
Modern JavaScript developers might choose to always use const for variables that don’t need to be reassigned later in the program.
Why? Because we should always use the simplest construct available to avoid making errors down the road.
Types
You might sometimes read that JS is untyped, but that’s incorrect. It’s true that you can assign all sorts of different types to a variable, but JavaScript has types. In particular, it provides primitive types, and object types.
Primitive types
Primitive types are
- Numbers
- Strings
- Booleans
And two special types:
- null
- undefined
Let’s see them in detail in the next sections.
Numbers
Internally, JavaScript has just one type for numbers: every number is a float.
A numeric literal is a number represented in the source code, amd depending on how it’s written, it can be an integer literal or a floating point literal.
Integers:
10
5354576767321
0xCC //hex
Floats:
3.14
.1234
5.2e4 //5.2 * 10^4
Strings
A string type is a sequence of characters. It’s defined in the source code as a string literal, which is enclosed in quotes or double quotes
'A string'
"Another string"
Strings can span across multiple lines by using the backslash
"A \
string"
A string can contain escape sequences that can be interpreted when the string is printed, like \n to create a new line. The backslash is also useful when you need to enter for example a quote in a string enclosed in quotes, to prevent the char to be interpreted as a closing quote:
'I\'m a developer'Strings can be joined using the + operator:
"A " + "string"Template strings
Introduced in ES2015, template strings are string literals that allow a more powerful way to define strings.
`a string`You can perform string substitution, embedding the result of any JavaScript expression:
`a string with ${something}`
`a string with ${something+somethingElse}`
`a string with ${obj.something()}`
You can have multiline strings easily:
`a string
with
${something}`
Booleans
JavaScript defines two reserved words for booleans: true and false. Many comparision operations == === < > (and so on) return either one or the other.
if, while statements and other control structures use booleans to determine the flow of the program.
They don’t just accept true or false, but also accept truthy and falsy values.
Falsy values, values interpreted as false, are
0
-0
NaN
undefined
null
'' //empty string
All the rest is considered a truthy value.
null
null is a special value that indicates the absence of a value.
It’s a common concept in other languages as well, can be known as nil or None in Python for example.
undefined
undefined indicates that a variable has not been initialized and the value is absent.
It’s commonly returned by functions with no return value. When a function accepts a parameter but that’s not set by the caller, it’s undefined.
To detect if a value is undefined, you use the construct:
typeof variable === 'undefined'Object types
Anything that’s not a primitive type is an object type.
Functions, arrays and what we call objects are object types. They are special on their own, but they inherit many properties of objects, like having properties and also having methods that can act on those properties.
Expressions
Expressions are units of code that can be evaluated and resolve to a value. Expressions in JS can be divided in categories.
Arithmetic expressions
Under this category go all expressions that evaluate to a number:
1 / 2
i++
i -= 2
i * 2
String expressions
Expressions that evaluate to a string:
'A ' + 'string'
'A ' += 'string'
Primary expressions
Under this category go variable references, literals and constants:
2
0.02
'something'
true
false
this //the current object
undefined
i //where i is a variable or a constant
but also some language keywords:
function
class
function* //the generator function
yield //the generator pauser/resumer
yield* //delegate to another generator or iterator
async function* //async function expression
await //async function pause/resume/wait for completion
/pattern/i //regex
() // grouping
Array and object initializers expressions
[] //array literal
{} //object literal
[1,2,3]
{a: 1, b: 2}
{a: {b: 1}}
Logical expressions
Logical expressions make use of logical operators and resolve to a boolean value:
a && b
a || b
!a
Left-hand-side expressions
new //create an instance of a constructor
super //calls the parent constructor
...obj //expression using the spread operator
Property access expressions
object.property //reference a property (or method) of an object
object[property]
object['property']
Object creation expressions
new object()
new a(1)
new MyRectangle('name', 2, {a: 4})
Function definition expressions
function() {}
function(a, b) { return a * b }
(a, b) => a * b
a => a * 2
() => { return 2 }
Invocation expressions
The syntax for calling a function or method
a.x(2)
window.resize()
Prototypal Inheritance
JavaScript is quite unique in the popular programming languages landscape because of its use of prototypal inheritance. Let’s find out what that means.
While most object-oriented languages use a class-based inheritance model, JavaScript is based on the prototype inheritance model.
What does this mean?
Every single JavaScript object has a property, called prototype, which points to a different object.
This different object is the object prototype.
Our object uses that object prototype to inherit properties and methods.
Say you have an object created using the object literal syntax:
const car = {}Or one created with the new Object syntax:
const car = new Object()In any case, the prototype of car is Object:
If you initialize an array, which is an object:
const list = []
//or
const list = new Array()
The prototype is Array.
You can verify this by checking the __proto__ getter:
car.__proto__ == Object.prototype //true
car.__proto__ == new Object().__proto__ //true
list.__proto__ == Object.prototype //false
list.__proto__ == Array.prototype //true
list.__proto__ == new Array().__proto__ //true
I use the
__proto__property here, which is non-standard but widely implemented in browsers. A more reliable way to get a prototype is to useObject.getPrototypeOf(new Object())
All the properties and methods of the prototype are available to the object that has that prototype:
Object.prototype is the base prototype of all the objects:
Array.prototype.__proto__ == Object.prototypeIf you wonder what’s the prototype of the Object.prototype, there is no prototype. It’s a special snowflake. ❄️
The above example you saw is an example of the prototype chain at work.
I can make an object that extends Array and any object I instantiate using it, will have Array and Object in its prototype chain and inherit properties and methods from all the ancestors.
In addition to using the new operator to create an object, or using the literals syntax for objects and arrays, you can instantiate an object using Object.create().
The first argument passed is the object used as prototype:
const car = Object.create({})
const list = Object.create(Array)
You can check the prototype of an object using the isPrototypeOf() method:
Array.isPrototypeOf(list) //truePay attention because you can instantiate an array using
const list = Object.create(Array.prototype)and in this case Array.isPrototypeOf(list) is false, while Array.prototype.isPrototypeOf(list) is true.
Classes
In 2015 the ECMAScript 6 (ES6) standard introduced classes.
Before that, JavaScript only had a quite unique way to implement inheritance. Its prototypal inheritance, while in my opinion great, was different from any other popular programming language.
People coming from Java or Python or other languages had a hard time understanding the intricacies of prototypal inheritance, so the ECMAScript committee decided to introduce a syntactic sugar on top of them, and resemble how classes-based inheritance works in other popular implementations.
This is important: JavaScript under the hoods is still the same, and you can access an object prototype in the usual way.
A class definition
This is how a class looks.
class Person {
  constructor(name) {
    this.name = name
  }
hello() {
return 'Hello, I am ' + this.name + '.'
}
}A class has an identifier, which we can use to create new objects using new ClassIdentifier().
When the object is initialized, the constructor method is called, with any parameters passed.
A class also has as many methods as it needs. In this case hello is a method and can be called on all objects derived from this class:
const flavio = new Person('Flavio')
flavio.hello()
Classes Inheritance
A class can extend another class, and objects initialized using that class inherit all the methods of both classes.
If the inherited class has a method with the same name as one of the classes higher in the hierarchy, the closest method takes precedence:
class Programmer extends Person {
  hello() {
    return super.hello() + ' I am a programmer.'
  }
}
const flavio = new Programmer('Flavio')
flavio.hello()The above program prints “Hello, I am Flavio. I am a programmer.”
Classes do not have explicit class variable declarations, but you must initialize any variable in the constructor.
Inside a class, you can reference the parent class calling super().
Static methods
Normally methods are defined on the instance, not on the class.
Static methods are executed on the class instead:
class Person {
  static genericHello() {
    return 'Hello'
  }
}
Person.genericHello() //HelloPrivate methods
JavaScript does not have a built-in way to define private or protected methods.
There are workarounds, but I won’t describe them here.
Getters and setters
You can add methods prefixed with get or set to create a getter and setter, which are two different pieces of code that are execute based on what you are doing: accessing the variable, or modifying its value.
class Person {
  constructor(name) {
    this.name = name
  }
set name(value) {
this.name = value
} get name() {
return this.name
}
}If you only have a getter, the property cannot be set, and any attempt at doing so will be ignored:
class Person {
  constructor(name) {
    this.name = name
  }
get name() {
return this.name
}
}If you only have a setter, you can change the value but not access it from the outside:
class Person {
  constructor(name) {
    this.name = name
  }
set name(value) {
this.name = value
}
}Exceptions
When the code runs into an unexpected problem, the idiomatic JavaScript way to handle this situation is through exceptions.
Creating exceptions
An exception is created using the throw keyword:
throw valueWhere value can be any JavaScript value including a string, a number or an object.
As soon as JavaScript executes this line, the normal program flow is halted and the control is held back to the nearest exception handler.
Handling exceptions
An exception handler is a try/catch statement.
Any exception raised in the lines of code included in the tryblock is handled in the corresponding catch block:
try {
  //lines of code
} catch (e) {}e in this example is the exception value.
You can add multiple handlers, that can catch different kinds of errors.
finally
To complete this statement JavaScript has another statement called finally, which contains code that is executed regardless of the program flow, if the exception was handled or not, if there was an exception or if there wasn’t:
try {
  //lines of code
} catch (e) {
} finally {}You can use finally without a catch block, to serve as a way to clean up any resource you might have opened in the tryblock, like files or network requests:
try {
  //lines of code
} finally {}Nested try blocks
try blocks can be nested, and an exception is always handled in the nearest catch block:
try {
  //lines of code
try {
//other lines of code
} finally {
//other lines of code
}} catch (e) {}If an exception is raised in the inner try, it’s handled in the outer catchblock.
Semicolons
JavaScript semicolons are optional. I personally like to avoid using semicolons in my code, but many people prefer them.
Semicolons in JavaScript divide the community. Some prefer to use them always, no matter what. Others like to avoid them.
After using semicolons for years, in the fall of 2017 I decided to try avoiding them as needed, and I did set up Prettier to automatically remove semicolons from my code, unless there is a particular code construct that requires them.
Now I find it natural to avoid semicolons, I think the code looks better and it’s cleaner to read.
This is all possible because JavaScript does not strictly require semicolons. When there is a place where a semicolon was needed, it adds it behind the scenes.
The process that does this is called Automatic Semicolon Insertion.
It’s important to know the rules that power semicolons, to avoid writing code that will generate bugs because does not behave like you expect.
The rules of JavaScript Automatic Semicolon Insertion
The JavaScript parser will automatically add a semicolon when, during the parsing of the source code, it finds these particular situations:
- when the next line starts with code that breaks the current one (code can spawn on multiple lines)
- when the next line starts with a
}, closing the current block - when the end of the source code file is reached
- when there is a
returnstatement on its own line - when there is a
breakstatement on its own line - when there is a
throwstatement on its own line - when there is a
continuestatement on its own line
Examples of code that does not do what you think
Based on those rules, here are some examples.
Take this:
const hey = 'hey'
const you = 'hey'
const heyYou = hey + ' ' + you
['h', 'e', 'y'].forEach((letter) => console.log(letter))You’ll get the error Uncaught TypeError: Cannot read property 'forEach' of undefined because based on rule 1 JavaScript tries to interpret the code as
const hey = 'hey';
const you = 'hey';
const heyYou = hey + ' ' + you['h', 'e', 'y'].forEach((letter) => console.log(letter))
Such a piece of code:
(1 + 2).toString()prints "3".
const a = 1
const b = 2
const c = a + b
(a + b).toString()
Instead, the above code raises a TypeError: b is not a function exception, because JavaScript tries to interpret it as
const a = 1
const b = 2
const c = a + b(a + b).toString()
Another example based on rule 4:
(() => {
  return
  {
    color: 'white'
  }
})()
You’d expect the return value of this immediately-invoked function to be an object that contains the color property, but it’s not. Instead, it’s undefined, because JavaScript inserts a semicolon after return.
Instead you should put the opening bracket right after return:
(() => {
  return {
    color: 'white'
  }
})()
You’d think this code shows ‘0’ in an alert:
1 + 1
-1 + 1 === 0 ? alert(0) : alert(2)
but it shows 2 instead, because JavaScript per rule 1 interprets it as:
1 + 1 -1 + 1 === 0 ? alert(0) : alert(2)Be careful. Some people are very opinionated on semicolons. I don’t care honestly, the tool gives us the option not to use it, so we can avoid semicolons.
I’m not suggesting anything, other than making your own decision.
We just need to pay a bit of attention, even if most of the times those basic scenarios never show up in your code.
Pick some rules:
- be careful with
returnstatements. If you return something, add it on the same line as the return (same forbreak,throw,continue) - never start a line with parentheses, those might be concatenated with the previous line to form a function call, or array element reference
And ultimately, always test your code to make sure it does what you want.
Quotes
Now we’ll go over the quotes allowed in JavaScript and their unique features.
JavaScript allows you to use 3 types of quotes:
- single quotes
- double quotes
- backticks
The first 2 are essentially the same:
const test = 'test'
const bike = "bike"
There’s little to no difference in using one or the other. The only difference lies in having to escape the quote character you use to delimit the string:
const test = 'test'
const test = 'te\'st'
const test = 'te"st'
const test = "te\"st"
const test = "te'st"
There are various style guides that recommend always using one style vs the other.
I personally prefer single quotes all the time, and use double quotes only in HTML.
Backticks are a recent addition to JavaScript, since they were introduced with ES6 in 2015.
They have a unique feature – they allow multiline strings.
Multiline strings are also possible using regular strings, using escape characters:
const multilineString = 'A string\non multiple lines'Using backticks (the key at the left of the number 1 on the keyboard), you can avoid using an escape character:
const multilineString = `A string
on multiple lines`
Not just that. You can interpolate variables using the ${} syntax:
const multilineString = `A string
on ${1+1} lines`
Those are called Template Literals.
Template Literals
Introduced in ES2015, aka ES6, Template Literals offer a new way to declare strings, but also some new interesting constructs which are already widely popular.
Template Literals are a new ES2015 / ES6 feature that allow you to work with strings in a novel way compared to ES5 and below.
The syntax at a first glance is very simple, just use backticks instead of single or double quotes:
const a_string = `something`They are unique because they provide a lot of features that normal strings built with quotes, in particular:
- they offer a great syntax to define multiline strings
- they provide an easy way to interpolate variables and expressions in strings
- they allow to create DSLs with template tags
Let’s dive into each of these in detail.
Multiline strings
Pre-ES6, to create a string spanned over two lines you had to use the \character at the end of a line:
const string = 'first part \
second part'
This allows to create a string on 2 lines, but it’s rendered on just one line:
first part second part
To render the string on multiple lines as well, you explicitly need to add \n at the end of each line, like this:
const string = 'first line\n \
second line'
or
const string = 'first line\n' +
               'second line'
Template literals make multiline strings much simpler.
Once a template literal is opened with the backtick, you just press enter to create a new line, with no special characters, and it’s rendered as-is:
const string = `Hey
this
string
is awesome!`Keep in mind that space is meaningful, so doing this:
const string = `First
                Second`
Is going to create a string like this:
First
                Second
An easy way to fix this problem is by having an empty first line, and appending the trim() method right after the closing backtick, which will eliminate any space before the first character:
const string = `
First
Second`.trim()
Interpolation
Template literals provide an easy way to interpolate variables and expressions into strings.
You do so by using the ${...} syntax:
const var = 'test'
const string = `something ${var}` //something test
Inside the ${} you can add anything, even expressions:
const string = `something ${1 + 2 + 3}`
const string2 = `something ${foo() ? 'x' : 'y' }`
Template tags
Tagged templates is one feature that might sound less useful at first for you, but it’s actually used by lots of popular libraries around, like Styled Components or Apollo, the GraphQL client/server library, so it’s essential to understand how it works.
In Styled Components template tags are used to define CSS strings:
const Button = styled.button`
  font-size: 1.5em;
  background-color: black;
  color: white;
`;
In Apollo template tags are used to define a GraphQL query schema:
const query = gql`
  query {
    ...
  }
`
The styled.button and gql template tags highlighted in those examples are just functions:
function gql(literals, ...expressions) {}This function returns a string, which can be the result of any kind of computation.
literals is an array containing the template literal content tokenized by the expressions interpolations.
expressions contains all the interpolations.
If we take the example above:
const string = `something ${1 + 2 + 3}`literals is an array with two items. The first is something, the string until the first interpolation, and the second is an empty string, the space between the end of the first interpolation (we only have one) and the end of the string.
expressions in this case is an array with a single item, 6.
A more complex example is:
const string = `something
another ${'x'}
new line ${1 + 2 + 3}
test`
In this case literals is an array where the first item is:
`something
another `
the second is:
`
new line `
and the third is:
`
test`
expressions in this case is an array with two items, x and 6.
The function that is passed those values can do anything with them, and this is the power of this kind of feature.
The most simple example is replicating what the string interpolation does, by simply joining literals and expressions:
const interpolated = interpolate`I paid ${10}€`and this is how interpolate works:
function interpolate(literals, ...expressions) {
  let string = ``
  for (const [i, val] of expressions) {
    string += literals[i] + val
  }
  string += literals[literals.length - 1]
  return string
}
JavaScript Functions
Now we’ll learn all about functions, from the general overview to the tiny details that will improve how you use them.
Everything in JavaScript happens in functions.
A function is a block of code, self contained, that can be defined once and run any number of times you want.
A function can optionally accept parameters, and returns one value.
Functions in JavaScript are objects, a special kind of object: function objects. Their superpower lies in the fact that they can be invoked.
In addition, functions are said to be first class functions because they can be assigned to a value, and they can be passed as arguments and used as a return value.
Let’s start with the “old”, pre-ES6/ES2015 syntax. Here’s a function declaration:
function dosomething(foo) {
  // do something
}
Now, in the post ES6/ES2015 world, referred to as a regular function
Functions can be assigned to variables (this is called a function expression):
const dosomething = function(foo) {
  // do something
}
Named function expressions are similar, but play nicer with the stack call trace, which is useful when an error occurs – it holds the name of the function:
const dosomething = function dosomething(foo) {
  // do something
}
ES6/ES2015 introduced arrow functions, which are especially nice to use when working with inline functions, as parameters or callbacks:
const dosomething = foo => {
  //do something
}
Arrow functions have an important difference from the other function definitions above, we’ll see which one later as it’s an advanced topic.
Parameters
A function can have one or more parameters.
const dosomething = () => {
  //do something
}
const dosomethingElse = foo => {
//do something
}const dosomethingElseAgain = (foo, bar) => {
//do something
}Starting with ES6/ES2015, functions can have default values for the parameters:
const dosomething = (foo = 1, bar = 'hey') => {
  //do something
}
This allows you to call a function without filling all the parameters:
dosomething(3)
dosomething()
ES2018 introduced trailing commas for parameters, a feature that helps reducing bugs due to missing commas when moving around parameters (e.g. moving the last in the middle):
const dosomething = (foo = 1, bar = 'hey') => {
  //do something
}
dosomething(2, 'ho!')You can wrap all your arguments in an array, and use the spread operator when calling the function:
const dosomething = (foo = 1, bar = 'hey') => {
  //do something
}
const args = [2, 'ho!']
dosomething(...args)
With many parameters, remembering the order can be difficult. Using objects, destructuring allows to keep the parameter names:
const dosomething = ({ foo = 1, bar = 'hey' }) => {
  //do something
  console.log(foo) // 2
  console.log(bar) // 'ho!'
}
const args = { foo: 2, bar: 'ho!' }
dosomething(args)
Return values
Every function returns a value, which by default is undefined.

Any function is terminated when its lines of code end, or when the execution flow finds a return keyword.
When JavaScript encounters this keyword it exits the function execution and gives control back to its caller.
If you pass a value, that value is returned as the result of the function:
const dosomething = () => {
return 'test'
}
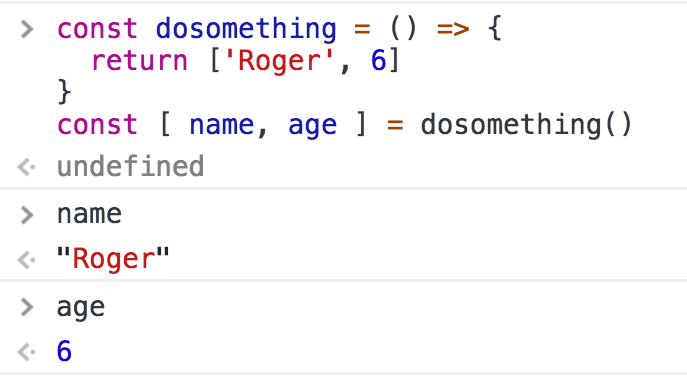
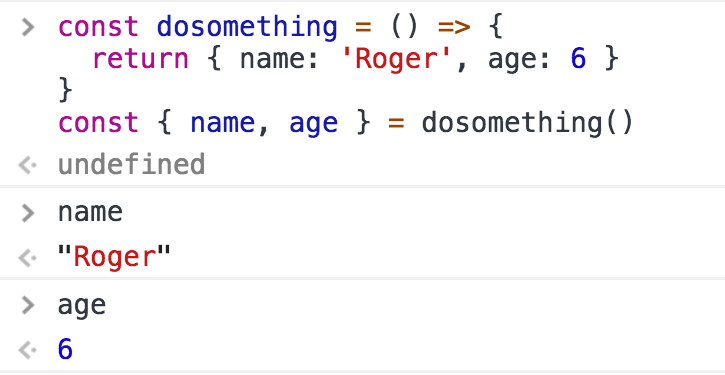
const result = dosomething() // result === 'test'You can only return one value.
To simulate returning multiple values, you can return an object literal, or an array, and use a destructuring assignment when calling the function.
Using arrays:
Using objects:
Nested functions
Functions can be defined inside other functions:
const dosomething = () => {
  const dosomethingelse = () => {}
  dosomethingelse()
  return 'test'
}
The nested function is scoped to the outside function, and cannot be called from the outside.
Object methods
When used as object properties, functions are called methods:
const car = {
  brand: 'Ford',
  model: 'Fiesta',
  start: function() {
    console.log(`Started`)
  }
}car.start()"this" in arrow functions
There’s an important behavior of Arrow Functions vs regular Functions when used as object methods. Consider this example:
const car = {
  brand: 'Ford',
  model: 'Fiesta',
  start: function() {
    console.log(`Started ${this.brand} ${this.model}`)
  },
  stop: () => {
    console.log(`Stopped ${this.brand} ${this.model}`)
  }
}
The stop() method does not work as you would expect.

This is because the handling of this is different in the two functions declarations style. this in the arrow function refers to the enclosing function context, which in this case is the window object:
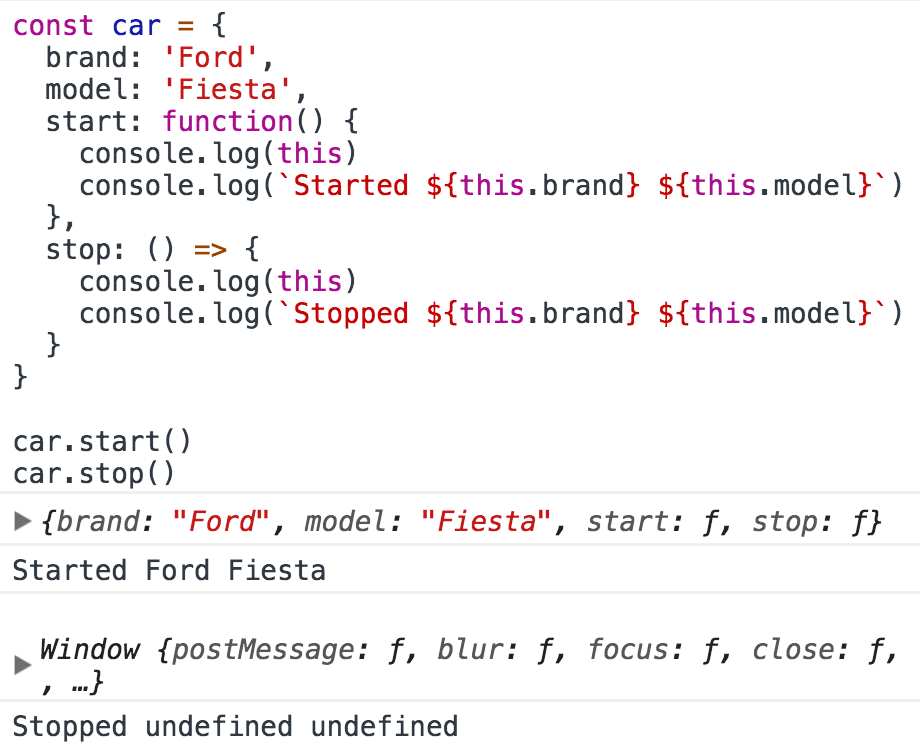
this, which refers to the host object using function()
This implies that arrow functions are not suitable to be used for object methods and constructors (arrow function constructors will actually raise a TypeError when called).
IIFE, Immediately Invoked Function Expressions
An IIFE is a function that’s immediately executed right after its declaration:
;(function dosomething() {
  console.log('executed')
})()
You can assign the result to a variable:
const something = (function dosomething() {
  return 'something'
})()
They are very handy, as you don’t need to separately call the function after its definition.
Function Hoisting
JavaScript before executing your code reorders it according to some rules.
Functions in particular are moved at the top of their scope. This is why it’s legal to write
dosomething()
function dosomething() {
  console.log('did something')
}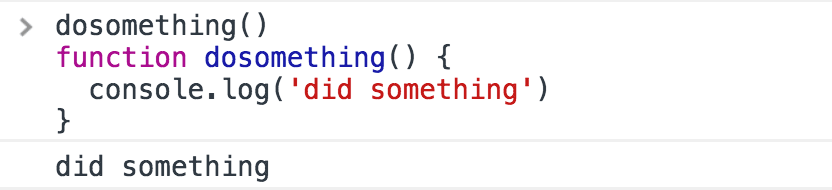
Internally, JavaScript moves the function before its call, along with all the other functions found in the same scope:
function dosomething() {
  console.log('did something')
}
dosomething()
Now, if you use named function expressions, since you’re using variablessomething different happens. The variable declaration is hoisted, but not the value, so not the function.
dosomething()
const dosomething = function dosomething() {
  console.log('did something')
}
Not going to work:
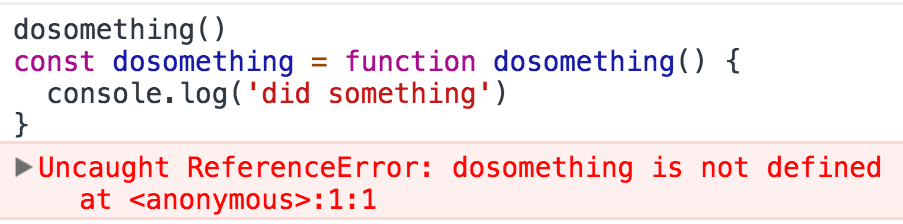
This is because what happens internally is:
const dosomething
dosomething()
dosomething = function dosomething() {
  console.log('did something')
}
The same happens for let declarations. var declarations do not work either, but with a different error:
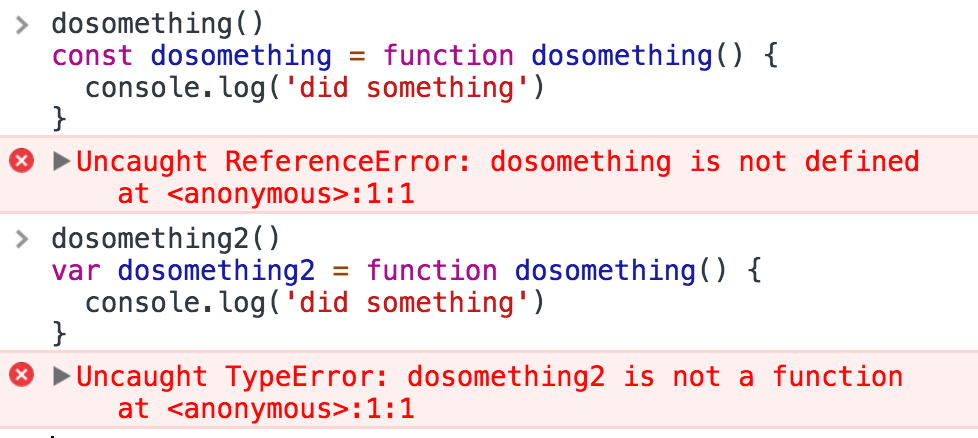
This is because var declarations are hoisted and initialized with undefinedas a value, while const and let are hoisted but not initialized.
Arrow Functions
Arrow Functions are one of the most impactful changes in ES6/ES2015, and they are widely used nowadays. They slightly differ from regular functions. Let’s see how below.
I already introduced arrow functions above, but they are so important they need their own section.
Arrow functions were introduced in ES6 / ECMAScript 2015, and since their introduction they changed forever how JavaScript code looks (and works).
In my opinion this change was so welcome that you now rarely see in modern codebases the usage of the function keyword.
Visually, it’s a simple and welcome change, which allows you to write functions with a shorter syntax, from:
const myFunction = function foo() {
  //...
}
to
const myFunction = () => {
  //...
}
If the function body contains just a single statement, you can omit the parentheses and write all on a single line:
const myFunction = () => doSomething()Parameters are passed in the parentheses:
const myFunction = (param1, param2) => doSomething(param1, param2)If you have one (and just one) parameter, you could omit the parentheses completely:
const myFunction = param => doSomething(param)Thanks to this short syntax, arrow functions encourage the use of small functions.
Implicit return
Arrow functions allow you to have an implicit return: values are returned without having to use the return keyword.
It works when there is a on-line statement in the function body:
const myFunction = () => 'test'myFunction() //'test'Another example, returning an object (remember to wrap the curly brackets in parentheses to avoid it being considered the wrapping function body brackets):
const myFunction = () => ({value: 'test'})myFunction() //{value: 'test'}How this works in arrow functions
this is a concept that can be complicated to grasp, as it varies a lot depending on the context and also varies depending on the mode of JavaScript (strict mode or not).
It’s important to clarify this concept because arrow functions behave very differently compared to regular functions.
When defined as a method of an object, in a regular function this refers to the object, so you can do:
const car = {
  model: 'Fiesta',
  manufacturer: 'Ford',
  fullName: function() {
    return `${this.manufacturer} ${this.model}`
  }
}
calling car.fullName() will return "Ford Fiesta".
The this scope with arrow functions is inherited from the execution context. An arrow function does not bind this at all, so its value will be looked up in the call stack, so in this code car.fullName() will not work, and will return the string "undefined undefined":
const car = {
  model: 'Fiesta',
  manufacturer: 'Ford',
  fullName: () => {
    return `${this.manufacturer} ${this.model}`
  }
}
Due to this, arrow functions are not suited as object methods.
Arrow functions cannot be used as constructors as well, when instantiating an object. It will raise a TypeError.
This is where regular functions should be used instead, when dynamic context is not needed.
This is also a problem when handling events. DOM Event listeners set this to be the target element, and if you rely on this in an event handler, a regular function is necessary:
const link = document.querySelector('#link')
link.addEventListener('click', () => {
  // this === window
})
const link = document.querySelector('#link')
link.addEventListener('click', function() {
// this === link
})Closures
Here’s a gentle introduction to the topic of closures, which are key to understanding how JavaScript functions work.
If you’ve ever written a function in JavaScript, you’ve already made use of closures.
It’s a key topic to understand, which has implications for the things you can do.
When a function is run, it’s executed with the scope that was in place when it was defined, and not with the state that’s in place when it is executed.
The scope basically is the set of variables which are visible.
A function remembers its Lexical Scope, and it’s able to access variables that were defined in the parent scope.
In short, a function has an entire baggage of variables it can access.
Let me immediately give an example to clarify this.
const bark = dog => {
  const say = `${dog} barked!`
  ;(() => console.log(say))()
}bark(`Roger`)This logs to the console Roger barked!, as expected.
What if you want to return the action instead:
const prepareBark = dog => {
  const say = `${dog} barked!`
  return () => console.log(say)
}
const bark = prepareBark(`Roger`)bark()This snippet also logs to the console Roger barked!.
Let’s make one last example, which reuses prepareBark for two different dogs:
const prepareBark = dog => {
  const say = `${dog} barked!`
  return () => {
    console.log(say)
  }
}
const rogerBark = prepareBark(`Roger`)
const sydBark = prepareBark(`Syd`)rogerBark()
sydBark()This prints
Roger barked!
Syd barked!
As you can see, the state of the variable say is linked to the function that’s returned from prepareBark().
Also notice that we redefine a new say variable the second time we call prepareBark(), but that does not affect the state of the first prepareBark()scope.
This is how a closure works: the function that’s returned keeps the original state in its scope.
Arrays
JavaScript arrays over time got more and more features, and sometimes it’s tricky to know when to use some construct vs another. This section aims to explain what you should use, as of 2018.
Initialize array
const a = []
const a = [1, 2, 3]
const a = Array.of(1, 2, 3)
const a = Array(6).fill(1) //init an array of 6 items of value 1
Don’t use the old syntax (just use it for typed arrays)
const a = new Array() //never use
const a = new Array(1, 2, 3) //never use
Get length of the array
const l = a.lengthIterating the array with `every`
a.every(f)Iterates a until f() returns false
Iterating the array with `some`
a.some(f)Iterates a until f() returns true
Iterate the array and return a new one with the returned result of a function
const b = a.map(f)Iterates a and builds a new array with the result of executing f() on each aelement
Filter an array
const b = a.filter(f)Iterates a and builds a new array with elements of a that returned true when executing f() on each a element
Reduce
a.reduce((accumulator, currentValue, currentIndex, array) => {
  //...
}, initialValue)
reduce() executes a callback function on all the items of the array and allows to progressively compute a result. If initialValue is specified, accumulatorin the first iteration will equal to that value.
Example:
;[1, 2, 3, 4].reduce((accumulator, currentValue, currentIndex, array) => {
  return accumulator * currentValue
}, 1)
// iteration 1: 1 * 1 => return 1
// iteration 2: 1 * 2 => return 2
// iteration 3: 2 * 3 => return 6
// iteration 4: 6 * 4 => return 24// return value is 24forEach
ES6
a.forEach(f)Iterates f on a without a way to stop
Example:
a.forEach(v => {
  console.log(v)
})
for..of
ES6
for (let v of a) {
  console.log(v)
}
for
for (let i = 0; i < a.length; i += 1) {
  //a[i]
}
Iterates a, can be stopped using return or break and an iteration can be skipped using continue
@@iterator
ES6
Getting the iterator from an array returns an iterator of values
const a = [1, 2, 3]
let it = a[Symbol.iterator]()
console.log(it.next().value) //1
console.log(it.next().value) //2
console.log(it.next().value) //3.entries() returns an iterator of key/value pairs
let it = a.entries()console.log(it.next().value) //[0, 1]
console.log(it.next().value) //[1, 2]
console.log(it.next().value) //[2, 3].keys() allows to iterate on the keys:
let it = a.keys()console.log(it.next().value) //0
console.log(it.next().value) //1
console.log(it.next().value) //2.next() returns undefined when the array ends. You can also detect if the iteration ended by looking at it.next() which returns a value, done pair. done is always false until the last element, which returns true.
Adding to the end of an array
a.push(4)Adding at the beginning of an array
a.unshift(0)
a.unshift(-2, -1)Removing an item from an array
From the end
a.pop()From the beginning
a.shift()At a random position
a.splice(0, 2) // get the first 2 items
a.splice(3, 2) // get the 2 items starting from index 3Do not use remove() as it leaves behind undefined values.
Remove and insert in place
a.splice(2, 3, 2, 'a', 'b') //removes 3 items starting from
//index 2, and adds 2 items,
// still starting from index 2Join multiple arrays
const a = [1, 2]
const b = [3, 4]
a.concat(b) // 1, 2, 3, 4Lookup the array for a specific element
ES5
a.indexOf()Returns the index of the first matching item found, or -1 if not found
a.lastIndexOf()Returns the index of the last matching item found, or -1 if not found
ES6
a.find((element, index, array) => {
//return true or false
})Returns the first item that returns true. Returns undefined if not found.
A commonly used syntax is:
a.find(x => x.id === my_id)The above line will return the first element in the array that has id === my_id.
findIndex returns the index of the first item that returns true, and if not found, it returns undefined:
a.findIndex((element, index, array) => {
//return true or false
})ES7
a.includes(value)Returns true if a contains value.
a.includes(value, i)Returns true if a contains value after the position i.
Get a portion of an array
a.slice()Sort the array
Sort alphabetically (by ASCII value – 0-9A-Za-z)
const a = [1, 2, 3, 10, 11]
a.sort() //1, 10, 11, 2, 3const b = [1, 'a', 'Z', 3, 2, 11]
b = a.sort() //1, 11, 2, 3, Z, aSort by a custom function
const a = [1, 10, 3, 2, 11]
a.sort((a, b) => a - b) //1, 2, 3, 10, 11Reverse the order of an array
a.reverse()Get a string representation of an array
a.toString()Returns a string representation of an array
a.join()Returns a string concatenation of the array elements. Pass a parameter to add a custom separator:
a.join(', ')Copy an existing array by value
const b = Array.from(a)
const b = Array.of(...a)Copy just some values from an existing array
const b = Array.from(a, x => x % 2 == 0)Copy portions of an array into the array itself, in other positions
const a = [1, 2, 3, 4]
a.copyWithin(0, 2) // [3, 4, 3, 4]
const b = [1, 2, 3, 4, 5]
b.copyWithin(0, 2) // [3, 4, 5, 4, 5]
//0 is where to start copying into,
// 2 is where to start copying from
const c = [1, 2, 3, 4, 5]
c.copyWithin(0, 2, 4) // [3, 4, 3, 4, 5]
//4 is an end indexLoops
JavaScript provides many ways to iterate through loops. This section explains all the various loop possibilities in modern JavaScript with a small example and the main properties.
for
const list = ['a', 'b', 'c']
for (let i = 0; i < list.length; i++) {
console.log(list[i]) //value
console.log(i) //index
}- You can interrupt a
forloop usingbreak - You can fast forward to the next iteration of a
forloop usingcontinue
forEach
Introduced in ES5. Given an array, you can iterate over its properties using list.forEach():
const list = ['a', 'b', 'c']
list.forEach((item, index) => {
console.log(item) //value
console.log(index) //index
})//index is optional
list.forEach(item => console.log(item))Unfortunately you cannot break out of this loop.
do...while
const list = ['a', 'b', 'c']
let i = 0
do {
console.log(list[i]) //value
console.log(i) //index
i = i + 1
} while (i < list.length)You can interrupt a while loop using break:
do {
if (something) break
} while (true)and you can jump to the next iteration using continue:
do {
if (something) continue //do something else
} while (true)while
const list = ['a', 'b', 'c']
let i = 0
while (i < list.length) {
console.log(list[i]) //value
console.log(i) //index
i = i + 1
}You can interrupt a while loop using break:
while (true) {
if (something) break
}and you can jump to the next iteration using continue:
while (true) {
if (something) continue //do something else
}The difference with do...while is that do...while always execute its cycle at least once.
for...in
Iterates all the enumerable properties of an object, giving the property names.
for (let property in object) {
console.log(property) //property name
console.log(object[property]) //property value
}for...of
ES2015 introduced the for...of loop, which combines the conciseness of forEach with the ability to break:
//iterate over the value
for (const value of ['a', 'b', 'c']) {
console.log(value) //value
}//get the index as well, using `entries()`
for (const [index, value] of ['a', 'b', 'c'].entries()) {
console.log(index) //index
console.log(value) //value
}Notice the use of const. This loop creates a new scope in every iteration, so we can safely use that instead of let.
for...in vs for...of
The difference with for...in is:
for...ofiterates over the property valuesfor...initerates the property names
Events
JavaScript in the browser uses an event-driven programming model. Everything starts by following an event. This section provides an introduction to JavaScript events and how event handling works.
JavaScript in the browser uses an event-driven programming model.
Everything starts by following an event.
The event could be the DOM is loaded, or an asynchronous request that finishes fetching, or a user clicking an element or scrolling the page, or the user types on the keyboard.
There are a lot of different kind of events.
Event handlers
You can respond to any event using an Event Handler, which is just a function that’s called when an event occurs.
You can register multiple handlers for the same event, and they will all be called when that event happens.
JavaScript offers three ways to register an event handler:
Inline event handlers
This style of event handlers is very rarely used today, due to its constrains, but it was the only way in the early days of JavaScript:
<a href="site.com" onclick="dosomething();">A link</a>DOM on-event handlers
This is common when an object has at most one event handler, as there is no way to add multiple handlers in this case:
window.onload = () => {
//window loaded
}It’s most commonly used when handling XHR requests:
const xhr = new XMLHttpRequest()
xhr.onreadystatechange = () => {
//.. do something
}You can check if an handler is already assigned to a property using if ('onsomething' in window) {}.
Using addEventListener()
This is the modern way. This method allows us to register as many handlers as we need, and it’s the most popular you will find:
window.addEventListener('load', () => {
//window loaded
})Note that IE8 and below do not support this, and instead used their own
attachEvent()API. Keep it in mind if you need to support older browsers.
Listening on different elements
You can listen on window to intercept «global» events, like the usage of the keyboard, and you can listen on specific elements to check events happening on them, like a mouse click on a button.
This is why addEventListener is sometimes called on window, sometimes on a DOM element.
The Event object
An event handler gets an Event object as the first parameter:
const link = document.getElementById('my-link')
link.addEventListener('click', event => {
// link clicked
})This object contains a lot of useful properties and methods, like:
target, the DOM element that originated the eventtype, the type of eventstopPropagation(), called to stop propagating the event in the DOM
Other properties are provided by specific kind of events, as Event is an interface for different specific events:
- MouseEvent
- KeyboardEvent
- DragEvent
- FetchEvent
- … and others
Each of those has a MDN page linked, so you can inspect all their properties.
For example when a KeyboardEvent happens, you can check which key was pressed, in a readable format (Escape, Enterand so on) by checking the keyproperty:
window.addEventListener('keydown', event => {
// key pressed
console.log(event.key)
})On a mouse event we can check which mouse button was pressed:
const link = document.getElementById('my-link')
link.addEventListener('mousedown', event => {
// mouse button pressed
console.log(event.button) //0=left, 2=right
})Event bubbling and event capturing
Bubbling and capturing are the two models that events use to propagate.
Suppose you DOM structure is
<div id="container">
<button>Click me</button>
</div>You want to track when users click on the button, and you have two event listeners, one on button, and one on #container. Remember, a click on a child element will always propagate to its parents, unless you stop the propagation (we’ll see this later).
Those event listeners will be called in order, and this order is determined by the event bubbling/capturing model used.
Bubbling means that the event propagates from the item that was clicked (the child) up to all its parent tree, starting from the nearest one.
In our example, the handler on button will fire before the #containerhandler.
Capturing is the opposite: the outer event handlers are fired before the more specific handler, the one on button.
By default all events bubble.
You can choose to adopt event capturing by applying a third argument to addEventListener, setting it to true:
document.getElementById('container').addEventListener(
'click',
() => {
//window loaded
},
true
)Note that first all capturing event handlers are run.
Then all the bubbling event handlers.
The order follows this principle: the DOM goes through all elements starting from the Window object, and goes to find the item that was clicked. While doing so, it calls any event handler associated with the event (capturing phase).
Once it reaches the target, it then repeats the journey up to the parents tree until the Window object, again calls the event handlers (bubbling phase).
Stopping the propagation
An event on a DOM element will be propagated to all its parent elements tree, unless it’s stopped.
<html>
<body>
<section>
<a id="my-link" ...>A click event on a will propagate to section and then body.
You can stop the propagation by calling the stopPropagation()method of an Event, usually at the end of the event handler:
const link = document.getElementById('my-link')
link.addEventListener('mousedown', event => {
// process the event
// ... event.stopPropagation()
})Popular events
Here’s a list of the most common events you will likely handle.
Load
load is fired on window and the body element when the page has finished loading.
Mouse events
click fires when a mouse button is clicked. dblclick when the mouse is clicked two times. Of course in this case click is fired just before this event. mousedown, mousemove and mouseup can be used in combination to track drag-and-drop events. Be careful with mousemove, as it fires many times during the mouse movement (see throttling later)
Keyboard events
keydown fires when a keyboard button is pressed (and any time the key repeats while the button stays pressed). keyup is fired when the key is released.
Scroll
The scroll event is fired on window every time you scroll the page. Inside the event handler you can check the current scrolling position by checking window.scrollY (Y Axis).
Keep in mind that this event is not a one-time thing. It fires a lot of times during scrolling, not just at the end or beginning of the scrolling, so don’t do any heavy computation or manipulation in the handler – use throttlinginstead.
Throttling
As we mentioned above, mousemove and scroll are two events that are not fired one-time per event, but rather they continuously call their event handler function during all the duration of the action.
This is because they provide coordinates so you can track what’s happening.
If you perform a complex operation in the event handler, you will affect the performance and cause a sluggish experience to your site users.
Libraries that provide throttling like Lodash implement it in 100+ lines of code, to handle every possible use case. A simple and easy to understand implementation is this, which uses setTimeout to cache the scroll event every 100ms:
let cached = null
window.addEventListener('scroll', event => {
if (!cached) {
setTimeout(() => {
//you can access the original event at `cached`
cached = null
}, 100)
}
cached = event
})The Event Loop
The Event Loop is one of the most important aspects to understand about JavaScript.
I’ve programmed for years with JavaScript, yet I’ve never fully understood how things work under the hoods. It’s completely fine to not know this concept in detail, but as usual, it’s helpful to know how it works, and also you might just be a little curious at this point.
This section aims to explain the inner details of how JavaScript works with a single thread, and how it handles asynchronous functions.
Your JavaScript code runs single threaded. There is just one thing happening at a time.
This is a limitation that’s actually very helpful, as it simplifies a lot how you program without worrying about concurrency issues.
You just need to pay attention to how you write your code and avoid anything that could block the thread, like synchronous network calls or infinite loops.
In general, in most browsers there is an event loop for every browser tab, to make every process isolated and avoid a web page with infinite loops or heavy processing to block your entire browser.
The environment manages multiple concurrent event loops, to handle API calls for example. Web Workers run in their own event loop as well.
You mainly need to be concerned that your code will run on a single event loop, and write code with this thing in mind to avoid blocking it.
Blocking the event loop
Any JavaScript code that takes too long to return back control to the event loop will block the execution of any JavaScript code in the page, even block the UI thread, and the user cannot click around, scroll the page, and so on.
Almost all the I/O primitives in JavaScript are non-blocking. Network requests, Node.js filesystem operations, and so on. Being blocking is the exception, and this is why JavaScript is based so much on callbacks, and more recently on promises and async/await.
The call stack
The call stack is a LIFO queue (Last In, First Out).
The event loop continuously checks the call stack to see if there’s any function that needs to run.
While doing so, it adds any function call it finds, to the call stack and executes each one in order.
You know the error stack trace you might be familiar with, in the debugger or in the browser console? The browser looks up the function names in the call stack to inform you which function originates the current call:
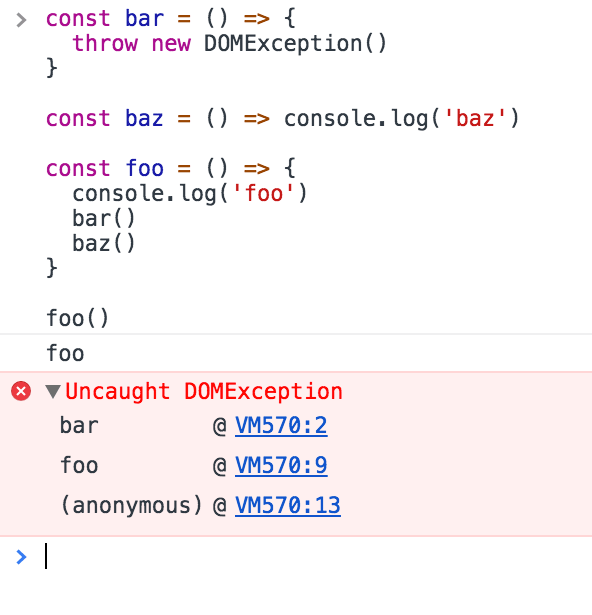
A simple event loop explanation
Let’s pick an example:
const bar = () => console.log('bar')const baz = () => console.log('baz')const foo = () => {
console.log('foo')
bar()
baz()
}foo()This code prints
foo
bar
bazas expected.
When this code runs, first foo() is called. Inside foo() we first call bar(), then we call baz().
At this point the call stack looks like this:

The event loop on every iteration looks if there’s something in the call stack, and executes it:
until the call stack is empty.
Queuing function execution
The above example looks normal, there’s nothing special about it: JavaScript finds things to execute, runs them in order.
Let’s see how to defer a function until the stack is clear.
The use case of setTimeout(() => {}), 0) is to call a function, but execute it once every other function in the code has executed.
Take this example:
const bar = () => console.log('bar')const baz = () => console.log('baz')const foo = () => {
console.log('foo')
setTimeout(bar, 0)
baz()
}foo()This code prints, maybe surprisingly:
foo
baz
barWhen this code runs, first foo() is called. Inside foo() we first call setTimeout, passing bar as an argument, and we instruct it to run immediately as fast as it can, passing 0 as the timer. Then we call baz().
At this point the call stack looks like this:

Here is the execution order for all the functions in our program:
Why is this happening?
The Message Queue
When setTimeout() is called, the Browser or Node.js start the timer. Once the timer expires, in this case immediately as we put 0 as the timeout, the callback function is put in the Message Queue.
The Message Queue is also where user-initiated events like click or keyboard events, or fetch responses are queued before your code has the opportunity to react to them. Or also DOM events like onLoad.
The loop gives priority to the call stack, and it first processes everything it finds in the call stack, and once there’s nothing in there, it goes to pick up things in the event queue.
We don’t have to wait for functions like setTimeout, fetch or other things to do their own work, because they are provided by the browser, and they live on their own threads. For example, if you set the setTimeout timeout to 2 seconds, you don’t have to wait 2 seconds – the wait happens elsewhere.
ES6 Job Queue
ECMAScript 2015 introduced the concept of the Job Queue, which is used by Promises (also introduced in ES6/ES2015). It’s a way to execute the result of an async function as soon as possible, rather than being put at the end of the call stack.
Promises that resolve before the current function ends will be executed right after the current function.
I find the analogy of a rollercoaster ride at an amusement park nicely explains it: the message queue puts you back in queue with after all the other people in the queue, while the job queue is the fastpass ticket that lets you take another ride right after you finished the previous one.
For Example:
const bar = () => console.log('bar')const baz = () => console.log('baz')const foo = () => {
console.log('foo')
setTimeout(bar, 0)
new Promise((resolve, reject) =>
resolve('should be right after baz, before bar')
).then(resolve => console.log(resolve))
baz()
}foo()This prints
foo
baz
should be right after baz, before bar
barThat’s a big difference between Promises (and Async/await, which is built on promises) and plain old asynchronous functions through setTimeout() or other platform APIs.
Asynchronous programming and callbacks
JavaScript is synchronous by default, and is single threaded. This means that code cannot create new threads and run in parallel. Let’s learn what asynchronous code means and how it looks.
Asynchronicity in Programming Languages
Computers are asynchronous by design.
Asynchronous means that things can happen independently of the main program flow.
In the current consumer computers, every program runs for a specific time slot, and then it stops its execution to let another program continue its execution. This thing runs in a cycle so fast that’s impossible to notice, and we think our computers run many programs simultaneously, but this is an illusion (except on multiprocessor machines).
Programs internally use interrupts, a signal that’s emitted to the processor to gain the attention of the system.
I won’t go into the internals of this, but just keep in mind that it’s normal for programs to be asynchronous, and halt their execution until they need attention, and the computer can execute other things in the meantime. When a program is waiting for a response from the network, it cannot halt the processor until the request finishes.
Normally, programming languages are synchronous, and some provide a way to manage asynchronicity, in the language or through libraries. C, Java, C#, PHP, Go, Ruby, Swift, Python, they are all synchronous by default. Some of them handle async by using threads, spawning a new process.
JavaScript
JavaScript is synchronous by default and is single threaded. This means that code cannot create new threads and run in parallel.
Lines of code are executed in series, one after another, for example:
const a = 1
const b = 2
const c = a * b
console.log(c)
doSomething()But JavaScript was born inside the browser, its main job, in the beginning, was to respond to user actions, like onClick, onMouseOver, onChange, onSubmit and so on. How could it do this with a synchronous programming model?
The answer was in its environment. The browser provides a way to do it by providing a set of APIs that can handle this kind of functionality.
More recently, Node.js introduced a non-blocking I/O environment to extend this concept to file access, network calls and so on.
Callbacks
You can’t know when a user is going to click a button, so what you do is, you define an event handler for the click event. This event handler accepts a function, which will be called when the event is triggered:
document.getElementById('button').addEventListener('click', () => {
//item clicked
})This is the so-called callback.
A callback is a simple function that’s passed as a value to another function, and will only be executed when the event happens. We can do this because JavaScript has first-class functions, which can be assigned to variables and passed around to other functions (called higher-order functions)
It’s common to wrap all your client code in a load event listener on the window object, which runs the callback function only when the page is ready:
window.addEventListener('load', () => {
//window loaded
//do what you want
})Callbacks are used everywhere, not just in DOM events.
One common example is by using timers:
setTimeout(() => {
// runs after 2 seconds
}, 2000)XHR requests also accept a callback. In this example, by assigning a function to a property that will be called when a particular event occurs (in this case, the state of the request changes):
const xhr = new XMLHttpRequest()
xhr.onreadystatechange = () => {
if (xhr.readyState === 4) {
xhr.status === 200 ? console.log(xhr.responseText) : console.error('error')
}
}
xhr.open('GET', 'https://yoursite.com')
xhr.send()Handling errors in callbacks
How do you handle errors with callbacks? One very common strategy is to use what Node.js adopted: the first parameter in any callback function is the error object: error-first callbacks
If there is no error, the object is null. If there is an error, it contains some description of the error and other information.
fs.readFile('/file.json', (err, data) => {
if (err !== null) {
//handle error
console.log(err)
return
} //no errors, process data
console.log(data)
})The problem with callbacks
Callbacks are great for simple cases!
However every callback adds a level of nesting, and when you have lots of callbacks, the code starts to be complicated very quickly:
window.addEventListener('load', () => {
document.getElementById('button').addEventListener('click', () => {
setTimeout(() => {
items.forEach(item => {
//your code here
})
}, 2000)
})
})This is just a simple 4-levels code, but I’ve seen much more levels of nesting and it’s not fun.
How do we solve this?
Alternatives to callbacks
Starting with ES6, JavaScript introduced several features that help us with asynchronous code that do not involve using callbacks:
- Promises (ES6)
- Async/Await (ES8)
Promises
Promises are one way to deal with asynchronous code in JavaScript, without writing too many callbacks in your code.
A promise is commonly defined as a proxy for a value that will eventually become available.
Promises are one way to deal with asynchronous code, without writing too many callbacks in your code.
Although being around since years, they have been standardized and introduced in ES2015, and now they have been superseded in ES2017 by async functions.
Async functions use the promises API as their building block, so understanding them is fundamental even if in newer code you’ll likely use async functions instead of promises.
How promises work, in brief
Once a promise has been called, it will start in pending state. This means that the caller function continues the execution, while it waits for the promise to do its own processing, and give the caller function some feedback.
At this point, the caller function waits for it to either return the promise in a resolved state, or in a rejected state, but as you know JavaScript is asynchronous, so the function continues its execution while the promise does its work.
Which JS APIs use promises?
In addition to your own code and libraries code, promises are used by standard modern Web APIs such as:
- the Battery API
- the Fetch API
- Service Workers
It’s unlikely that in modern JavaScript you’ll find yourself not using promises, so let’s start diving right into them.
Creating a promise
The Promise API exposes a Promise constructor, which you initialize using new Promise():
let done = trueconst isItDoneYet = new Promise(
(resolve, reject) => {
if (done) {
const workDone = 'Here is the thing I built'
resolve(workDone)
} else {
const why = 'Still working on something else'
reject(why)
}
}
)As you can see the promise checks the done global constant, and if that’s true, we return a resolved promise, otherwise a rejected promise.
Using resolve and reject we can communicate back a value, and in the above case we just return a string, but it could be an object as well.
Consuming a promise
In the last section, we introduced how a promise is created.
Now let’s see how the promise can be consumed or used.
const isItDoneYet = new Promise(
//...
)const checkIfItsDone = () => {
isItDoneYet
.then((ok) => {
console.log(ok)
})
.catch((err) => {
console.error(err)
})
}Running checkIfItsDone() will execute the isItDoneYet()promise and will wait for it to resolve, using the then callback, and if there is an error, it will handle it in the catch callback.
Chaining promises
A promise can be returned to another promise, creating a chain of promises.
A great example of chaining promises is given by the Fetch API, a layer on top of the XMLHttpRequest API, which we can use to get a resource and queue a chain of promises to execute when the resource is fetched.
The Fetch API is a promise-based mechanism, and calling fetch() is equivalent to defining our own promise using new Promise().
Example of chaining promises
const status = (response) => {
if (response.status >= 200 && response.status < 300) {
return Promise.resolve(response)
}
return Promise.reject(new Error(response.statusText))
}const json = (response) => response.json()fetch('/todos.json')
.then(status)
.then(json)
.then((data) => { console.log('Request succeeded with JSON response', data) })
.catch((error) => { console.log('Request failed', error) })In this example, we call fetch() to get a list of TODO items from the todos.json file found in the domain root, and we create a chain of promises.
Running fetch() returns a response, which has many properties, and within those we reference:
status, a numeric value representing the HTTP status codestatusText, a status message, which isOKif the request succeeded
response also has a json() method, which returns a promise that will resolve with the content of the body processed and transformed into JSON.
So given those premises, this is what happens: the first promise in the chain is a function that we defined, called status(), that checks the response status and if it’s not a success response (between 200 and 299), it rejects the promise.
This operation will cause the promise chain to skip all the chained promises listed and will skip directly to the catch() statement at the bottom, logging the Request failed text along with the error message.
If that succeeds instead, it calls the json() function we defined. Since the previous promise, when successful, returned the response object, we get it as an input to the second promise.
In this case, we return the data JSON processed, so the third promise receives the JSON directly:
.then((data) => {
console.log('Request succeeded with JSON response', data)
})and we simply log it to the console.
Handling errors
In the example, in the previous section, we had a catch that was appended to the chain of promises.
When anything in the chain of promises fails and raises an error or rejects the promise, the control goes to the nearest catch()statement down the chain.
new Promise((resolve, reject) => {
throw new Error('Error')
})
.catch((err) => { console.error(err) })// ornew Promise((resolve, reject) => {
reject('Error')
})
.catch((err) => { console.error(err) })Cascading errors
If inside the catch() you raise an error, you can append a second catch() to handle it, and so on.
new Promise((resolve, reject) => {
throw new Error('Error')
})
.catch((err) => { throw new Error('Error') })
.catch((err) => { console.error(err) })Orchestrating promises
Promise.all()
If you need to synchronize different promises, Promise.all()helps you define a list of promises, and execute something when they are all resolved.
For Example:
const f1 = fetch('/something.json')
const f2 = fetch('/something2.json')Promise.all([f1, f2]).then((res) => {
console.log('Array of results', res)
})
.catch((err) => {
console.error(err)
})The ES2015 destructuring assignment syntax allows you to also do
Promise.all([f1, f2]).then(([res1, res2]) => {
console.log('Results', res1, res2)
})You are not limited to using fetch of course, any promise is good to go.
Promise.race()
Promise.race() runs when the first of the promises you pass to it resolves, and it runs the attached callback just once, with the result of the first promise resolved.
For Example:
const first = new Promise((resolve, reject) => {
setTimeout(resolve, 500, 'first')
})
const second = new Promise((resolve, reject) => {
setTimeout(resolve, 100, 'second')
})Promise.race([first, second]).then((result) => {
console.log(result) // second
})Async and Await
Now we’ll discover the modern approach to asynchronous functions in JavaScript. JavaScript evolved in a very short time from callbacks to Promises, and since ES2017, asynchronous JavaScript is even simpler with the async/await syntax.
Async functions are a combination of promises and generators, and basically, they are a higher level abstraction over promises. Let me repeat: async/await is built on promises.
Why were async/await introduced?
They reduce the boilerplate around promises, and the “don’t break the chain” limitation of chaining promises.
When Promises were introduced in ES2015, they were meant to solve a problem with asynchronous code, and they did, but over the 2 years that separated ES2015 and ES2017, it was clear that promises could not be the final solution.
Promises were introduced to solve the famous callback hell problem, but they introduced complexity on their own, and syntax complexity.
They were good primitives around which a better syntax could be exposed to the developers, so when the time was right we got async functions.
They make the code look like it’s synchronous, but it’s asynchronous and non-blocking behind the scenes.
How it works
An async function returns a promise, like in this example:
const doSomethingAsync = () => {
return new Promise((resolve) => {
setTimeout(() => resolve('I did something'), 3000)
})
}When you want to call this function you prepend await, and the calling code will stop until the promise is resolved or rejected. One caveat: the client function must be defined as async. Here’s an example:
const doSomething = async () => {
console.log(await doSomethingAsync())
}A quick example
This is a simple example of async/await used to run a function asynchronously:
const doSomethingAsync = () => {
return new Promise((resolve) => {
setTimeout(() => resolve('I did something'), 3000)
})
}const doSomething = async () => {
console.log(await doSomethingAsync())
}console.log('Before')
doSomething()
console.log('After')The above code will print the following to the browser console:
Before
After
I did something //after 3sPromise all the things
Prepending the async keyword to any function means that the function will return a promise.
Even if it’s not doing so explicitly, it will internally make it return a promise.
This is why this code is valid:
const aFunction = async () => {
return 'test'
}aFunction().then(alert) // This will alert 'test'and it’s the same as:
const aFunction = async () => {
return Promise.resolve('test')
}aFunction().then(alert) // This will alert 'test'The code is much simpler to read
As you can see in the example above, our code looks very simple. Compare it to code using plain promises, with chaining and callback functions.
And this is a very simple example, the major benefits will arise when the code is much more complex.
For example here’s how you would get a JSON resource, and parse it, using promises:
const getFirstUserData = () => {
return fetch('/users.json') // get users list
.then(response => response.json()) // parse JSON
.then(users => users[0]) // pick first user
.then(user => fetch(`/users/${user.name}`)) // get user data
.then(userResponse => response.json()) // parse JSON
}getFirstUserData()And here is the same functionality provided using await/async:
const getFirstUserData = async () => {
const response = await fetch('/users.json') // get users list
const users = await response.json() // parse JSON
const user = users[0] // pick first user
const userResponse = await fetch(`/users/${user.name}`) // get user data
const userData = await user.json() // parse JSON
return userData
}getFirstUserData()Multiple async functions in series
Async functions can be chained very easily, and the syntax is much more readable than with plain promises:
const promiseToDoSomething = () => {
return new Promise(resolve => {
setTimeout(() => resolve('I did something'), 10000)
})
}const watchOverSomeoneDoingSomething = async () => {
const something = await promiseToDoSomething()
return something + ' and I watched'
}const watchOverSomeoneWatchingSomeoneDoingSomething = async () => {
const something = await watchOverSomeoneDoingSomething()
return something + ' and I watched as well'
}watchOverSomeoneWatchingSomeoneDoingSomething().then((res) => {
console.log(res)
})Will print:
I did something and I watched and I watched as wellEasier debugging
Debugging promises is hard because the debugger will not step over asynchronous code.
Async/await makes this very easy because to the compiler it’s just like synchronous code.
Loops and Scope
There is one feature of JavaScript that might cause a few headaches to developers, related to loops and scoping. We’ll learn some tricks about loops and scoping with var and let.
Take this example:
const operations = []for (var i = 0; i < 5; i++) {
operations.push(() => {
console.log(i)
})
}for (const operation of operations) {
operation()
}It basically iterates and for 5 times it adds a function to an array called operations. This function simply console logs the loop index variable i.
Later it runs these functions.
The expected result here should be:
0
1
2
3
4but actually what happens is this:
5
5
5
5
5Why is this the case? Because of the use of var.
Since var declarations are hoisted, the above code equals to
var i;
const operations = []for (i = 0; i < 5; i++) {
operations.push(() => {
console.log(i)
})
}for (const operation of operations) {
operation()
}So, in the for-of loop, i is still visible, it’s equal to 5 and every reference to iin the function is going to use this value.
So how should we do to make things work as we want?
The simplest solution is to use let declarations. Introduced in ES2015, they are a great help in avoiding some of the weird things about var declarations.
Simply changing var to let in the loop variable is going to work fine:
const operations = []for (let i = 0; i < 5; i++) {
operations.push(() => {
console.log(i)
})
}for (const operation of operations) {
operation()
}Here’s the output:
0
1
2
3
4How is this possible? This works because on every loop iteration i is created as a new variable each time, and every function added to the operationsarray gets its own copy of i.
Keep in mind you cannot use const in this case, because there would be an error as for tries to assign a new value in the second iteration.
Another way to solve this problem was very common in pre-ES6 code, and it is called Immediately Invoked Function Expression (IIFE).
In this case you can wrap the entire function and bind i to it. Since in this way you’re creating a function that immediately executes, you return a new function from it, so we can execute it later:
const operations = []for (var i = 0; i < 5; i++) {
operations.push(((j) => {
return () => console.log(j)
})(i))
}for (const operation of operations) {
operation()
}Timers
When writing JavaScript code, you might want to delay the execution of a function. We’ll discuss how to use setTimeout and setInterval to schedule functions in the future.
setTimeout()
When writing JavaScript code, you might want to delay the execution of a function.
This is the job of setTimeout. You specify a callback function to execute later, and a value expressing how later you want it to run, in milliseconds:
setTimeout(() => {
// runs after 2 seconds
}, 2000)setTimeout(() => {
// runs after 50 milliseconds
}, 50)This syntax defines a new function. You can call whatever other function you want in there, or you can pass an existing function name, and a set of parameters:
const myFunction = (firstParam, secondParam) => {
// do something
}// runs after 2 seconds
setTimeout(myFunction, 2000, firstParam, secondParam)setTimeout returns the timer id. This is generally not used, but you can store this id, and clear it if you want to delete this scheduled function execution:
const id = setTimeout(() => {
// should run after 2 seconds
}, 2000)// I changed my mind
clearTimeout(id)Zero delay
If you specify the timeout delay to 0, the callback function will be executed as soon as possible, but after the current function execution:
setTimeout(() => {
console.log('after ')
}, 0)console.log(' before ')will print before after.
This is especially useful to avoid blocking the CPU on intensive tasks and let other functions execute while performing a heavy calculation, by queuing functions in the scheduler.
Some browsers (IE and Edge) implement a
setImmediate()method that does this same exact functionality, but it’s not standard and unavailable on other browsers. But it’s a standard function in Node.js.
setInterval
setInterval is a function similar to setTimeout, with a difference: instead of running the callback function once, it will run it forever, at the specific time interval you specify (in milliseconds):
setInterval(() => {
// runs every 2 seconds
}, 2000)The function above runs every 2 seconds unless you tell it to stop, using clearInterval, passing it the interval id that setInterval returned:
const id = setInterval(() => {
// runs every 2 seconds
}, 2000)clearInterval(id)It’s common to call clearInterval inside the setInterval callback function, to let it auto-determine if it should run again or stop. For example this code runs something unless App.somethingIWait has the value arrived:
const interval = setInterval(() => {
if (App.somethingIWait === 'arrived') {
clearInterval(interval)
return
}
// otherwise do things
}, 100)Recursive setTimeout
setInterval starts a function every n milliseconds, without any consideration about when a function finished its execution.
If a function takes always the same amount of time, it’s all fine:

Maybe the function takes different execution times, depending on network conditions for example:

And maybe one long execution overlaps the next one:

To avoid this, you can schedule a recursive setTimeout to be called when the callback function finishes:
const myFunction = () => {
// do something setTimeout(myFunction, 1000)
}setTimeout(
myFunction()
}, 1000)to achieve this scenario:

setTimeout and setInterval are available in Node.js, through the Timers module.
Node.js also provides setImmediate(), which is equivalent to using setTimeout(() => {}, 0), mostly used to work with the Node.js Event Loop.
This
this is a value that has different values depending on where it’s used. Not knowing this tiny detail of JavaScript can cause a lot of headaches, so it’s worth taking 5 minutes to learn all the tricks
Not knowing this tiny detail of JavaScript can cause a lot of headaches, so it’s worth taking 5 minutes to learn all the tricks.
this in strict mode
Outside any object, this in strict mode is always undefined.
Notice I mentioned strict mode. If strict mode is disabled (the default state if you don’t explicitly add 'use strict' on top of your file ), you are in the so-called sloppy mode, and this – unless some specific cases mentioned here below – has the value of the global object.
Which means window in a browser context.
this in methods
A method is a function attached to an object.
You can see it in various forms.
Here’s one:
const car = {
maker: 'Ford',
model: 'Fiesta', drive() {
console.log(`Driving a ${this.maker} ${this.model} car!`)
}
}car.drive()
//Driving a Ford Fiesta car!In this case, using a regular function, this is automatically bound to the object.
Note: the above method declaration is the same as drive: function() {…, but shorter:
const car = {
maker: 'Ford',
model: 'Fiesta', drive: function() {
console.log(`Driving a ${this.maker} ${this.model} car!`)
}
}The same works in this example:
const car = {
maker: 'Ford',
model: 'Fiesta'
}car.drive = function() {
console.log(`Driving a ${this.maker} ${this.model} car!`)
}car.drive()
//Driving a Ford Fiesta car!An arrow function does not work in the same way, as it’s lexically bound:
const car = {
maker: 'Ford',
model: 'Fiesta', drive: () => {
console.log(`Driving a ${this.maker} ${this.model} car!`)
}
}car.drive()
//Driving a undefined undefined car!Binding arrow functions
You cannot bind a value to an arrow function, like you do with normal functions.
It’s simply not possible due to the way they work. this is lexically bound, which means its value is derived from the context where they are defined.
Explicitly pass an object to be used as this
JavaScript offers a few ways to map this to any object you want.
Using bind(), at the function declaration step:
const car = {
maker: 'Ford',
model: 'Fiesta'
}const drive = function() {
console.log(`Driving a ${this.maker} ${this.model} car!`)
}.bind(car)drive()
//Driving a Ford Fiesta car!You could also bind an existing object method to remap its this value:
const car = {
maker: 'Ford',
model: 'Fiesta', drive() {
console.log(`Driving a ${this.maker} ${this.model} car!`)
}
}const anotherCar = {
maker: 'Audi',
model: 'A4'
}car.drive.bind(anotherCar)()
//Driving a Audi A4 car!Using call() or apply(), at the function invocation step:
const car = {
maker: 'Ford',
model: 'Fiesta'
}const drive = function(kmh) {
console.log(`Driving a ${this.maker} ${this.model} car at ${kmh} km/h!`)
}drive.call(car, 100)
//Driving a Ford Fiesta car at 100 km/h!drive.apply(car, [100])
//Driving a Ford Fiesta car at 100 km/h!The first parameter you pass to call() or apply() is always bound to this. The difference between call() and apply() is just that the second one wants an array as the arguments list, while the first accepts a variable number of parameters, which passes as function arguments.
The special case of browser event handlers
In event handlers callbacks, this refers to the HTML element that received the event:
document.querySelector('#button').addEventListener('click', function(e) {
console.log(this) //HTMLElement
}You can bind it using
document.querySelector('#button').addEventListener(
'click',
function(e) {
console.log(this) //Window if global, or your context
}.bind(this)
)Strict Mode
Strict Mode is an ES5 feature, and it’s a way to make JavaScript behave in a better way — and in a different way, as enabling Strict Mode changes the semantics of the JavaScript language.
It’s really important to know the main differences between JavaScript code in strict mode, and normal JavaScript, which is often referred as sloppy mode
And in a different way, as enabling Strict Mode changes the semantics of the JavaScript language.
It’s really important to know the main differences between JavaScript code in strict mode, and “normal” JavaScript, which is often referred as sloppy mode.
Strict Mode mostly removes functionality that was possible in ES3, and deprecated since ES5 (but not removed because of backwards compatibility requirements)
How to enable Strict Mode
Strict mode is optional. As with every breaking change in JavaScript, we can’t simply change how the language behaves by default, because that would break gazillions of JavaScript around, and JavaScript puts a lot of effort into making sure 1996 JavaScript code still works today. It’s a key of its success.
So we have the 'use strict' directive we need to use to enable Strict Mode.
You can put it at the beginning of a file, to apply it to all the code contained in the file:
'use strict'const name = 'Flavio'
const hello = () => 'hey'//...You can also enable Strict Mode for an individual function, by putting 'use strict' at the beginning of the function body:
function hello() {
'use strict' return 'hey'
}This is useful when operating on legacy code, where you don’t have the time to test or the confidence to enable strict mode on the whole file.
What changes in Strict Mode
Accidental global variables
If you assign a value to an undeclared variable, JavaScript by default creates that variable on the global object:
;(function() {
variable = 'hey'
})()(() => {
name = 'Flavio'
})()variable //'hey'
name //'Flavio'Turning on Strict Mode, an error is raised if you try to do what we did above:
;(function() {
'use strict'
variable = 'hey'
})()(() => {
'use strict'
myname = 'Flavio'
})()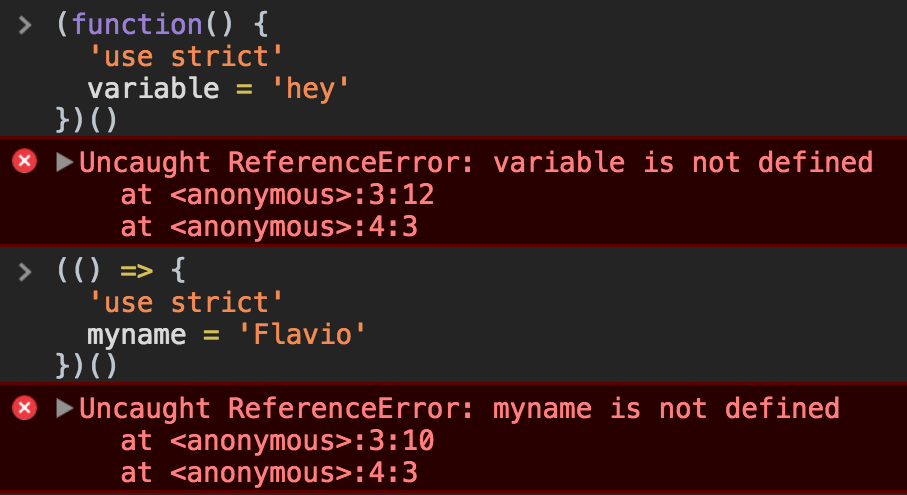
Assignment errors
JavaScript silently fails some conversion errors.
In Strict Mode, those silent errors now raise issues:
const undefined = 1(() => {
'use strict'
undefined = 1
})()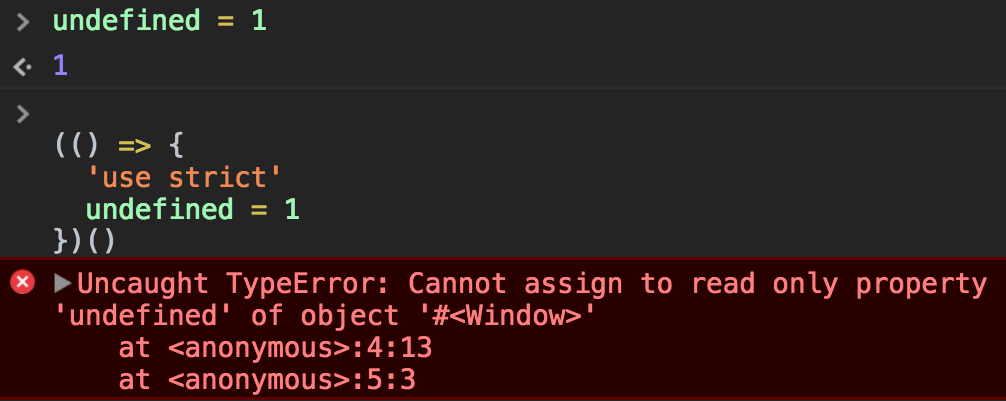
The same applies to Infinity, NaN, eval, arguments and more.
In JavaScript you can define a property of an object to be not writable, by using
const car = {}
Object.defineProperty(car, 'color', { value: 'blue', writable: false })In strict mode, you can’t override this value, while in sloppy mode that’s possible:

The same works for getters:
const car = {
get color() {
return 'blue'
}
}
car.color = 'red'(
//ok () => {
'use strict'
car.color = 'yellow' //TypeError: Cannot set property color of #<Object> which has only a getter
}
)()Sloppy mode allows to extend a non-extensible object:
const car = { color: 'blue' }
Object.preventExtensions(car)
car.model = 'Fiesta'(
//ok () => {
'use strict'
car.owner = 'Flavio' //TypeError: Cannot add property owner, object is not extensible
}
)()Also, sloppy mode allows to set properties on primitive values, without failing, but also without doing nothing at all:
true.false = ''(
//''
1
).name =
'xxx' //'xxx'
var test = 'test' //undefined
test.testing = true //true
test.testing //undefinedStrict mode fails in all those cases:
;(() => {
'use strict'
true.false = ''(
//TypeError: Cannot create property 'false' on boolean 'true'
1
).name =
'xxx' //TypeError: Cannot create property 'name' on number '1'
'test'.testing = true //TypeError: Cannot create property 'testing' on string 'test'
})()Deletion errors
In sloppy mode, if you try to delete a property that you cannot delete, JavaScript simply returns false, while in Strict Mode, it raises a TypeError:
delete Object.prototype(
//false () => {
'use strict'
delete Object.prototype //TypeError: Cannot delete property 'prototype' of function Object() { [native code] }
}
)()Function arguments with the same name
In normal functions, you can have duplicate parameter names:
(function(a, a, b) {
console.log(a, b)
})(1, 2, 3)
//2 3
(function(a, a, b) {
'use strict'
console.log(a, b)
})(1, 2, 3)
//Uncaught SyntaxError: Duplicate parameter name not allowed in this contextNote that arrow functions always raise a SyntaxError in this case:
((a, a, b) => {
console.log(a, b)
})(1, 2, 3)
//Uncaught SyntaxError: Duplicate parameter name not allowed in this contextOctal syntax
Octal syntax in Strict Mode is disabled. By default, prepending a 0 to a number compatible with the octal numeric format makes it (sometimes confusingly) interpreted as an octal number:
(() => {
console.log(010)
})()
//8(() => {
'use strict'
console.log(010)
})()
//Uncaught SyntaxError: Octal literals are not allowed in strict mode.You can still enable octal numbers in Strict Mode using the 0oXX syntax:
;(() => {
'use strict'
console.log(0o10)
})()
//8Removed with
Strict Mode disables the with keyword, to remove some edge cases and allow more optimization at the compiler level.
Immediately-Invoked Function Expressions (IIFE)
An Immediately-invoked Function Expression is a way to execute functions immediately, as soon as they are created.
IIFEs are very useful because they don’t pollute the global object, and they are a simple way to isolate variables declarations.
This is the syntax that defines an IIFE:
;(function() {
/* */
})()IIFEs can be defined with arrow functions as well:
;(() => {
/* */
})()We basically have a function defined inside parentheses, and then we append () to execute that function: (/* function */)().
Those wrapping parentheses are actually what make our function, internally, be considered an expression. Otherwise, the function declaration would be invalid, because we didn’t specify any name:
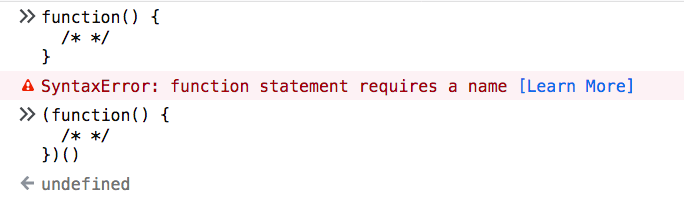
Function declarations want a name, while function expressions do not require it.
You could also put the invoking parentheses inside the expression parentheses, there is no difference, just a styling preference:
(function() {
/* */
}())(() => {
/* */
}())Alternative syntax using unary operators
There is some weirder syntax that you can use to create an IIFE, but it’s very rarely used in the real world, and it relies on using any unary operator:
;-(function() {
/* */
})() +(function() {
/* */
})()~(function() {
/* */
})()!(function() {
/* */
})()(does not work with arrow functions)
Named IIFE
An IIFE can also be named regular functions (not arrow functions). This does not change the fact that the function does not “leak” to the global scope, and it cannot be invoked again after its execution:
;(function doSomething() {
/* */
})()IIFEs starting with a semicolon
You might see this in the wild:
;(function() {
/* */
})()This prevents issues when blindly concatenating two JavaScript files. Since JavaScript does not require semicolons, you might concatenate with a file with some statements in its last line that causes a syntax error.
This problem is essentially solved with “smart” code bundlers like webpack.
Math Operators
Performing math operations and calculus is a very common thing to do with any programming language. JavaScript offers several operators to help us work with numbers.
Arithmetic operators
Addition (+)
const three = 1 + 2
const four = three + 1The + operator also serves as string concatenation if you use strings, so pay attention:
const three = 1 + 2
three + 1 // 4
'three' + 1 // three1Subtraction (-)
const two = 4 - 2Division (/)
Returns the quotient of the first operator and the second:
const result = 20 / 5 //result === 4
const result = 20 / 7 //result === 2.857142857142857If you divide by zero, JavaScript does not raise any error but returns the Infinity value (or -Infinity if the value is negative).
1 / 0 //Infinity
-1 / 0 //-InfinityRemainder (%)
The remainder is a very useful calculation in many use cases:
const result = 20 % 5 //result === 0
const result = 20 % 7 //result === 6A reminder by zero is always NaN, a special value that means «Not a Number»:
1 % 0 //NaN
-1 % 0 //NaNMultiplication (*)
1 * 2 //2
-1 * 2 //-2Exponentiation (**)
Raise the first operand to the power second operand
1 ** 2 //1
2 ** 1 //2
2 ** 2 //4
2 ** 8 //256
8 ** 2 //64Unary operators
Increment (++)
Increment a number. This is a unary operator, and if put before the number, it returns the value incremented.
If put after the number, it returns the original value, then increments it.
let x = 0
x++ //0
x //1
++x //2Decrement ( — )
Works like the increment operator, except it decrements the value.
let x = 0
x-- //0
x //-1
--x //-2Unary negation (-)
Return the negation of the operand
let x = 2
-x //-2
x //2Unary plus (+)
If the operand is not a number, it tries to convert it. Otherwise if the operand is already a number, it does nothing.
let x = 2
+x //2x = '2'
+x //2x = '2a'
+x //NaNAssignment shortcuts
The regular assignment operator, =, has several shortcuts for all the arithmetic operators which let you combine assignment, assigning to the first operand the result of the operations with the second operand.
They are:
+=: addition assignment-=: subtraction assignment*=: multiplication assignment/=: division assignment%=: remainder assignment**=: exponentiation assignment
Examples:
const a = 0
a += 5 //a === 5
a -= 2 //a === 3
a *= 2 //a === 6
a /= 2 //a === 3
a %= 2 //a === 1Precedence rules
Every complex statement will introduce precedence problems.
Take this:
const a = 1 * 2 + 5 / 2 % 2The result is 2.5, but why? What operations are executed first, and which need to wait?
Some operations have more precedence than the others. The precedence rules are listed as follows:
-+++--unary operators, increment and decrement*/%multiply/divide+-addition/subtraction=+=-=*=/=%=**=assignments
Operations on the same level (like + and -) are executed in the order they are found
Following the order above, we can solve this calculation:
const a = 1 * 2 + 5 / 2 % 2
const a = 1 * 2 + 5 / 2 % 2
const a = 2 + 2.5 % 2
const a = 2 + 0.5
const a = 2.5The Math Object
The Math object contains lots of utilities math-related. Let’s have a look at them all here.
Constants
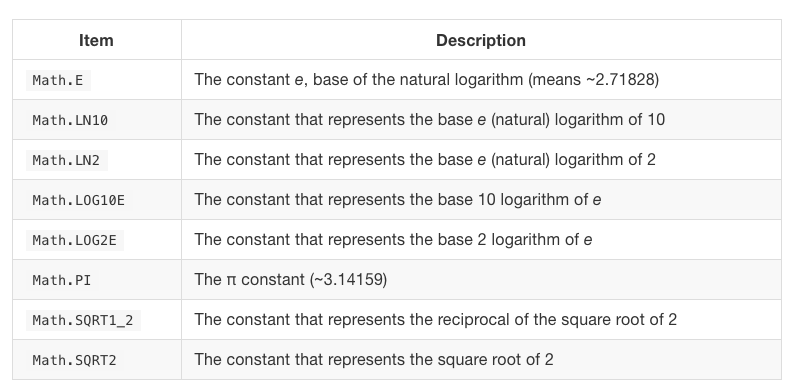
Functions
All those functions are static. Math cannot be instantiated.
Math.abs()
Returns the absolute value of a number
Math.abs(2.5) //2.5
Math.abs(-2.5) //2.5Math.acos()
Returns the arccosine of the operand
The operand must be between -1 and 1
Math.acos(0.8) //0.6435011087932843Math.asin()
Returns the arcsine of the operand
The operand must be between -1 and 1
Math.asin(0.8) //0.9272952180016123Math.atan()
Returns the arctangent of the operand
Math.atan(30) //1.5374753309166493Math.atan2()
Returns the arctangent of the quotient of its arguments.
Math.atan2(30, 20) //0.982793723247329Math.ceil()
Rounds a number up
Math.ceil(2.5) //3
Math.ceil(2) //2
Math.ceil(2.1) //3
Math.ceil(2.99999) //3Math.cos()
Return the cosine of an angle expressed in radiants
Math.cos(0) //1
Math.cos(Math.PI) //-1Math.exp()
Return the value of Math.E multiplied per the exponent that’s passed as argument
Math.exp(1) //2.718281828459045
Math.exp(2) //7.38905609893065
Math.exp(5) //148.4131591025766Math.floor()
Rounds a number down
Math.ceil(2.5) //2
Math.ceil(2) //2
Math.ceil(2.1) //2
Math.ceil(2.99999) //2Math.log()
Return the base e (natural) logarithm of a number
Math.log(10) //2.302585092994046
Math.log(Math.E) //1Math.max()
Return the highest number in the set of numbers passed
Math.max(1,2,3,4,5) //5
Math.max(1) //1Math.min()
Return the smallest number in the set of numbers passed
Math.max(1,2,3,4,5) //1
Math.max(1) //1Math.pow()
Return the first argument raised to the second argument
Math.pow(1, 2) //1
Math.pow(2, 1) //2
Math.pow(2, 2) //4
Math.pow(2, 4) //16Math.random()
Returns a pseudorandom number between 0.0 and 1.0
Math.random() //0.9318168241227056
Math.random() //0.35268950194094395Math.round()
Rounds a number to the nearest integer
Math.round(1.2) //1
Math.round(1.6) //2Math.sin()
Calculates the sin of an angle expressed in radiants
Math.sin(0) //0
Math.sin(Math.PI) //1.2246467991473532e-16)Math.sqrt()
Return the square root of the argument
Math.sqrt(4) //2
Math.sqrt(16) //4
Math.sqrt(5) //2.23606797749979Math.tan()
Calculates the tangent of an angle expressed in radiants
Math.tan(0) //0
Math.tan(Math.PI) //-1.2246467991473532e-16ES Modules
ES Modules is the ECMAScript standard for working with modules. While Node.js has been using the CommonJS standard for a long time, the browser never had a module system. Every major decision such as a module system must be first standardized by ECMAScript and then implemented by the browser.
This standardization process completed with ES6 and browsers started implementing this standard trying to keep everything well aligned, working all in the same way, and now ES Modules are supported in Chrome, Safari, Edge and Firefox (since version 60).
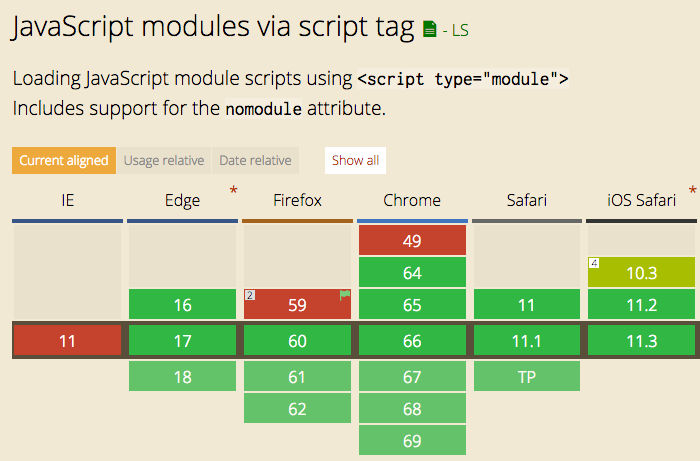
Modules are very cool, because they let you encapsulate all sorts of functionality, and expose this functionality to other JavaScript files as libraries.
The ES Modules Syntax
The syntax to import a module is:
import package from 'module-name'while CommonJS uses
const package = require('module-name')A module is a JavaScript file that exports one or more value (objects, functions or variables), using the export keyword. For example, this module exports a function that returns a string uppercase:
uppercase.js
export default str => str.toUpperCase()In this example, the module defines a single, default export, so it can be an anonymous function. Otherwise it would need a name to distinguish it from other exports.
Now, any other JavaScript module can import the functionality offered by uppercase.js by importing it.
An HTML page can add a module by using a <script> tag with the special type="module" attribute:
<script type="module" src="index.js"></script>Note: this module import behaves like a
deferscript load. See efficiently load JavaScript with defer and async
It’s important to note that any script loaded with type="module" is loaded in strict mode.
In this example, the uppercase.js module defines a default export, so when we import it, we can assign it a name we prefer:
import toUpperCase from './uppercase.js'and we can use it:
toUpperCase('test') //'TEST'You can also use an absolute path for the module import, to reference modules defined on another domain:
import toUpperCase from 'https://flavio-es-modules-example.glitch.me/uppercase.js'This is also valid import syntax:
import { foo } from '/uppercase.js'
import { foo } from '../uppercase.js'This is not:
import { foo } from 'uppercase.js'
import { foo } from 'utils/uppercase.js'It’s either absolute, or has a ./ or / before the name.
Other import/export options
We saw this example above:
export default str => str.toUpperCase()This creates one default export. In a file however you can export more than one thing, by using this syntax:
const a = 1
const b = 2
const c = 3export { a, b, c }Another module can import all those exports using
import * from 'module'You can import just a few of those exports, using the destructuring assignment:
import { a } from 'module'
import { a, b } from 'module'You can rename any import, for convenience, using as:
import { a, b as two } from 'module'You can import the default export, and any non-default export by name, like in this common React import:
import React, { Component } from 'react'You can check an ES Modules example on https://glitch.com/edit/#!/flavio-es-modules-example?path=index.html
CORS
Modules are fetched using CORS. This means that if you reference scripts from other domains, they must have a valid CORS header that allows cross-site loading (like Access-Control-Allow-Origin: *)
What about browsers that do not support modules?
Use a combination of type="module" and nomodule:
<script type="module" src="module.js"></script>
<script nomodule src="fallback.js"></script>Conclusion
ES Modules are one of the biggest features introduced in modern browsers. They are part of ES6 but the road to implement them has been long.
We can now use them! But we must also remember that having more than a few modules is going to have a performance hit on our pages, as it’s one more step that the browser must perform at runtime.
Webpack is probably going to still be a huge player even if ES Modules land in the browser, but having such a feature directly built in the language is huge for a unification of how modules work in the client-side and on Node.js as well.
CommonJS
The CommonJS module specification is the standard used in Node.js for working with modules.
Client-side JavaScript that runs in the browser uses another standard, calledES Modules
They let you create clearly separate and reusable snippets of functionality, each testable on its own.
The huge npm ecosystem is built upon this CommonJS format.
The syntax to import a module is:
const package = require('module-name')In CommonJS, modules are loaded synchronously, and processed in the order the JavaScript runtime finds them. This system was born with server-side JavaScript in mind, and is not suitable for the client-side (this is why ES Modules were introduced).
A JavaScript file is a module when it exports one or more of the symbols it defines, being them variables, functions, objects:
uppercase.js
exports.uppercase = str => str.toUpperCase()Any JavaScript file can import and use this module:
const uppercaseModule = require('uppercase.js')
uppercaseModule.uppercase('test')A simple example can be found in this Glitch.
You can export more than one value:
exports.a = 1
exports.b = 2
exports.c = 3and import them individually using the destructuring assignment:
const { a, b, c } = require('./uppercase.js')or just export one value using:
//file.js
module.exports = valueand import it using
const value = require('./file.js')Glossary
To end with, a guide to a few terms used in frontend development that might be alien to you
Asynchronous
Code is asynchronous when you initiate something, forget about it, and when the result is ready you get it back without having to wait for it. The typical example is an AJAX call, which might take even seconds and in the meantime you complete other stuff, and when the response is ready, the callback function gets called. Promises and async/await are the modern way to handle async.
Block
In JavaScript a block is delimited curly braces ({}). An if statement contains a block, a for loop contains a block.
Block Scoping
With Function Scoping, any variable defined in a block is visible and accessible from inside the whole block, but not outside of it.
Callback
A callback is a function that’s invoked when something happens. A click event associated to an element has a callback function that’s invoked when the user clicks the element. A fetch request has a callback that’s called when the resource is downloaded.
Declarative
A declarative approach is when you tell the machine what you need to do, and you let it figure out the details. React is considered declarative, as you reason about abstractions rather than editing the DOM directly. Every high level programming language is more declarative than a low level programming language like Assembler. JavaScript is more declarative than C. HTML is declarative.
Fallback
A fallback is used to provide a good experience when a user hasn’t access to a particular functionality. For example a user that browses with JavaScript disabled should be able to have a fallback to a plain HTML version of the page. Or for a browser that has not implemented an API, you should have a fallback to avoid completely breaking the experience of the user.
Function Scoping
With Function Scoping, any variable defined in a function is visible and accessible from inside the whole function.
Immutability
A variable is immutable when its value cannot change after it’s created. A mutable variable can be changed. The same applies to objects and arrays.
Lexical Scoping
Lexical Scoping is a particular kind of scoping where variables of a parent function are made available to inner functions as well. The scope of an inner function also includes the scope of a parent function.
Polyfill
A polyfill is a way to provide new functionality available in modern JavaScript or a modern browser API to older browsers. A polyfill is a particular kind of shim.
Pure function
A function that has no side effects (does not modify external resources), and its output is only determined by the arguments. You could call this function 1M times, and given the same set of arguments, the output will always be the same.
Reassignment
JavaScript with var and let declaration allows you to reassign a variable indefinitely. With constdeclarations you effectively declare an immutable value for strings, integers, booleans, and an object that cannot be reassigned (but you can still modify it through its methods).
Scope
Scope is the set of variables that’s visible to a part of the program.
Scoping
Scoping is the set of rules that’s defined in a programming language to determine the value of a variable.
Shim
A shim is a little wrapper around a functionality, or API. It’s generally used to abstract something, pre-fill parameters or add a polyfill for browsers that do not support some functionality. You can consider it like a compatibility layer.
Side effect
A side effect is when a function interacts with some other function or object outside it. Interaction with the network or the file system, or with the UI, are all side effects.
State
State usually comes into play when talking about Components. A component can be stateful if it manages its own data, or stateless if it doesn’t.
Stateful
A stateful component, function or class manages its own state (data). It could store an array, a counter or anything else.
Stateless
A stateless component, function or class is also called dumb because it’s incapable of having its own data to make decisions, so its output or presentation is entirely based on its arguments. This implies that pure functions are stateless.
Strict mode
Strict mode is an ECMAScript 5.1 new feature, which causes the JavaScript runtime to catch more errors, but it helps you improve the JavaScript code by denying undeclared variables and other things that might cause overlooked issues like duplicated object properties and other subtle things. Hint: use it. The alternative is “sloppy mode” which is not a good thing even looking at the name we gave it.
Tree Shaking
Tree shaking means removing “dead code” from the bundle you ship to your users. If you add some code that you never use in your import statements, that’s not going to be sent to the users of your app, to reduce file size and loading time.
Thanks for reading!
Note: You can get a PDF, ePub, or Mobi version of this JavaScript Handbook for easier reference, or for reading on your Kindle or tablet.
Source: https://medium.freecodecamp.org/the-complete-javascript-handbook-f26b2c71719c
Written by
Flavio Copes
I write tutorials for developers at https://flaviocopes.com
freeCodeCamp.org
Stories worth reading about programming and technology from our open source community.