If you’re reading this, you probably already know the benefits of making an internationalized app, like expand your public, ux, etc. So let’s jump right into the tutorial.
Introduction
Localization in Flutter is like any other thing, a Widget. We’re going to use the package flutter_localizations that is based on Dart intl package and it supports until now about 24 languages.
This is the typical way of doing using the Dart intl package and a little bit convoluted, but it’s not the only way, stay tuned;).
1. Add localization dependencies
Start by adding this to the dependencies in your pubspec.yaml : ( You can create a new project or add to a existing one)
dependencies: flutter: sdk: flutter flutter_localizations:# add thissdk: flutter# add this
# other lines
dev_dependencies:
  intl_translation: ^0.17.1
The first one says our package needs the localization Flutter package to run, and the second give us the tools to generate dart code with the messages from .arbfiles.
2. The app Localization class
The common way of doing this is creating a class that have all the localization helpers to using in the whole app, like an AppLocalizations that would be very similar from app to app, except by the string resources. Below the example:
import 'dart:async';

import 'package:flutter/material.dart';
import 'package:intl/intl.dart';

import 'l10n/messages_all.dart';

class AppLocalizations {
  static Future<AppLocalizations> load(Locale locale) {
    final String name =
        locale.countryCode == null ? locale.languageCode : locale.toString();
    final String localeName = Intl.canonicalizedLocale(name);

    return initializeMessages(localeName).then((bool _) {
      Intl.defaultLocale = localeName;
      return new AppLocalizations();
    });
  }

  static AppLocalizations of(BuildContext context) {
    return Localizations.of<AppLocalizations>(context, AppLocalizations);
  }

  String get title {
    return Intl.message('Hello world App',
        name: 'title', desc: 'The application title');
  }

  String get hello {
    return Intl.message('Hello', name: 'hello');
  }
}

class AppLocalizationsDelegate extends LocalizationsDelegate<AppLocalizations> {
  const AppLocalizationsDelegate();

  @override
  bool isSupported(Locale locale) {
    return ['en', 'es', 'pt'].contains(locale.languageCode);
  }

  @override
  Future<AppLocalizations> load(Locale locale) {
    return AppLocalizations.load(locale);
  }

  @override
  bool shouldReload(LocalizationsDelegate<AppLocalizations> old) {
    return false;
  }
}
This AppLocalizations class will have four main pieces:
loadfunction will load the string resources from the desired Locale as you can see in the parameter.offunction will be a helper like any other InheritedWidget to facilitate the access to any string from any part of the app code.get’s functions that will list the available resources translated to our app, note theIntl.messagewrapper in the return, that will make the intl tool lookup this class and populate theinitializeMessagesfor us with the translated ones.initializeMessagesthis method will be generated by the intl tool, note the import"l10n/messages_all.dart", this file contains the method that effectively load the translated messages.
Below the AppLocalizations there’s another class AppLocalizationsDelegate. This is the true Localization class from our app, AppLocalizations is used to encapsulates the resources and AppLocalizationsDelegate to provide this resources to our app. It can be divided in three main pieces:
load, from the docs: the load method must method return an object that contains a collection of related resources (typically defined with one method per resource). We return ourAppLocalizations.load.isSupported, as the name suggests, yes, it returnstrueif the app has support for the receivedlocale.shouldReload, basically, if this method returnstruethen all the app widgets will be rebuilt after theloadof resources.
So summarizing, our AppLocalizations class is the object expected by the delegate and contains the resources in the get’s.
3. The .arb file
The final step is to create the string translations. The translations are made using Application Resource Bundle files, which have a .arb extension. This format is also supported by the Google Translators Toolkit. Each .arb file contains a single JSON table that maps from resource IDs to localized values.
To start, we run this dart intl tool command to generate an arb template.
flutter pub pub run intl_translation:extract_to_arb --output-dir=lib/l10n lib/localizations.dartNote 1: The
output-dirmust exist before running the command.
Note 2: The last parameter is the file that contains theIntl.message‘s
This command will generate a file called intl_messages.arb file into lib/i10n and this file serves as a template for the English, we have to create the desired translations based on this file:

intl_en.arb:
{
   "@@last_modified": "2018-05-25T11:50:40.743319",
   "title": "Hello world App",
   "@title": {
     "description": "The application title",
     "type": "text",
     "placeholders": {}
   },
   "hello": "Hello",
   "@hello": {
     "type": "text",
     "placeholders": {}
   }
 }
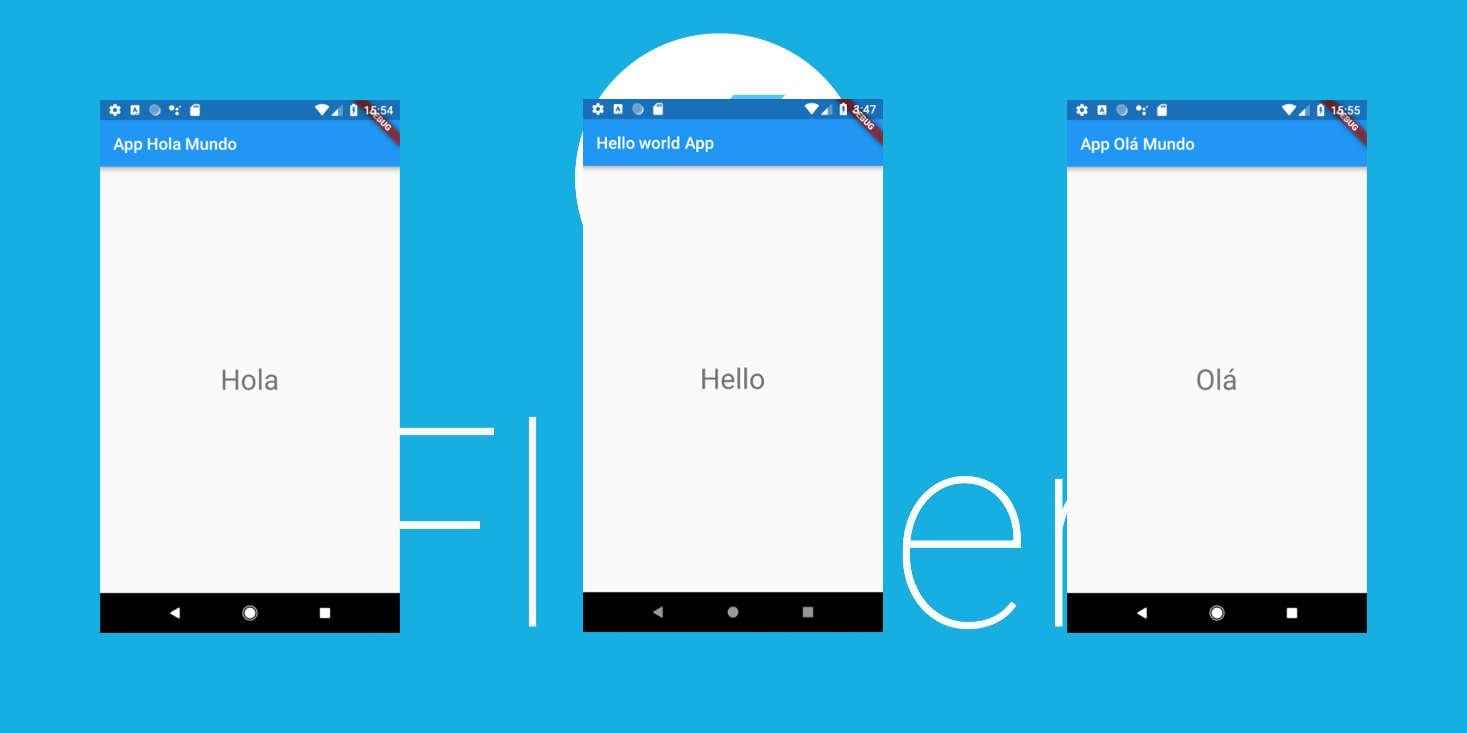
intl_pt.arb:
{
   "@@last_modified": "2018-05-25T11:50:40.743319",
   "title": "App Olá Mundo",
   "@title": {
     "description": "The application title",
     "type": "text",
     "placeholders": {}
   },
   "hello": "Olá",
   "@hello": {
     "type": "text",
     "placeholders": {}
   }
}
intl_es.arb:
{
   "@@last_modified": "2018-05-25T11:50:40.743319",
   "title": "App Hola Mundo",
   "@title": {
     "description": "The application title",
     "type": "text",
     "placeholders": {}
   },
   "hello": "Hola",
   "@hello": {
     "type": "text",
     "placeholders": {}
   }
}
Yes, you just copy the base intl_messages.arb and translate the resources.
With the translations ready, we are going to link the initializeMessages as I said in the first step. This is made with the follow command:
flutter pub pub run intl_translation:generate_from_arb --output-dir=lib/l10n \
   --no-use-deferred-loading lib/localization.dart lib/l10n/intl_*.arb
You can see that all the necessary files were generate. The
AppLocalizationsclass uses the generatedinitializeMessages()function (defined inmessages_all.dart) to load the localized messages andIntl.message()to look them up. — (flutter.io)
Last Step
To finalize the localization, we have to say to our app to use the AppLocalizationsDelegate class as the app localization class.
import 'package:flutter/material.dart';
import 'package:flutter_localizations/flutter_localizations.dart';

import 'localizations.dart';

void main() => runApp(new MyApp());

class MyApp extends StatelessWidget {
  // This widget is the root of your application.
  @override
  Widget build(BuildContext context) {
    return new MaterialApp(
      localizationsDelegates: [
        AppLocalizationsDelegate(),
        GlobalMaterialLocalizations.delegate,
        GlobalWidgetsLocalizations.delegate
      ],
      supportedLocales: [Locale("en"), Locale("es"), Locale("pt")],
      onGenerateTitle: (BuildContext context) =>
          AppLocalizations.of(context).title,
      theme: new ThemeData(
        primarySwatch: Colors.blue,
      ),
      home: new MyHomePage(title: 'Flutter Demo Home Page'),
    );
  }
}

class MyHomePage extends StatelessWidget {
  MyHomePage({Key key, this.title}) : super(key: key);
  final String title;

  @override
  Widget build(BuildContext context) {
    return Scaffold(
      appBar: AppBar(
        title: Text(AppLocalizations.of(context).title),
      ),
      body: Center(
        child: Text(
          AppLocalizations.of(context).hello,
          style: Theme.of(context).textTheme.display1,
        ),
      ),
    );
  }
}
That’s made by localizationsDelegates and supportedLocales properties. You repeat the supportedLocales of your delegates and set the localizationDelegates array with the AppLocalizationsDelegate, plus the GlobalDelegates from flutter_localizations package.
The elements of the
localizationsDelegateslist are factories that produce collections of localized values.GlobalMaterialLocalizations.delegateprovides localized strings and other values for the Material Components library.GlobalWidgetsLocalizations.delegatedefines the default text direction, either left to right or right to left, for the widgets library. — flutter.io
Conclusion
That’s all for this tutorial, you can checkout the source code of the example at https://github.com/biessek/flutter_localization_example.
Personally, this localization method is a little bit complicated and also boring for who knows the android native system. But I think this will improve with time.
You can check this flutter IntelliJ plugin that makes a lot of the hand work for you and makes the process easier.
Also you can check the flutter.io tutorial on this.
Note: As mentioned by Gerry High in the comments, there is an open issue regarding a current localization problem on iOS.
Source: https://proandroiddev.com/flutter-localization-step-by-step-30f95d06018d
Written by
Alessandro Biessek
Android Developer and fan | Flutter enthusiast. https://twitter.com/ABiessek
ProAndroidDev
Professional Android Development: the latest posts from Android Professionals and Google Developer Experts.