
OK, so you know you want to build a website. You have an idea how it should look like and what content it should display. You are sure that it should be fast, eye-pleasing, gain a lot of traction, and attract many visitors. But how do you create that? What are the trends around building websites these days? How are others building successful websites and where should YOU start? Let’s give you a head start!
Before you get going, it is important to understand what are you building. The approach is different for a large corporate website than for a website for your parents’ business or your dog’s blog. First, think about what you want to achieve with the website.
Throughout this series of articles I will follow all the steps with you, so let me start with the first one.
I will be building my personal website. I have never had a personal website before as I never needed to present myself to the outside world. But nowadays I believe it will be nice to have a single place where I could aggregate all my blogs (or links) and other information. It will also make it easy for everyone to get in touch with me. So you can see what my goals are:
- Nicely looking website to represent myself
- List all my blogs and other information
- Enable easy contact
Your goals could be very similar, but could also include things like ‘amount of visitors’ or ‘conversion ratio’. Note these so you can later look back to see how successful your website is.
Start with the website structure
Before we dive into comparing all the available technologies and try to pick those that fit our scenario the best, let’s start with the looks. I am starting with my website on a green field. That means I do have an idea of what I want, but do not have any content yet nor do I have any graphic templates prepared.
Prepare content
First, it is important to have at least basic idea of what you want to present through your website. When you start with defining content, you start visualizing how the website structure is going to look like. That is the key to good design. Let’s see what content I want to present on my site:
- Few paragraphs of text about me
- List of my latest blog posts
- List of my latest tweets (optionally)
Website design
Next, you will need to decide on design of the website.
You can either get in touch with a local graphics designer studio and have them create the website design that would fit your desires and goals, or you can look for a template online. If you set goals that include conversion ratio or other significant aspects of user experience directly related to website design, you are better off with a graphics designer. They can prepare a specific design for you based on your requirements and goals.
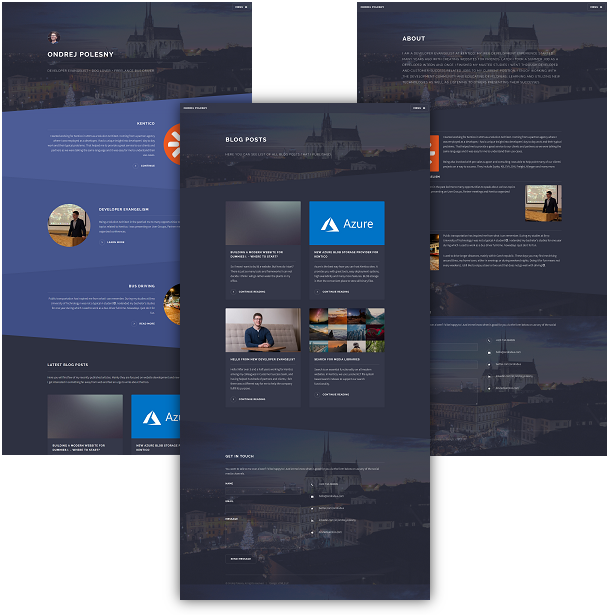
I, on the other hand, am building a simple profile website. It should look modern and attractive, sure, but it does not need to generate any revenue. So I can base this website design decision on my personal feeling. Therefore, I went to HTML5UP.net and opened up a few design templates. All those designs are responsive, cool, and are easy to adjust. After reviewing several options, I picked the Solid State template. Take your time and pick one that gives you goosebumps :-).
Note that when you know the list of content before you start looking at templates, it helps you eliminate a lot of templates that do not fit your goals like personal card or photo gallery templates.
Visitor’s journey through your website
Having picked a website design is an exciting step in building your website as you finally know how is your masterpiece going to look like! But before we go any further, it is a very good idea to put together the content you specified earlier with the design template. All templates usually contain lists of usable elements, like grids, tables, paragraphs, side boxes, etc. These elements together with your content form your website.
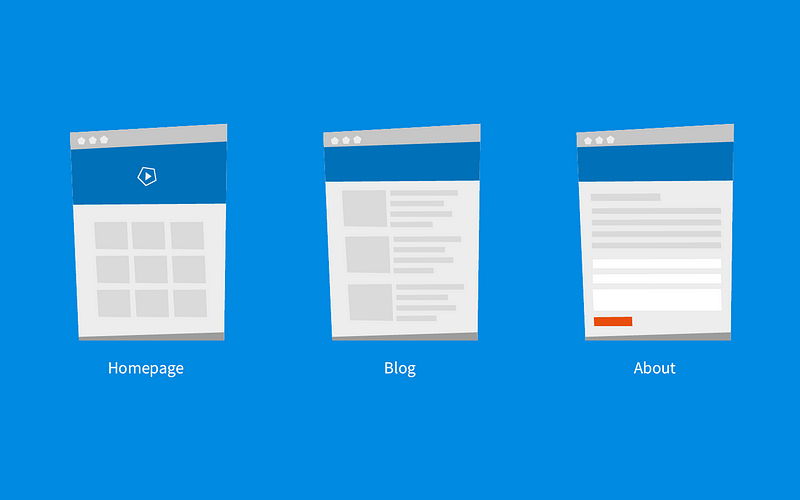
I decided to have 3 simple pages. In your case, you may also end up with a single page website.
- Homepage — main landing page that will contain a brief intro about me, a few of my recent articles and a contact form in the footer
- About — page with my ‘full’ life story
- Blog — list of all my published blog posts
This lets me prepare the HTML templates into their final form. Over time, I have learned that spending more time here and pinning down all my pages and their expected content saves a lot of time during the actual implementation.
Have you downloaded an HTML website template? Then go ahead and get your templates ready!
Website technology
Now, we have prepared the structure of our new websites and adjusted the chosen HTML template into multiple pages. Great job! That gives us a pretty good idea about both the content and design of the website. If you asked me 15 years ago, I would have told you that I consider myself finished at this stage and I would proceed to deployment. I did not know any programming language back then. So when I added a new page to the website, I had to change all my other pages to reference it. Sounds like a lot of manual work, right? Well, it was. But I was too afraid to learn and had no idea where to start. Every tutorial just seemed too long and complicated.
Fortunately, that time is long gone. It is so easy to make your website dynamic these days! So let me show you what are your options and let’s pick one of them together.
1. Custom logic
A Custom logic approach means you need to implement the whole logic yourself. First, you would need to install a web server (like Apache or IIS) on your computer. You would need to pick a programming language, like PHP, and install it on the server — your computer — as well. And finally comes the database, like MySQL with its runtime connector. Of course, all these steps can be automated using one of the prepared packages that install all of that automatically, like XAMPP or WAMP.
In the past, I always preferred this approach. The language (in my case PHP) was simple, at least the basics, and I liked owning all code (I consider that a bad thing now when I look at my implementations from that time :-)). However, the initial setup takes a lot of time and you will need to implement everything on your own. There are frameworks (like Nette) that can help you with that, but you still need to learn the language and the framework on top of that. When you want to upload a website built like this, you need all those components (webserver, runtime, database) to be provided by your hosting partner.
2. All-in-one solution
But you are not the only one who is creating a website, right? There must be many others doing the same thing. Yes, there are. And to speed it all up, you can use Content Management System (CMS). Generally, they run on the same stack of technologies as I described above, so you still need to install those prerequisites on your computer and you still need the same hosting space. They are for example WordPress, Drupal, and others, which run on PHP and MySQL, or Kentico EMS running on .NET framework.
When you install them, you are presented with an administration interface for your (blank) website. Using this interface, you can either pick a template for your site or enrich your templates with dynamic functionalities.
While this certainly gets you up and running quickly, these systems usually limit you in various ways, like how the output HTML will look like, how components are built and which technologies you can use. You also need to learn how to work with the system itself.
3. Microservice architecture
While the two mentioned approaches are robust and sort of a standard in the industry, that sometimes works against them. Look at the technology stack you need to install on your machine before you can write a single code-block. Them being robust also means that your hosting space needs to be equipped with appropriate amount of power to cope with all the supporting libraries and tools that ensure the functionality. And with standard CMS systems, you usually do not even use the majority of their functionalities (for which you may also pay a lot of money).

Microservice architecture helps with these inconveniences. It is a nice way how to enjoy more time with beer in your hand rather than spend your nights debugging someone else’s code (if you want to hear about many of my sleepless nights debugging Prestashop, let me know). So how does this work?
Let’s take a look how we all do our shopping. When I go out for groceries — ehm, so when my girlfriend goes for groceries on her way home, she used to end up in a big supermarket just near where we live. She always spent so much time there and bought a lot of things she did not really need just because they were sort of on her way. After getting her cart filled up, she spent another quarter of an hour at the cashier’s desk and with both her hands full steered home.
Just a few months ago, there was a fire and the market had to be closed for about two weeks. That posed a problem for us as we were used to their products and offers and even though other markets were not that far away, we felt uncomfortable going elsewhere.
These days we do it differently. We still shop in the big market for some things, but the rest we get in the city on our way home. We get fruits and vegetables from a farmers’ market, meat from local butcher and we buy toiletries and dog food online. We found out this gives us better control over quality and availability — if any supplier fails to deliver, we can easily switch to another one.
Microservice architecture is very similar. Instead of using one big system or program (like a traditional CMS) to do it all, you can connect multiple systems that rather than do everything just focus on one specific problem.
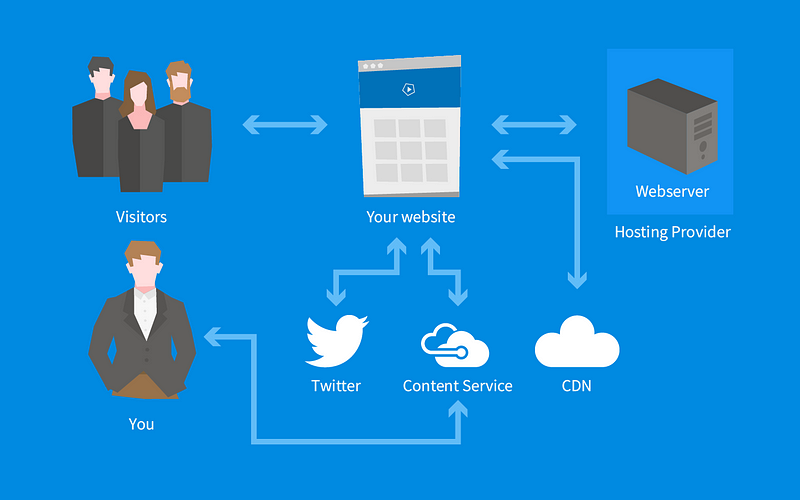
In my case it looks like the picture above. My website is the center of all systems. I am still going to use my hosting provider to serve static files of my website except images. Images and content is provided by a Content service (API first content hub like Kentico Cloud) in the middle. A list of my last blog posts can be compiled either by data from the Content service or by getting my latest tweets via the Twitter service. Last, but not least, are front-end resources that are available via Content Delivery Network. But we will get to those later.
You see, the functionality is no longer one huge piece of code. It is nicely separated into smaller blocks. That means it will be:
- easy, quick and fun to put them all together
- easy to debug possible issues
- cost-effective as the services often offer free plans
If any service provider fails to deliver results, it is no problem to switch to another one. Well, except for Twitter :-).
Do you remember what was it like when you needed to change something in a huge piece of code you haven’t touched for a year? We’ve all been there. With microservices you can quickly find a cause of any issue and fix it instantly.
Choosing the right architecture
I often get questions from developers asking about which approach to use. Well, there is no ultimate recipe, it always depends on each project and its requirements. My website is a great fit for a microservice architecture, because:
- I don’t want to spend a lot of time setting up local and remote environment for such a small site
- There is not much custom functionality
- There is no budget, I need to be as cost-effective as possible (no license, no superior hardware, etc.)
- I want to have fun building it
Do you find yourself somehow aligned with these points? Then microservice architecture is the right choice for you too.
Stay tuned, in the next article I will show you how to power up your prepared HTML templates, compare JavaScript frameworks and explain the best way to continue building microservice-based website even if you have zero previous experience.
Other articles in the series:
- How to start creating an impressive website for the first time
- How to decide on the best technology for your website?
- How to power up your website with Vue.js and minimal effort
- How to Mix Headless CMS with a Vue.js Website and Pay Zero
- How to Make Form Submissions Secure on an API Website
- Building a super-fast and secure website with a CMS is no big deal. Or is it?
Written by
Ondřej Polesný
Web development enthusiast with passion for anything new and intriguing. Developer Evangelist, Solution Architect, Developer. Tell me what are your struggles.
freeCodeCamp.org
Stories worth reading about programming and technology from our open source community.