Learn how to develop your own realtime applications using Dart libraries and Bulma CSS
Real-time experience rule the web today. When done correctly, this results in responsive and fluid interfaces that contribute to a good user experience.
In this three-part series, we will implement real-time functionality by building the obligatory chat app. We will be working with various libraries that come with the Dart SDK to achieve this and the Bulma CSS Framework for the UI styles.
At the end of this part, we will have the first UI view of our chat app fleshed out. Any user that visits the app will have to enter their name in a sign in view before proceeding to the chatroom.
The diagram below details the full flow:
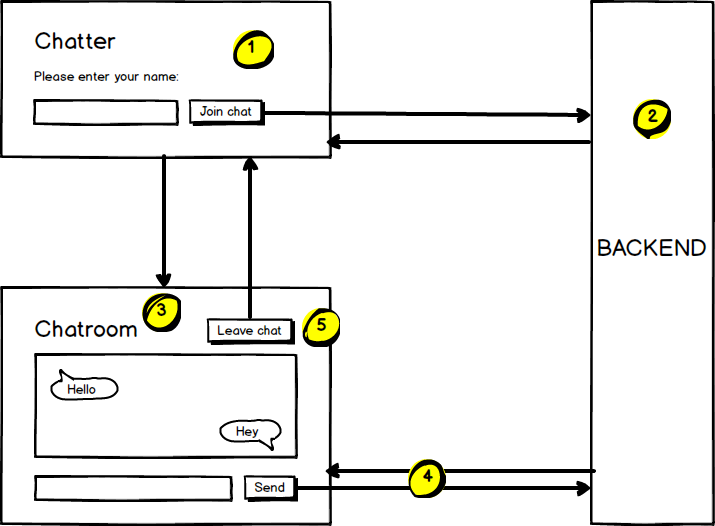
The chat flow goes like this:
- Visitor enters their name and clicks the Join chat button. This sends the username via
POSTrequest to our backend. - The backend receives and checks for the username, returning a
200 OKresponse if valid, else a400 Bad Requestis returned. - On
200 OKthe screen will be swapped to the Chatroom. - From here will be a WebSocket connection listening for messages sent from the input field and broadcasted to other users on the chat.
- Clicking the Leave chat button will close the WebSocket connection and return to the username sign in screen.
So let’s begin shall we?
1. Set up your project
Install the Stagehand package and create a web project
$ pub global activate stagehand
And create a web project:
$ mkdir chat_app && cd chat_app
$ stagehand web-simple
$ pub get
Install the webdev tool to spin up our server for local development:
$ pub global activate webdev
$ webdev serve --live-reload # live reload works in Chrome
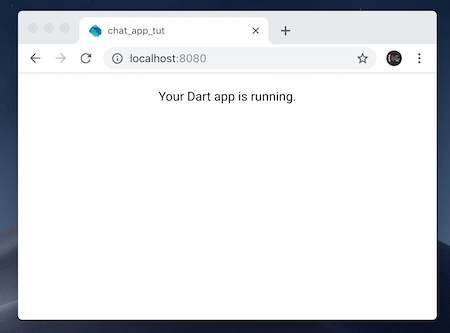
Visiting http://localhost:8080 will show you this screen:
2. Mark up our HTML page
We will use the UI style classes from Bulma to construct our screens.
In web/index.html, add the link tags below in the <head> before <link rel="stylesheet" href="styles.css"> to import the latest minified styles and the Font Awesome icon font dependency:
<link rel="stylesheet" href="https://cdnjs.cloudflare.com/ajax/libs/bulma/0.7.1/css/bulma.min.css" integrity="sha256-zIG416V1ynj3Wgju/scU80KAEWOsO5rRLfVyRDuOv7Q=" crossorigin="anonymous" />
<link rel="stylesheet" href="https://use.fontawesome.com/releases/v5.3.1/css/all.css" integrity="sha384-mzrmE5qonljUremFsqc01SB46JvROS7bZs3IO2EmfFsd15uHvIt+Y8vEf7N7fWAU" crossorigin="anonymous" />
In web/styles.css , replace the file content with the below:
html,
body {
  background-color: #f5f5f5;
}
In web/index.html, replace <div id="output"></div> with the markup for our screens:
<section class="section">
  <div class="container">

    <div id="ChatSignin">
      <h1 class="title">Chatter ?</h1>
      <div class="columns">
        <div class="column is-6">
          <div class="field">
            <label class="label">Please enter your name</label>
            <div class="control is-expanded has-icons-left">
              <input class="input is-medium" type="text" placeholder="Enter your name and hit ENTER" />
              <span class="icon is-medium is-left">
                <i class="fas fa-user"></i>
              </span>
            </div>
            <p class="help is-danger"></p>
          </div>
          <div class="field">
            <div class="control">
              <button class="button is-medium is-primary">
                Join chat
              </button>
            </div>
          </div>
        </div>
      </div>
    </div>

    <div id="ChatRoom" hidden>
      <h1 class="title">Success!</h1>
    </div>

  </div>
</section>
This contains the views for the Sign in and Chatroom screens, seen in the <div id="ChatSignin">...</div> and <div id="ChatRoom>...</div>. The #Chatroom has a hidden attribute which hides it till we remove this later when the username is validated.
To prevent errors remove the implementation from the main() function inside web/main.dart:
void main() {
  // delete the line below
  // querySelector('#output').text = 'Your Dart app is running.';
}
We should now see the output below:
3. Implement browser logic for sign in flow
Let’s add the logic to receive our username and send to the backend.
In web/main.dart, we will start with the content below:
import 'dart:html';

void main() {
  // Selectors
  var chatSigninBox = querySelector('#ChatSignin');
  var chatRoomBox = querySelector('#ChatRoom');
  var validationBox = chatSigninBox.querySelector('p.help');
  InputElement nameField = chatSigninBox.querySelector('input[type="text"]');
  ButtonElement submitBtn = chatSigninBox.querySelector('button');

  // Event listeners
  nameField.addEventListener('input', (evt) {
    // TODO: Run field validation
  });

  submitBtn.addEventListener('click', (evt) async { // using async/await ;)
    // TODO: Run name field validation
    // TODO: Submit name field to backend
    // TODO: Handle success response
    // TODO: Handle failure responses
  });
}
The snippet begins with our dart:html import, which allows access to the window and document objects, including their methods.
In the above snippet, we are using the querySelector() top-level function to select our DOM elements and listen for various events on them.
An advice I’d give on defining selectors…
Specify the type whenever possible! In other words, instead of using the var keyword, state the type of object the identifier is, so:
InputField nameField = chatSigninBox.querySelector('input[type="text"]');
This is because the querySelector() method returns an object of type Element, which means that specific properties on particular DOM elements are not visible to the Dart analyser(that’s expected), like value on nameFieldas it won’t exist under Element. Having InputElement as a subtype allows the analyser to find the value property and prevents an error from being thrown when you try to access value under Element:
// Bad
var nameField = chatSigninBox.querySelector('input[type="text"]');
print(nameField.value); // Analyser will throw an error

// Good
InputElement nameField = chatSigninBox.querySelector('input[type="text"]');
print(nameField.value); // Analyser sees value prop in `InputElement`
Great! Moving on…
Let’s implement the event listener for the username field:
nameField.addEventListener('input', (evt) {
  if (nameField.value.trim().isNotEmpty) {
    nameField.classes
      ..removeWhere((className) => className == 'is-danger')
      ..add('is-success');
    validationBox.text = '';
  } else {
    nameField.classes
      ..removeWhere((className) => className == 'is-success')
      ..add('is-danger');
  }
});
This will validate the field and add the appropriate classes for success and failure states. These class names(is-success and is-danger) are provided by Bulma.
Let’s implement the event listener for the submit button:
submitBtn.addEventListener('click', (evt) async {
// 1. Validate name field
  if (nameField.value.trim().isEmpty) {
    nameField.classes.add('is-danger');
    validationBox.text = 'Please enter your name';
    return;
  }

  submitBtn.disabled = true;

  try {
// 2. Submit name to backend via POST
    var response = await HttpRequest.postFormData(
      'http://localhost:9780/signin', // TODO: Endpoint to be created in next step
      {
        'username': nameField.value,
      },
    );

// 3. Handle success response and switch view
    chatSigninBox.hidden = true;
    chatRoomBox.hidden = false;
  } catch (e) {
// 4. Handle failure response
    submitBtn
      ..disabled = false
      ..text = 'Failed to join chat. Try again?';
  }
});
Here’s what’s happening once the Join chat button is clicked:
- We check the username field for a valid entry. If not valid, we display an error message and stop executing any further. If valid, then we move to step 2.
- We send the form data to the endpoint at
http://localhost:9780/signin - On successful response, we will hide the chat sign in UI and reveal the chatroom UI
- If the backend returns an error, we will replace the text of the Join chatbutton, and encourage the user to try again
Here’s what you should now have:

Submitting the username displays the failure message, since we have not implemented the backend yet.
4. Implement logic for the backend
We now need the backend to receive our request containing the username.
Create a bin/server.dart file and create a server:
import 'dart:io';
import 'dart:convert';

main() async {
  // TODO: Get port from environment variable
  var port = 9780;
  var server = await HttpServer.bind(InternetAddress.loopbackIPv4, port);

  print('Server listening on port $port');

await for (HttpRequest request in server) {
    // TODO: Handle requests
  }
}
Learn more on writing HTTP servers and handling POST requests in Dart.
Replace the // TODO: Handle requests line with the below:
// TODO: Only needed in local development. Will be removed in future
request.response.headers.add('Access-Control-Allow-Origin', 'http://localhost:8080');

switch (request.uri.path) {
case '/signin':
    String payload = await request.transform(Utf8Decoder()).join();
    var username = Uri.splitQueryString(payload)['username'];

    if (username != null && username.isNotEmpty) {
      // TODO: Check username is unique
request.response
        ..write(username)
        ..close();
    } else {
      request.response
        ..statusCode = 400
        ..write('Please provide a valid user name')
        ..close();
    }
    break;
  case '/ws':
    // TODO: Upgrade request to WebSocket connection
    break;
  default:
    // TODO: Forward to static file server
}
The snippet begins with a CORS header allowing connections from our webdev server. This will only be needed for local development. When building for production, we will refactor this line.
Then we have a switch statement to execute logic based on the path of the request. The relevant area right now is the case for /signin. It validates the username and sends the right response.
Run this file with the command below:
$ dart bin/server.dart
Server listening on port 9780 # You should see this message
Return to http://localhost:8080 and try again:
Conclusion
And this concludes Part 1 of the series. As always, I hope this was insightful and you learnt something new today. And the working solution is here.
One thing before you go…Subscribe to my Youtube channel for the latest videos on Dart. Thanks!
Like, share and follow me ? for more content on Dart.
P.S. Here’s Part 2 of the series.
Further reading
Source: https://codeburst.io/build-a-chat-application-in-dart-2-part-1-567eacdcf0c8
Written by
Jermaine Oppong
Christian | Web Developer | Director at Creative Bracket | Egghead.io instructor | @creativ_bracket on Twitter
codeburst
Bursts of code to power through your day. Web Development articles, tutorials, and news.