Learn how to develop a real-time chatroom using Dart libraries and Bulma CSS
In Part 1 we constructed the UI for our Chat sign in screen and wrote a basic flow to transition to the Chatroom UI once the username is successfully validated.
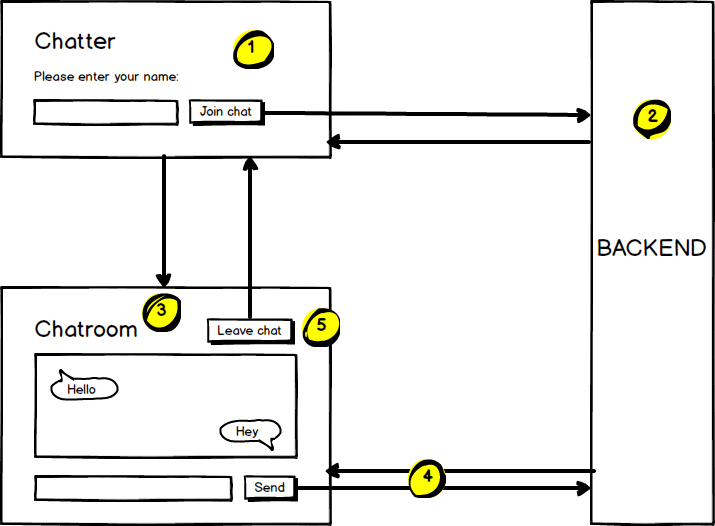
In this part, we will refactor our working solution and implement a basic router to handle transitioning between views. Here’s the diagram again of the chat flow:
We have a bit to uncover, so without further ado let’s begin!
1. Encapsulate logic for sign in UI
Currently we have our application logic inside web/main.dart, which will be a maintenance nightmare should we continue to build on that logic! So we are going to manage the logic for each screen in a View class.
Create the directory below inside the web folder with the listed files:
views/
  chat_room.dart
  chat_signin.dart
  view.dart
Now in view.dart, create an interface which will be used as a blueprint for our View classes:
abstract class View {
  void onEnter(); // Run this when the view is loaded in
  void onExit();  // Run this when we exit the view
  void prepare(); // Prepare the view template, register event handlers etc...
  void render();  // Render the view on the screen
}
At this point some of you may be wondering why we are using abstract class instead of the interface keyword? Answer: The Dart team made it so! The rationale here is that classes are implicit interfaces so to simplify things they stuck with abstract classes. This means that we can either extend or implement an abstract class.
Let’s use this interface to implement our view inside chat_signin.dart:
// Absolute imports
import 'dart:html';

// Relative imports
import './view.dart';

class ChatSigninView implements View {
  ChatSigninView() : _contents = DocumentFragment() {
    onEnter();
  }

  /// Properties
  DocumentFragment _contents;
  DivElement chatSigninBox;
  ParagraphElement validationBox;
  InputElement nameField;
  ButtonElement submitBtn;
  HttpRequest _response;

@override
  void onEnter() {
    prepare();
    render();
  }

@override
  void onExit() {}

@override
  void prepare() {}

@override
  void render() {}
}
Before the constructor body is run, we initiate _contents with a new DocumentFragment. We will populate it with with our template and define our event handlers before inserting into the page.
Let’s implement the prepare() method to use _contents:
@override
void prepare() {
_contents.innerHtml = '''
  <div id="ChatSignin">
      <h1 class="title">Chatter ?</h1>
      <div class="columns">
        <div class="column is-6">
          <div class="field">
            <label class="label">Please enter your name</label>
            <div class="control is-expanded has-icons-left">
              <input class="input is-medium" type="text" placeholder="Enter your name and hit ENTER" />
              <span class="icon is-medium is-left">
                <i class="fas fa-user"></i>
              </span>
            </div>
            <p class="help is-danger"></p>
          </div>
          <div class="field">
            <div class="control">
              <button class="button is-medium is-primary">
                Join chat
              </button>
            </div>
          </div>
        </div>
      </div>
    </div>
    ''';

  chatSigninBox = _contents.querySelector('#ChatSignin');
  validationBox = chatSigninBox.querySelector('p.help');
  nameField = chatSigninBox.querySelector('input[type="text"]');
  submitBtn = chatSigninBox.querySelector('button');

_addEventListeners(); // TODO: Implement this method
}
And now to implement _addEventListeners() and its related methods:
class ChatSigninView implements View {
  ...
  ...
  void _addEventListeners() {
    // Event listeners on form controls
    nameField.addEventListener('input', _inputHandler);
    submitBtn.addEventListener('click', _clickHandler);
  }

  void _inputHandler(evt) {
    if (nameField.value.trim().isNotEmpty) {
      nameField.classes
        ..removeWhere((className) => className == 'is-danger')
        ..add('is-success');
      validationBox.text = '';
    } else {
      nameField.classes
        ..removeWhere((className) => className == 'is-success')
        ..add('is-danger');
    }
  }

  void _clickHandler(evt) async {
    // Validate name field
    if (nameField.value.trim().isEmpty) {
      nameField.classes.add('is-danger');
      validationBox.text = 'Please enter your name';
      return;
    }

    submitBtn.disabled = true;

    // Submit name to backend via POST
    try {
      _response = await HttpRequest.postFormData(
        'http://localhost:9780/signin',
        {
          'username': nameField.value,
        },
      );

      // Handle success response and switch view
      onExit();
    } catch (e) {
      // Handle failure response
      submitBtn
        ..disabled = false
        ..text = 'Failed to join chat. Try again?';
    }
  }
}
Most of the logic above have been moved from web/main.dart from Part 1 of the series.
The _inputHandler() method is responsible for validating the input text field and adding the appropriate classes. The _clickHandler() method will validate and submit the form, POSTing to the endpoint at http://localhost:9780/signin . The result is assigned to the _responseinstance variable. We then call the onExit() method, which will pass the response data to the next view.
Let’s render the prepared document fragment to the screen:
@override
void render() {
  querySelector('#app')
    ..innerHtml = ''
    ..append(_contents);
}
And define our exit strategy:
@override
void onExit() {
  nameField.removeEventListener('input', _inputHandler);
  submitBtn.removeEventListener('click', _clickHandler);

  // Swap view to chat room
// TODO: Transition to Chat room screen
}
To see this view in the browser, update web/main.dart:
import './views/chat_signin.dart';

void main() {
ChatSigninView();
}
Change the <body> markup of web/index.html to this:
<section class="section">
<div class="container" id="app">
<!-- Views will be rendered here -->
</div>
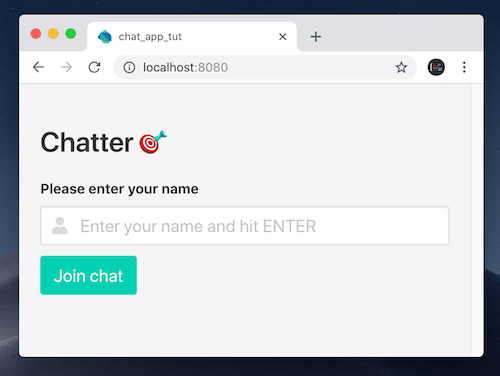
</section>Run the webdev server and visit http://localhost:8080:
webdev serve --live-reload
2. Encapsulate logic for Chat room UI
Define a ChatRoomView class inside web/views/chat_room.dart:
And now to implement _addEventListeners() and _removeEventListeners():
void _addEventListeners() {
  sendBtn.disabled = true;

  /// Event listeners
  messageField.addEventListener('input', _messageFieldInputHandler);
  sendBtn.addEventListener('click', _sendBtnClickHandler);
}

void _removeEventListeners() {
  messageField.removeEventListener('input', _messageFieldInputHandler);
  sendBtn.removeEventListener('click', _sendBtnClickHandler);
}

void _messageFieldInputHandler(e) {
  // Disable the send button if message input is empty
  sendBtn.disabled = messageField.value.isEmpty;
}

void _sendBtnClickHandler(e) {
  // TODO: Broadcast message to other chat users
  messageField.value = '';
}
Now that the logic for both views are encapsulated, we need to be able to transition between the two. Now you can do this easily by replacing the TODO: Transition to * screen with instantiating the class for the view you wish to launch, so ChatRoomView() or ChatSigninView().
I’m not too fond of that approach since it means importing one class into the other and vice versa. I would rather delegate this to a separate class to handle that concern.
That brings us to Step #3 below…
3. Implement a Router class
In web/router.dart define a Router class:
import './views/view.dart';

// Type definition to label a Function that returns a `View` type
typedef ViewInstantiateFn = View Function(Map data);

class Router {
Router() : _routes = [];

  List<Map<String, ViewInstantiateFn>> _routes;

register(String path, ViewInstantiateFn viewInstance) {
    // The key `path` is a computed property
    // It could also be written as {'$path': viewInstance}
    _routes.add({path: viewInstance});
  }

go(String path, {Map params = null}) {
    // Find the matching `Map` object in _routes
    // and invoke it's `View` object instance
    _routes.firstWhere(
      (Map<String, ViewInstantiateFn> route) => route.containsKey(path),
      orElse: () => null,
    )[path](params ?? {});
  }
}

Router router = Router();
The Router class contains a list of routes under the _routes instance variable. Each route is a Map containing a key name which is the path and the value of that key is a function that returns a View object. We’ve created a type definition called ViewInstantiateFn to represent the structure of that function.
To add a route we will call the register() method, passing it a path and a function to instantiate our View. To transition to the view we will call the go() method, passing it a path and a map of parameters to be consumed by the View.
Let’s use this class in web/main.dart :
import './router.dart';
import './views/chat_room.dart';
import './views/chat_signin.dart';

void main() {
router
    ..register('/', (_) => ChatSigninView())
    ..register('/chat-room', (params) => ChatRoomView(params))
    ..go('/'); // Loads the chat sign in screen
}
Go to web/views/chat_signin.dart and replace // TODO: Transition to Chat room screen with a call to router.go():
import '../router.dart'; // <-- Remember to import this
..
..

  @override
  void onExit() {
    nameField.removeEventListener('input', _inputHandler);
    submitBtn.removeEventListener('click', _clickHandler);

    // Swap view to chat room
router.go('/chat-room', params: {'username': _response.responseText}); // <-- Added this line
  }
Go to web/views/chat_room.dart and replace // TODO: Transition to chat sign in screen in onExit() method:
import '../router.dart'; // <-- Remember to import this
..
..

  @override
  void onExit() {
    _removeEventListeners();

router.go('/'); // <-- Added this line
  }
Now run the backend server in a separate terminal:
dart bin/server.dart
Add this css rule in web/styles.css to make the chat room message log bigger:
#ChatRoomLog {
  height: 300px;
  overflow-y: scroll;
}
Conclusion
And this concludes Part 2 of the series. In Part 3, we will implement the chat conversation logic and complete this series.
As always, I hope this was insightful and you learnt something new today. And the working solution is here.
One thing before you go…Subscribe to my Youtube channel for the latest videos on Dart. Thanks!
Like, share and follow me ? for more content on Dart.
Further reading
Source: https://codeburst.io/build-a-chat-application-in-dart-part-2-d43a4d450487
Written by
Jermaine Oppong
Christian | Web Developer | Director at Creative Bracket | Egghead.io instructor | @creativ_bracket on Twitter
codeburst
Bursts of code to power through your day. Web Development articles, tutorials, and news.