
Implementing forms on a Vue.js website? Having a readonly website is a piece of cake. Easy to develop using headless CMS, easy to maintain, and zero worries about security. But, what if you want to have a contact form on your site? Where are you going to store the form submissions? How are you going to protect it from bots and other forms of misuse?
When we start talking about forms and processing data that people submit, we need to handle three important parts:
- Form definition
Which fields do we want to display and in which order - Form submissions storage
Where are we going to store data of submitted forms - Form security
How are we going to protect the form from robots and evil people
When collecting data from website visitors, you may be required to comply with GDPR. If that is the case, make sure to collect visitors’ consent for processing the data and store the data in GDPR compliant service.
In this article I will be showing all the steps on my personal site like in the previous articles.
Form definition
When you decide you want to have a form — method of user input — on your website, you probably have an idea what kind of data you want to get from website visitors. In most cases it is a simple contact form. It is beneficial to make a list of the fields you want to collect data for. In my case, that list looks like this:
- Name
- Message
I don’t want to overwhelm visitors with too many fields, as that reduces the probability of them actually submitting the message. Therefore the form is very simple, but all fields are required.

Form submissions storage
Alright, the form is defined, contains all fields, but what is the action URL? What is the target of the form?
This is where the fun starts! We will use an external service to store all data from submitted forms. So far we’ve used headless CMS Kentico Cloud as an external service to feed our websites with content. However, headless CMS is not designed to store form submissions. Its purpose is to maintain content and deliver it to various channels, in our case a website. Form submissions always contain private data that will never end up being published on the site.
Therefore we need to pick a service that is designed for this task. I’ve stumbled upon few services that do just that:
If you do more research, you are likely to find others. I chose Form.io for one particular reason — it’s free for 1000 submissions per month.
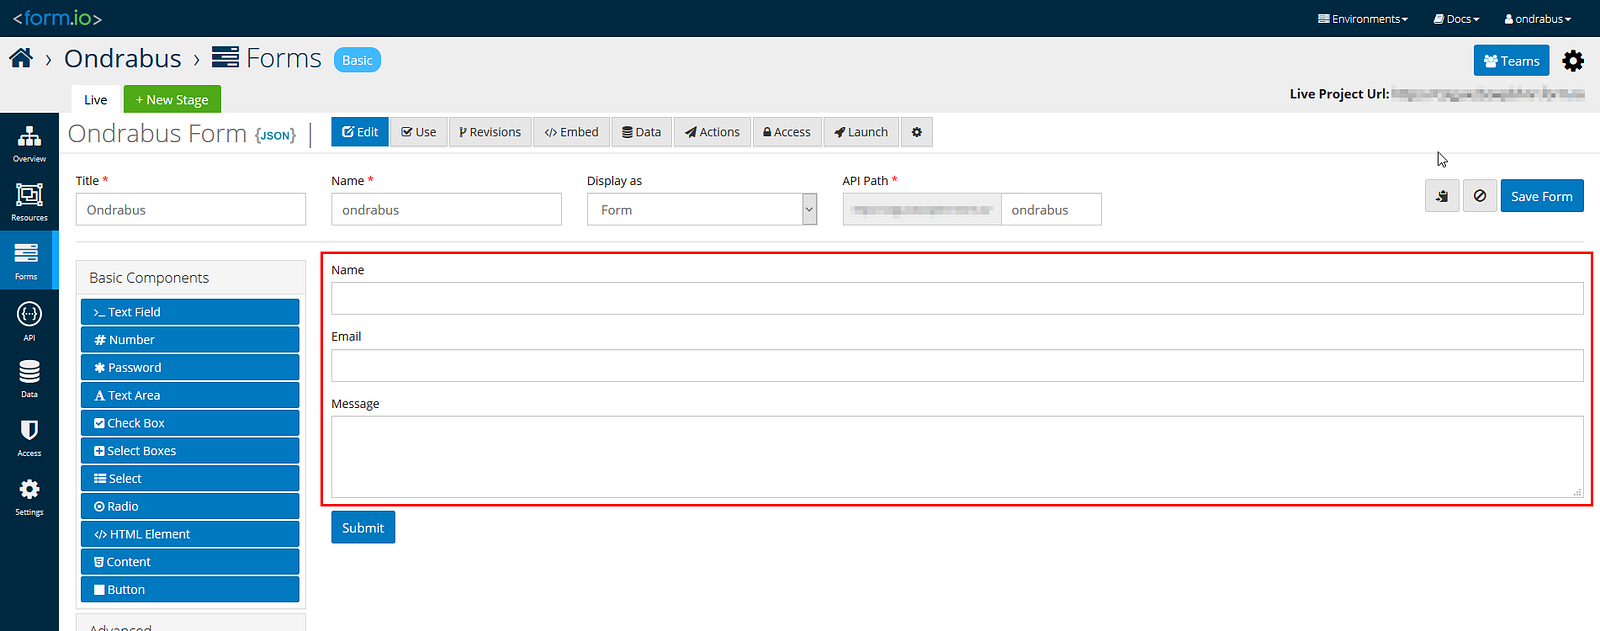
After a quick registration the administration interface let’s you create form definitions. This defines fields to store data from submissions. In my case I just followed the list I composed earlier and defined fields for name, email and message.
To make the whole process of submitting data to this form easy, switch to Access tab and enable Anonymous access via API.
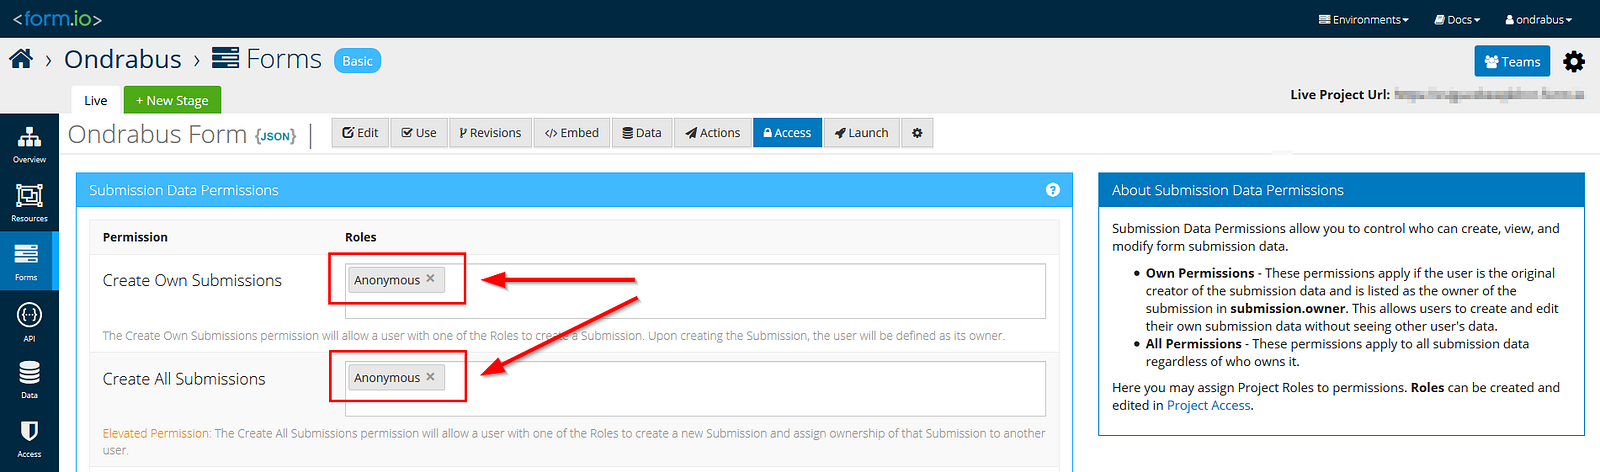
Anonymous API access sounds a bit insecure, right? Well, in order to post data to your Form.io form, even anonymously, you need to know the API Path. Therefore as long as you keep the API Path a secret, you have nothing to worry about. I will explain later why the anonymous access is easier here.
Form security
The form is defined, form submissions storage selected, let’s put it all together!
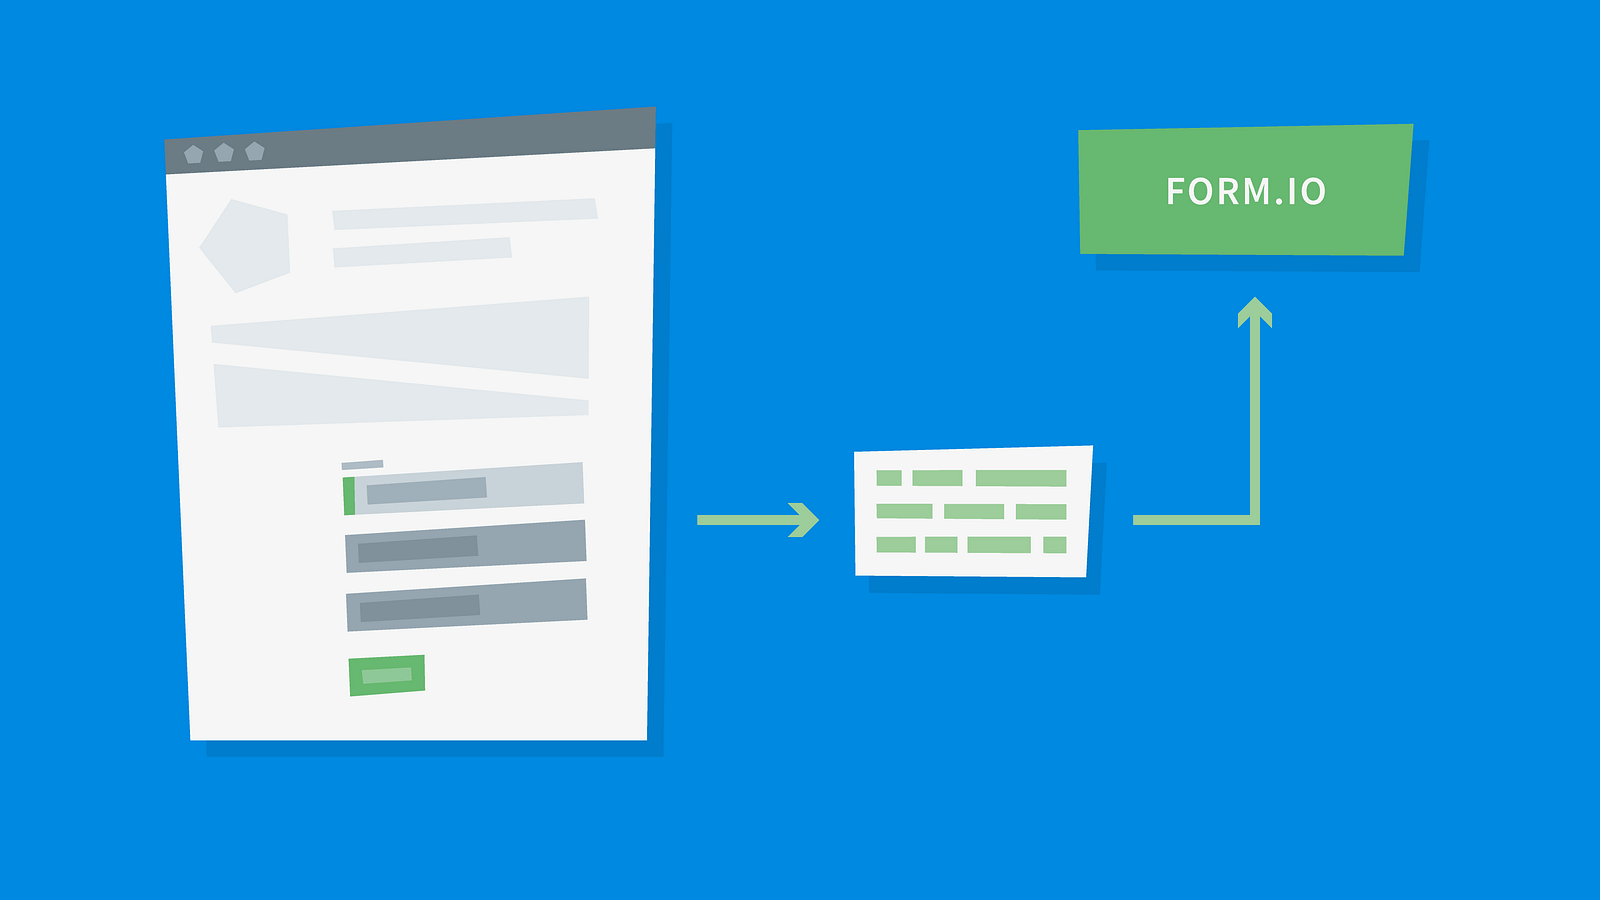
Well, not yet. It is possible to wire up the contact form I presented earlier with Form.io form directly, but that would make it very vulnerable.
Why? Anyone would be able to repeat posting the contact form indefinitely. That would have a negative effect on the website’s availability. Also, the free plan of Form.io includes only certain number of API calls which would be quickly exceeded. And can you imagine what a nightmare it would be to separate SPAM submissions from real ones?
Therefore we need to secure the form. In the past I’ve always used reCaptcha control from Google. I’m sure you’ve seen it in action on many websites. You tick a box, wait a moment and you are free to submit the form.

Of course we need to validate this process on the server too. Otherwise any person submitting the form could just repeat the outgoing HTTP request to the form’s endpoint regardless if you have reCaptcha or not.
To make this validation you need a service that lets you process a bit of code. I decided to use Webtask.io as it is — yet again — free. But you can just as easily leverage for example Azure Functions (check out this great article about Azure Functions by Bryan Soltis).
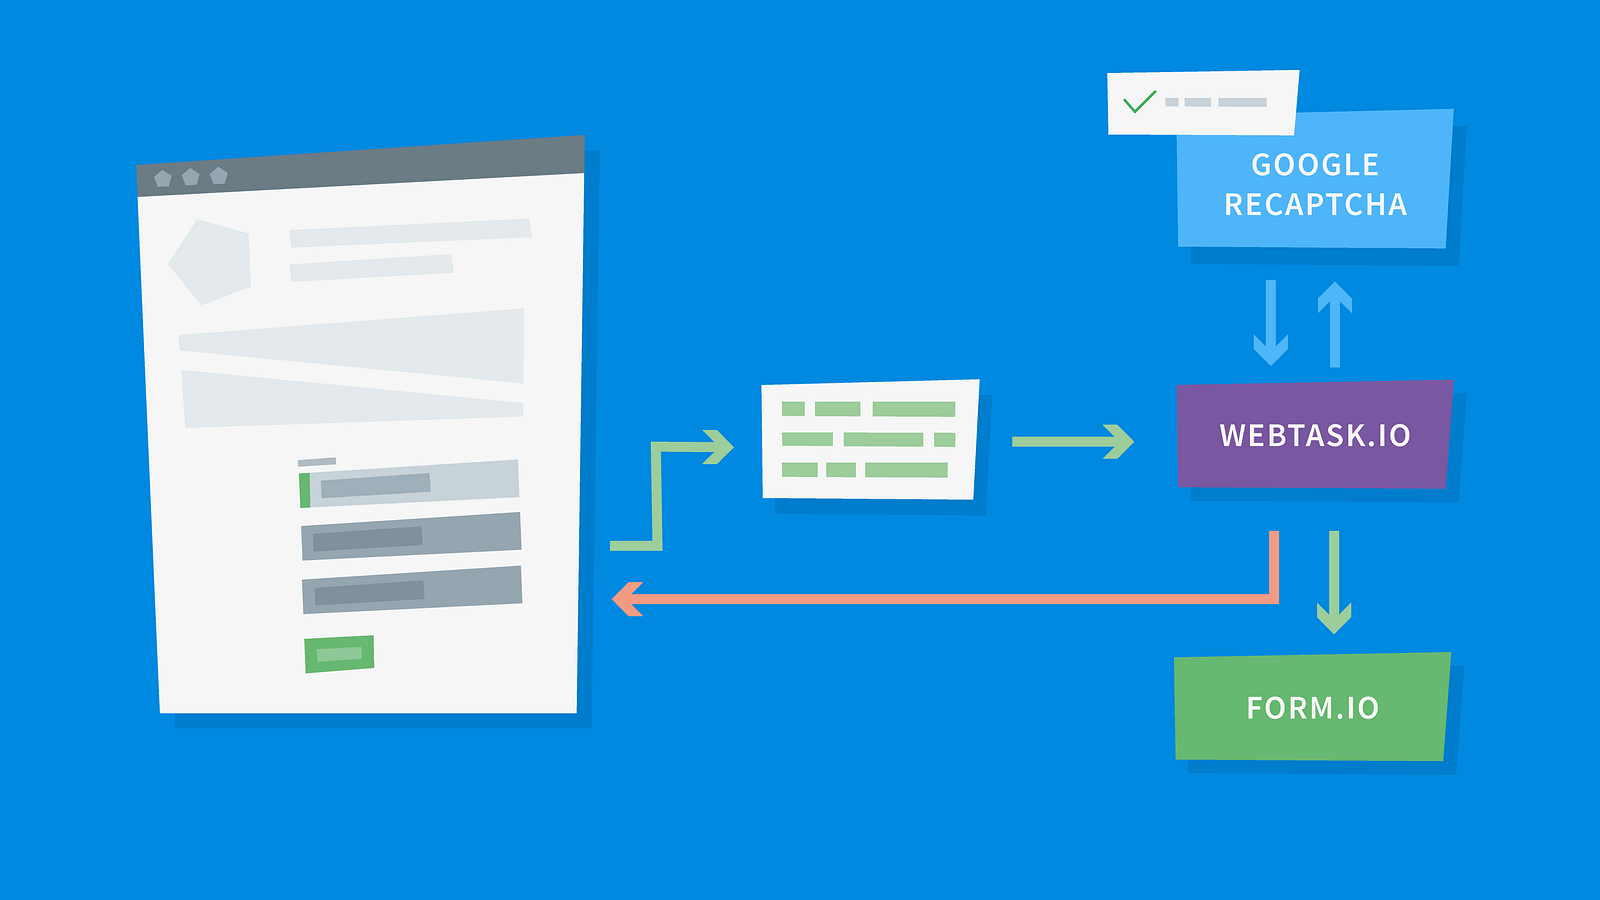
The server function on Webtask.io will check if the submission has data for all required fields and will also validate submitted reCaptcha code. If there are any issues it will respond back with an appropriate message. Otherwise it would send the data to Form.io API directly.
Let’s do it
Does the last schema look like a lot of work? That is the beauty of microservices architecture. It may look complicated, but when you see the actual code, it is very short, clean, and easy to understand. Putting this all together took me just few hours including all sign-ups and figuring out the API specifics as I did not have previous experience with Webtask.io or Form.io.
Google reCaptcha
First let’s add reCaptcha to the website. After registering the application on Google reCaptcha, there is one JavaScript file which needs to be included within HTML header:
...
<script src='https://www.google.com/recaptcha/api.js?onload=recaptchaLoaded'></script>
...
Note that I added attribute onload with recaptchaLoaded value. ReCaptcha needs to be initialized before it can be used and this attribute ensures that once that happens it will invoke method recaptchaLoaded. Of course, this method needs to be implemented. I added it to the bottom of the app.js file:
...
var recaptchaLoaded = function(){
 bus.$emit('recaptchaLoaded');
}
...
Have you noticed the bus variable? Good job! The whole form is a Vue.js component and as such it handles all functionality around itself. That includes data submissions, form rendering and so on. Therefore we need to tell the component that reCaptcha is initialized and form can be submitted. Simple way how to do it is using events in Vue.js. We just need to create one dedicated instance of Vue.js for this purpose. I added it to the beginning of components.js file as it is the first one in order.
var bus = new Vue();
...
Vue.js implementation
Let’s stay in the components.js file for now and see the implementation of the Form component.
...
data: function(){
 return {
  name: null,
  email: null,
  message: null,
  errors: [],
  formGood: false,
  disabled: true,
  sending: false
 }
},
...
The data function now contains several new properties. There is a property for each of the form fields (name, email, message), array for error messages (errors) and three status fields (formGood, disabled, sending).
...
template: `
 <form>
  <div class="fields" v-if="!formGood">
  …
  <input type="text" v-model="name" id="name" required />
  …
  <input type="email" v-model="email" id="email" required />
  …
  <textarea v-model="message" id="message" rows="4"></textarea>
  …
  <div class="g-recaptcha" data-sitekey="{your-site-key}"></div>
  …
  <div class="field" v-if="errors.length">
  …
  <li v-for="error in errors">{{error}}</li>
  …
  <ul class="actions" v-if="!formGood">
   <li><input type="submit" value="Send Message" @click.prevent="submitForm" :disabled="disabled" /></li>
  </ul>
  <div v-if="formGood">
   <h3>Thank you!</h3>
   <p>Your message was submitted. I will get back to you as soon as I can.<br />Ondrej</p>
  </div>
  …
  <div v-if="sending" class="form-overlay"><i class="fa fa-circle-o-notch fa-spin"></i></div>
 </form>
`,
...
Properties of form fields are bound to respective inputs using v-modelattribute. The status property formGood will ensure that the Thank youmessage is displayed when the form is successfully submitted. Property sending will present a simple overlay above the form while the form submission is being processed. And finally the disabled property will ensure that the form can not be submitted before reCaptcha is initialized. Remember the recaptchaLoaded function? The one that emits the event recaptchaLoadedwhen reCaptcha is initialized. The created function of form component will listen for this event.
...
created: function(){
 bus.$on('recaptchaLoaded', this.enable);
},
...
The created function is executed when the Form component is created. That occurs long before reCaptcha gets initialized so when that happens, form is already waiting for the event and subsequently invokes the enable method which in turn enables the Submit button through disabled property.
...
methods: {
 enable(){
  this.$data.disabled = false;
 },
 submitForm(){
  this.sending = true;
  this.errors = [];
  this.formGood = false;
  fetch({webtask.io/your-function-endpoint}, {
   body: JSON.stringify({
    name: this.$data.name,
    email: this.$data.email,
    message: this.$data.message,
    recaptcha: grecaptcha.getResponse()
   }),
   headers: { 'content-type':'application/json' },
   method: 'POST'
  })
  .then(res => res.json())
  .then(res => {
   if (res.status){
    this.$data.formGood = true;
   } else {
    grecaptcha.reset();
    this.$data.errors = res.errors;
   }
   this.$data.sending = false;
  });
 }
}
...
Let’s focus on the submitForm method. I am using fetch to get back a Promise object with response from a Webtask.io function. In the body of such request you can find all fields from the contact form in JSON format. Note that the reCaptcha code needs to be obtained directly from the JavaScript object representing reCaptcha using getResponse() method.
The response to the submit request is again in JSON format. After parsing it and checking the status, there are 2 possibilities. Either the submission was successful and form data were forwarded to Form.io, or there are some issues. In that case the errors are copied into local dataset and displayed to the visitor by Vue.js.
At the end of processing the submission we may reset the sending flag so that the overlay is again hidden.
Webtask.io function
I mentioned the Webtask.io function several times, but what does the implementation look like? Basically there are two tasks to solve:
- Validate all required fields
- Validate reCaptcha
This is the base implementation of the function:
'use strict';
const request = require('request');
module.exports = (context, cb) => {
 // gather the form fields from body
 let form = context.body;
 checkForm(context.body, context.secrets.recaptcha)
  .then(result => {
   if (result.errors.length){
    cb(null, {status: false, errors: result.errors});
   }else{
    // here we will store data in Form.io
    sendToFormIo(context.body)
     .then(result => {
      if (result.errors.length){
       cb(null, {status: false, errors: result.errors});
      }else{
       cb(null, {status: true});
      }
     });
   }
 });
}
...
The body that contains the form fields data in JSON is available in context.body property. In function checkFormwe check the form’s required fields and validate reCaptcha. If the request validates, the data are submitted to Form.io using sendToFormIo function, otherwise we respond with error messages and status.
...
function checkForm(f, recaptchaKey){
 return new Promise((resolve) => {
  let errors = [];
  if (!f.name || f.name.trim() === '')
   errors.push("Please fill in your name.");
  if (!f.email || f.email.trim() === '')
   errors.push("Please fill in your email address.");
  if (!f.message || f.message.trim() === '')
   errors.push("Please fill in your message.");

  request.post('https://www.google.com/recaptcha/api/siteverify', {
   form: {
    secret: recaptchaKey,
    response: f.recaptcha
   }
  }, (err, resp, body) => {
   if (!JSON.parse(body).success){
    errors.push('Please complete captcha validation.');
   }
   resolve({errors: errors});
  });
 });
}
...
In the checkFormfunction take a look how it is possible to validate reCaptcha code. There needs to be a POST request to the Google API and in return Google responds with the validation result. Note that in order to validate reCaptcha codes you need to provide your reCaptcha API key. I stored it as a secret variable in Webtask.io secrets:

If you do it the same way, you can reference this value using context.secrets.recaptcha in the function’s implementation.
...
function sendToFormIo(f){
 return new Promise((resolve) => {
  let errors = [];
  request.post('{your-form.io-api-path}/{form.io-form-name}/submission', {
   body: {
    data: {
     name: f.name,
     email: f.email,
     message: f.message
    }
   },
   json: true
  }, (err, resp, body) =>
  {
   if (resp.statusCode !== 201){
    console.log(resp);
    errors.push('Your submission could not be saved. Please try again later.');
   }
   resolve({errors: errors});
  });
 });
}
In the last part of Webtask.io function you see that I am basically forwarding the same message to Form.io API. Remember the anonymous access that I suggested you enable on Form.io form? That is what enables me to post the message directly to the Form.io API. Otherwise I would have to adjust the function’s implementation to first obtain jwt-token in authentication request and send the form data in another authenticated request. Because the communication between Webtask.io and Form.io is private and API path is kept a secret, there is no need to worry about authentication here.
Note that near the response processing logic there is a console.log(resp). In case something goes wrong and the request can not be processed because of failure in the communication between services, the actual response with error codes and description would be stored in log using console.log and can be investigated later in Webtask.io administration interface.
In this part I got inspiration for my implementation in a great article by Raymond Camden on his blog.
Conclusion
Once you have it all implemented, go ahead and give it a test run. After the first successful form submission you will see form data in Form.io form under the Data tab.
You will see that it is easy to wire services together and create a website that just works and treats sensitive data in a secure way. You don’t need to babysit any huge solution running on an expensive hosting plan, or worse, on a rented virtual server.
So, my website is currently using the following services:
- Headless API CMS Kentico Cloud (free)
- Webtask.io function (free)
- Form.io form with API (free)
- Hosting space for few static files (in my case $4.2/year)
Cool, right? What is your experience with Software-as-a-Service services? Are you using any? Would you have picked different ones than I did? Leave a comment.
In my next article I will focus on security, SEO, performance and other more advanced features.
Other articles in the series:
- How to start creating an impressive website for the first time
- How to decide on the best technology for your website?
- How to power up your website with Vue.js and minimal effort
- How to Mix Headless CMS with a Vue.js Website and Pay Zero
- How to Make Form Submissions Secure on an API Website
- Building a super-fast and secure website with a CMS is no big deal. Or is it?
SOURCE: https://itnext.io/how-to-make-form-submissions-secure-on-an-api-website-d80bcfdb5149
Written by
Ondřej Polesný
Web development enthusiast with passion for anything new and intriguing. Developer Evangelist, Solution Architect, Developer. Tell me what are your struggles.
freeCodeCamp.org
Stories worth reading about programming and technology from our open source community.