In this tutorial, we will spin around the frontend to our ‘Restaurant-Menu’ app using the very famous ReactJS library and use MongoDB as the database. We will keep it simple by making a GET request to the API we created in Part 1and display the food items on the browser.
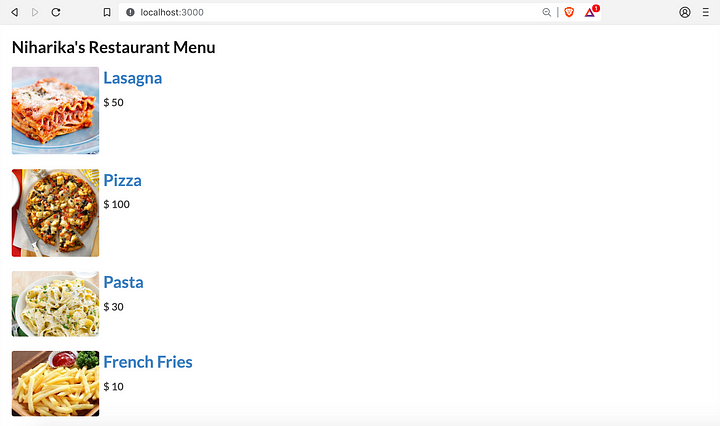
The final web-app will look like this:
Are you excited? Well, I am!

First things first… Setting Up The Dev Environment
I’m assuming you’ve already set up the dev environment as described in Part 1.Also, this article assumes basic knowledge of React terminology and ES2015 syntax.
- Install React
$ npm install -g create-react-app
If you’re stuck anywhere, here is a really nice tutorial to get started with.
2. Install a text editor
In Part 1, we did not write any code so there was no “real” need to use a text editor. In this part, we will be writing a lot of code. So, you can use your favorite text editor or my favourite text editor.
3. Robomongo
This is optional. If you wish to have a graphical interface to your MongoDB database, then Robomongo is an essential tool. I personally love it.
A little tweak in the Loopback server file:
By default, the loopback API explorer is served on port 3000 and coincidentally, React also serves on port 3000 by default. Both of these ports MUST be different. So, I’ll transfer loopback API explorer to port 8080.
So open config.json and make the following changes:
{
"restApiRoot": "/api",
"host": "0.0.0.0",
"port": 8080,
"remoting": {
"context": false,
"rest": {
"handleErrors": false,
"normalizeHttpPath": false,
"xml": false
},
"json": {
"strict": false,
"limit": "100kb"
},
"urlencoded": {
"extended": true,
"limit": "100kb"
},
"cors": false
}
}
This will ensure that React and Loopback API Explorers do not clash.
Step 1: Populate your database with some dishes
The data we feed into our database will show up in our React web-app when we make a GET request.
There are different ways to populate the data. The most appropriate one would be to use the API Explorer.
So point your web browser to http://localhost:8080/explorer and make a POST request. This time, I changed the model schema and added ‘picture’ as well so that we have a nice looking app.
This is what my schema looks like
{
  "name": "string",
  "price": 0,
  "picture": "string"
}
I made 4 entries here:
[
  {
    "name": "Lasagna",
    "price": 50,
    "picture": "https://www.thewholesomedish.com/wp-content/uploads/2018/07/Best-Lasagna-550.jpg",
    "id": "5c401174d3bf4ffe05b5d42b"
  },
  {
    "name": "Pizza",
    "price": 100,
    "picture": "https://www.tasteofhome.com/wp-content/uploads/2017/10/Chicken-Pizza_exps30800_FM143298B03_11_8bC_RMS-2.jpg",
    "id": "5c401678d3bf4ffe05b5d42c"
   },
   {
     "name": "Pasta",
     "price": 30,
     "picture": "https://food.fnr.sndimg.com/content/dam/images/food/fullset/2011/2/4/1/RX-FNM_030111-Lighten-Up-012_s4x3.jpg.rend.hgtvcom.616.462.suffix/1382539856907.jpeg",
     "id": "5c401698d3bf4ffe05b5d42d"
   },
   {
     "name": "French Fries",
     "price": 10,
     "picture": "https://shop.gerald.ph/content/images/thumbs/0003743_french-fries_340.jpeg",
     "id": "5c404b677199790b33f2e3a6"
   }
 ]
You can make however many entries with whatsoever dishes!
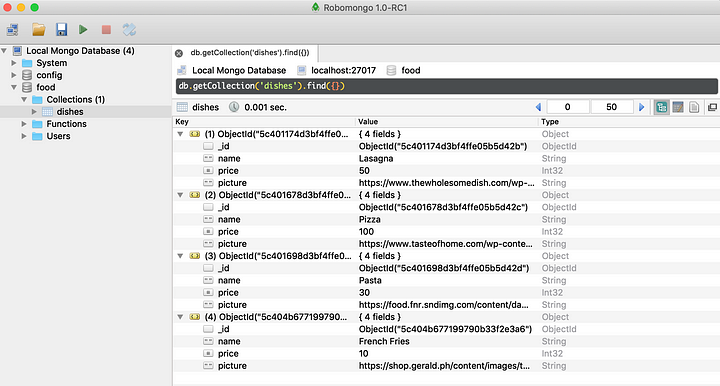
So after making the entries, you can view these on Robomongo.
Step 2: Create a React App
Let’s use create-react-app to create our React web-app.
$ create-react-app restaurant-app
I named my app restaurant-app.
Then, cd restaurant-app.
Then run the react app by npm start. This will start the web-app on localhost:3000.
You should see this:

Step 3: Delete all files in the src folder
In the React boilerplate code, delete the files in src folder. We’d be writing the code from scratch.
Step 4: Add in CSS library to reduce some designing headache…
In this project, I am using Semantic UI. You are free to use whichever library you want to.
In the folder of our React project, open index.html file and add a link tag anyhwere in the <head>. So let’s add Semantic UI CDN.
<link rel="stylesheet" href="https://cdnjs.cloudflare.com/ajax/libs/semantic-ui/2.4.1/semantic.min.css"/>
Step 5: Create Index.js and App.js
Create a new file in src folder named index.js.
Create a folder named Components in the src folder. Create a file named App.js in Components.

Contents of App.js:
import React from 'react';
class App extends React.Component {
render() {
     return (
          <div> App Component <div>
     );
  }
}
Contents of Index.js:
import React from 'react';
import ReactDOM from 'react-dom';
import App from './Components/App';
ReactDOM.render(<App/>, document.querySelector('#root'));
Now if you point your browser to localhost:3000, you should see App Component written on the screen.
Step 6: Install Axios to make API calls
Fire up your terminal and install Axios.
$ npm install --save axios
Step 7: Make API calls
We need to make changes to App.js.
import React from 'react';
import axios from 'axios';
class App extends React.Component {
constructor(props){
super(props);
this.state = {
name: [],
price: [],
picture: []
};
}
componentDidMount = () => {
axios.get('http://localhost:8080/api/dishes').then((res) => {
for (var i = 0; i < res.data.length; i++)
this.setState({
name: [...this.state.name, res.data[i].name],
price: [...this.state.price, res.data[i].price],
picture: [...this.state.picture, res.data[i].picture]
});
}).catch ((err) => {
console.log(err);
});
}
Style = {
margin: '10px',
padding: '10px'
};
render() {
return (
<div className="ui list" style={this.Style}>
<h1> Niharika's Restaurant Menu </h1>
<div className="item">
<img className="ui small rounded image" src={this.state.picture[0]} alt="lasagna"/>
<div className="content">
<h1><a className="header">{this.state.name[0]}</a></h1>
<div className="description"> <h3> $ {this.state.price[0]} </h3> . </div>
</div>
</div>
</div>
);
}
}
export default App;
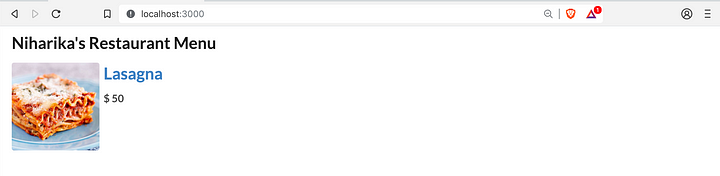
This will only display name, price, and picture of the first entry. To make things easier, we will create a new component name FoodItem to reduce code in App.js.
Step 8: Create a FoodItem component to render other dishes
In Components folder, create a file named FoodItem.js.
Contents of FoodItem.js:
import React from 'react';
const FoodItem = (props) => {
return (
<div className="item">
<img className="ui small rounded image" src={props.picture} alt="lasagna"/>
<div className="content">
<h1><a className="header">{props.name}</a></h1>
<div className="description"> <h3> $ {props.price} </h3> . </div>
</div>
</div>
);
};
export default FoodItem;
Concept of props is used here.
Modify App.js :
import React from 'react';
import axios from 'axios';
import FoodItem from './FoodItem';
class App extends React.Component {
constructor(props){
super(props);
this.state = {
name: [],
price: [],
picture: []
};
}
componentDidMount = () => {
axios.get('http://localhost:8080/api/dishes').then((res) => {
for (var i = 0; i < res.data.length; i++)
this.setState({
name: [...this.state.name, res.data[i].name],
price: [...this.state.price, res.data[i].price],
picture: [...this.state.picture, res.data[i].picture]
});
}).catch ((err) => {
console.log(err);
});
}
Style = {
margin: '10px',
padding: '10px'
};
render() {
return (
<div className="ui list" style={this.Style}>
<h1> Niharika's Restaurant Menu </h1>
<FoodItem
picture={this.state.picture[0]}
name={this.state.name[0]}
price={this.state.price[0]}
/>
       <br/>

       <FoodItem
picture={this.state.picture[1]}
name={this.state.name[1]}
price={this.state.price[1]}
/>
<br/>
<FoodItem
picture={this.state.picture[2]}
name={this.state.name[2]}
price={this.state.price[2]}
/>
<br/>
<FoodItem
picture={this.state.picture[3]}
name={this.state.name[3]}
price={this.state.price[3]}
/>
</div>
);
}
}
export default App;
The final result should look like this:
In this tutorial, we only focused on GET method. We can even POST more dishes from this console and do a lot more things.
This was all.
I hope you made it till the end. If you liked it, please appreciate it by applauding. Thanks a lot! ❤
Written by
Niharika Singh
So, can you paradigm?