If the title of this article excites you, then my friend, you’re about to achieve level 100 of satisfaction by the end. I’ll quickly go through the course of this article:
- What we are about to create: RESTful API which handles logs of food items on a restaurant menu. The database used in the back-end will be MongoDB. (You can literally use any fricking database on this planet. There’s an exhaustive list of database connectors/non-database connectors supported by LoopBack below.)
- What is LoopBack: In extremely simple terms, it is highly extensible, open source Node.js framework used to create dynamic, end-to-end REST APIs very rapidly. APIs generated via LoopBack are Swagger APIs (world’s most popular API framework, and you’ll see why very soon). The front-end could be made in whichever framework you’re in love with; Angular or React.
- Creating application via CLI: This is the WOW part which removes all the programming involved. LoopBack CLI is so beautiful that all the hours of development work are reduced down to seconds. Here, we’d be setting up our database using CLI.
- Creating data models via CLI: Again, no programming. All via the beautiful CLI.
- Setting up Authentication via CLI: If you have experience creating APIs, you know how tough it is to restrict parts of API using authentication. Setting up token-based authentication using Express+Node.js on the server side is a pain. All of that pain will be taken away by tasting the elixir of LoopBack! It is heaven’s own drink.

Step by Step Guide:
Pre-requisites: Make sure you’ve got Node.js, Robomongo installed and MongoDB server running.
STEP 1: Install LoopBack CLI via NPM
Open the terminal and write the following command to install LoopBack CLI so that ‘lb’ command can be accessed. Only through ‘lb’ command can we generate applications, models, data sources etc. For further reading: https://loopback.io/doc/en/lb2/Command-line-tools.html#using-yeoman
$ npm install -g loopback-cli
Make sure you install this globally, or else ‘lb’ command might not work for you.
STEP 2: Creating Application
Make a directory where you wish to store your project. I’ll name it ‘restaurant-menu’. Make sure you’ve opened this directory in your terminal so that all the files generated via LoopBack are stored in that folder.
Then enter the following command:
$ lb
A lot of questions will be asked, like those displayed in the image below.
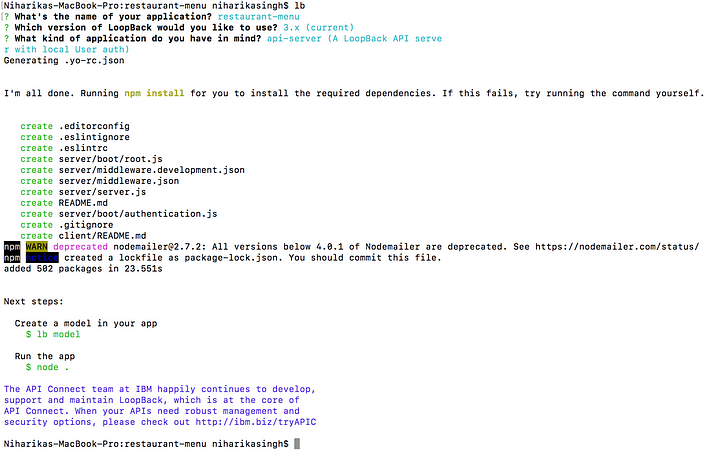
(To navigate among options, use arrow keys on your keyboard)
THE API IS CREATED!

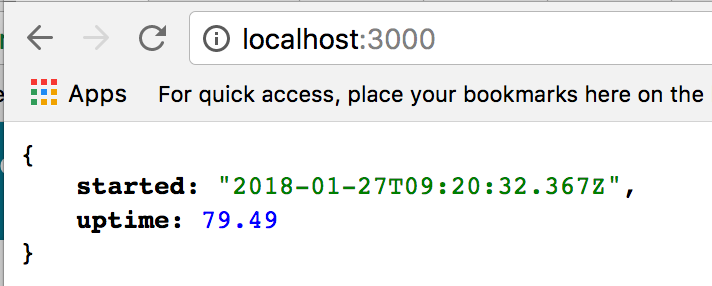
I’m not kidding. Don’t believe me? Run the application using the following command:
$ node .

If you point to localhost:3000, you’ll see something like this:
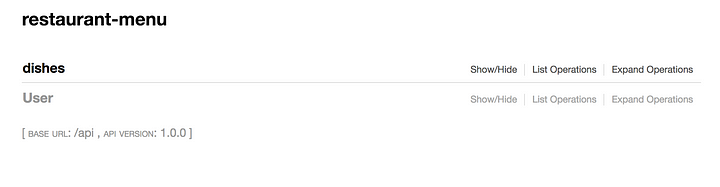
However, if you go to localhost:3000/explorer, you’ll see the gorgeous SwaggerAPI.
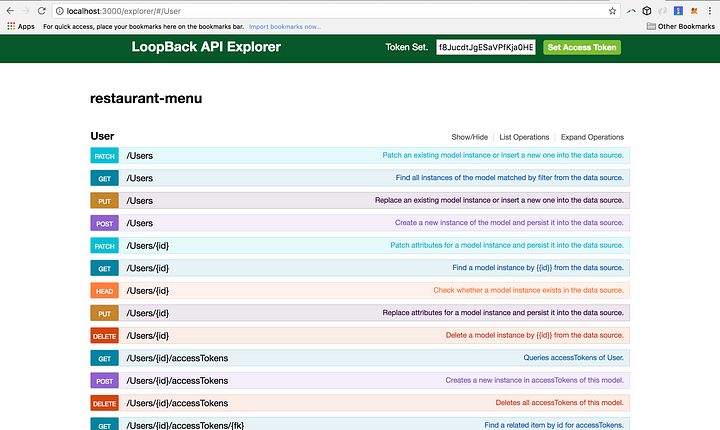
LoopBack has set up all the routes for you:
GET users, POST users, PUT users, DELETE users, Login, Log out, Change Password. Literally everything! It would otherwise take hours of work to code this out.
Open this folder in any text editor. I’d be using Atom.
STEP 3: Connecting MongoDB
If you open datasources.json in the Server folder, you should see something like:
{
  "db": {
    "name": "db",
    "connector": "memory"
  }
}
This means that presently, the data source being used is the memory of our computer. We’ve got to change this to Mongo. So let’s install mongo connector:
$ npm install --save loopback-connector-mongodb
Alongside, I hope mongod is running. This is how you’d know it is running:
2018-01-27T15:01:13.278+0530 I NETWORK [thread1] waiting for connections on port 27017
Now, let’s connect the connector!
$ lb datasource mongoDS --connector mongoDB
This will ask a lot of questions as follows:
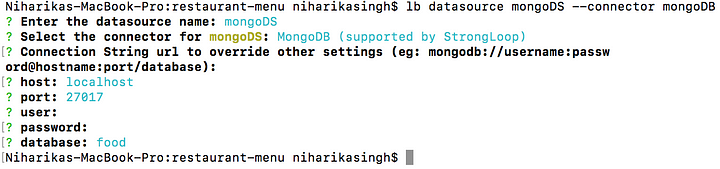
Now modify datasources.json because we don’t wish to use memory. We wish to use Mongo.
{
  "db": {
    "host": "localhost",
    "port": 27017,
    "url": "",
    "database": "food",
    "password": "",
    "name": "mongoDS",
    "user": "",
    "connector": "mongodb"
  }
}
So our database named: food is created.
STEP 4: Creating Data Models
Run following command to create data models:
$ lb model
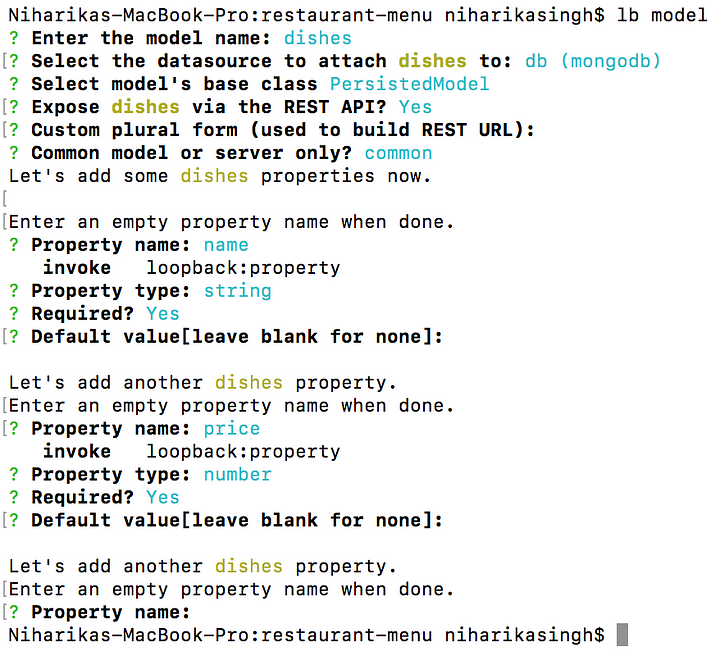
You may add however many properties to a particular model. To stop entering more properties, just hit Enter to get out of the CLI.
Check out dishes.json in the Common/Models folder.
{
  "name": "dishes",
  "base": "PersistedModel",
  "idInjection": true,
  "options": {
    "validateUpsert": true
  },
  "properties": {
    "name": {
      "type": "string",
      "required": true
    },
    "price": {
      "type": "number",
      "required": true
    }
  },
  "validations": [],
  "relations": {},
  "acls": [],
  "methods": {}
}
You may edit the properties from this json file as well. It is not necessary to use CLI.
Now let’s rerun the server using the following command and head over to localhost:3000/explorer
$ node .
Now you’ll see 2 models: dishes, and user
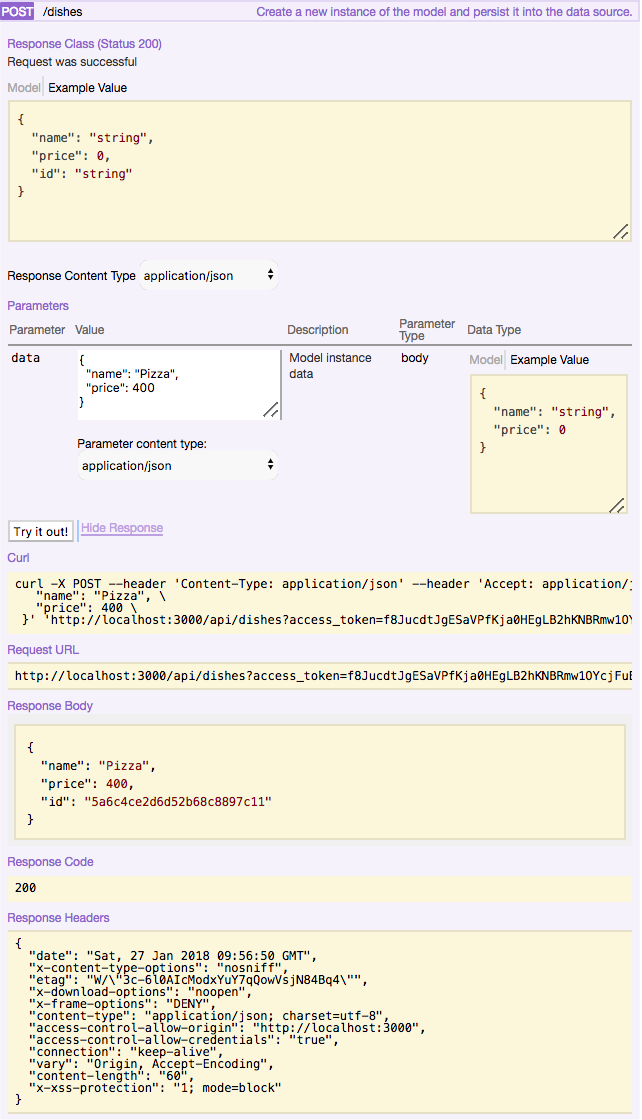
Now let’s POST some dish.
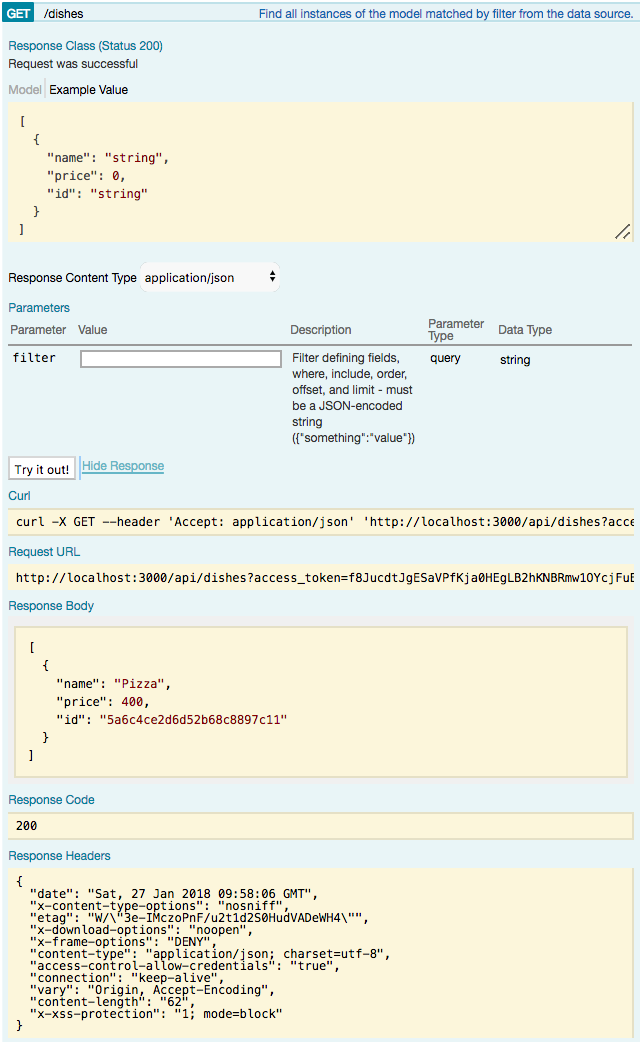
Now let’s GET the same dish.
You may play around with other HTTP requests too!
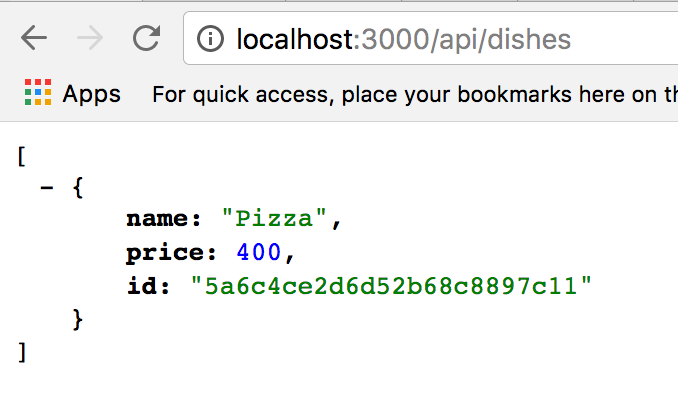
These APIs can be accessed outside the explorer as well:
http://localhost:3000/api/dishes
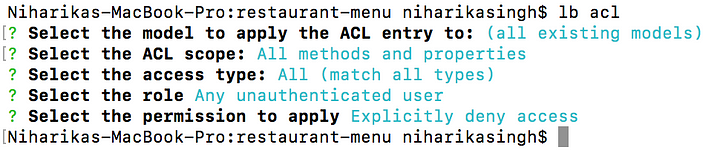
STEP 5: AUTHENTICATION: Cherry on the cake!
To set up authentication, run the following command:
$ lb acl
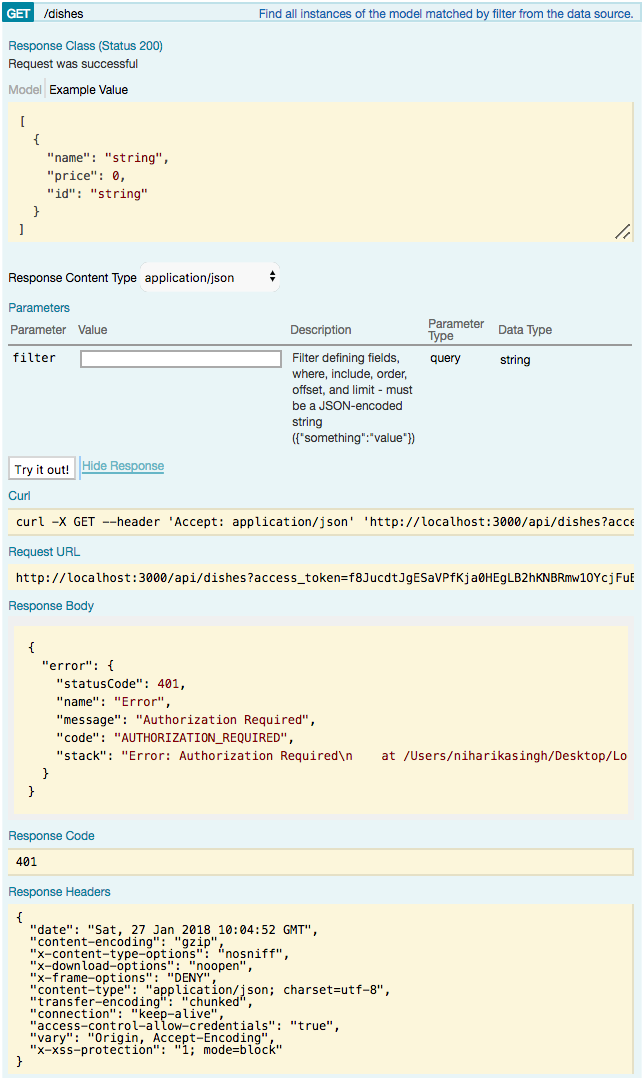
Now, let’s try to GET the dishes. Before that, please rerun the server.
Let’s get authenticated! For that, we need to get registered first. So we POST in users.
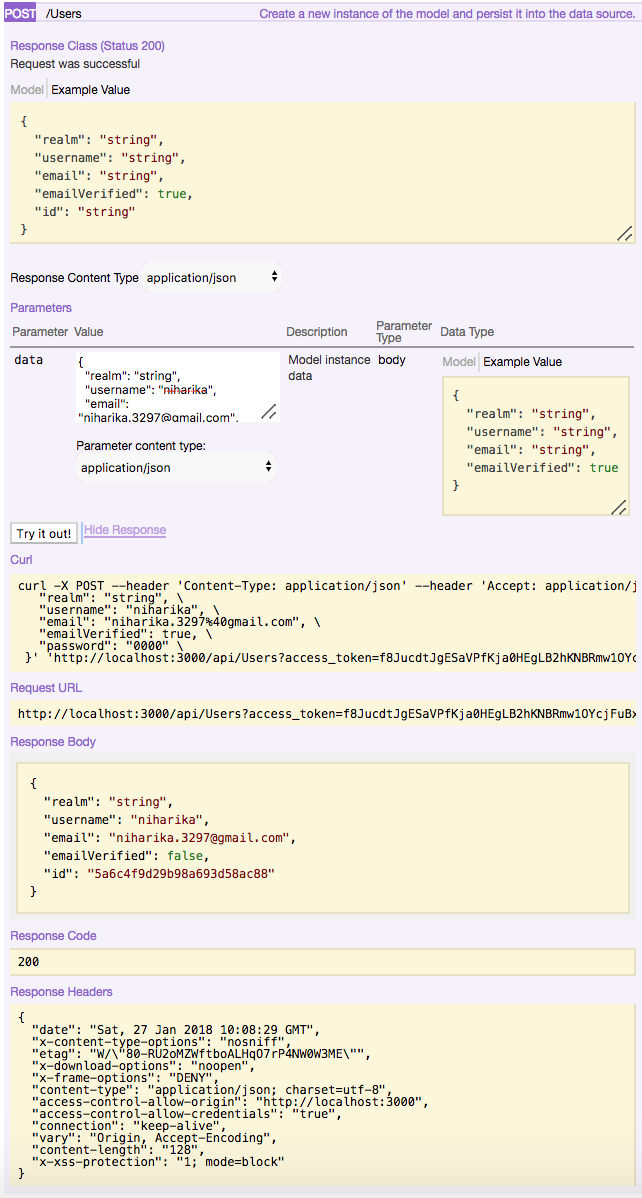
Now, let’s log in.
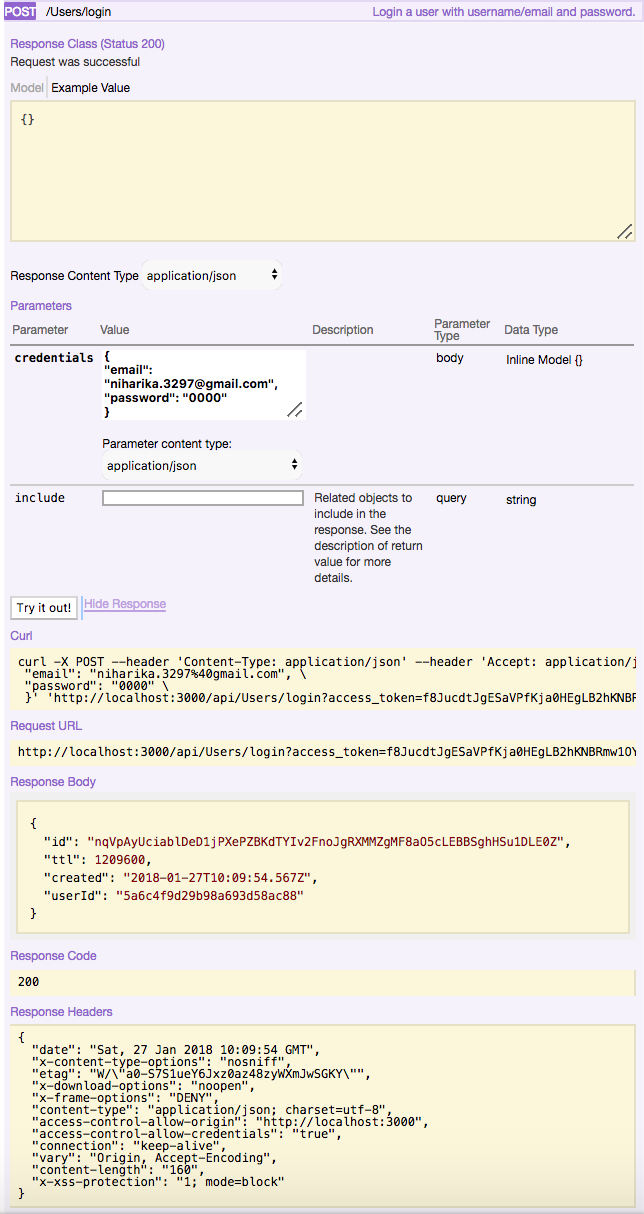
Now, copy the ID in the response body and paste it in the Access Token field on top of the page.

Now we are authenticated. YAY.
Now, let’s GET the dishes again.

HOORAY!
Congratulations if you’ve successfully reached this step. So proud of you.
Next steps would be to create a front end around this API which would be done later.

Bye folks!
Happy coding.
Written by
Niharika Singh
So, can you paradigm?
freeCodeCamp.org
Stories worth reading about programming and technology from our open source community.