
Knowing one approach to web scraping may solve your problem in the short term, but all methods have their own strengths and weaknesses. Being aware of this can save you time and help you to solve a task more efficiently.
Numerous resources exist, which will show you a single technique for extracting data from a web page. The reality is that multiple solutions and tools can be used for that.
What are your options to programmatically extract data from a web page?
What are the pros and cons of each approach?
How to use cloud services to increase the degree of automation?
This guide meant to answer these questions.
I assume you have a basic understanding of browsers in general, HTTPrequests, the DOM (Document Object Model), HTML, CSS selectors, and Async JavaScript.
If these phrases sound unfamiliar, I suggest checking out those topics before continue reading. Examples are implemented in Node.js, but hopefully you can transfer the theory into other languages if needed.
Static content
HTML source
Let’s start with the simplest approach.
If you are planning to scrape a web page, this is the first method to try. It requires a negligible amount of computing power and the least time to implement.
However, it only works if the HTML source code contains the data you are targeting. To check that in Chrome, right-click the page and choose View page source. Now you should see the HTML source code.
It’s important to note here, that you won’t see the same code by using Chrome’s inspect tool, because it shows the HTML structure related to the current state of the page, which is not necessarily the same as the source HTML document that you can get from the server.
Once you find the data here, write a CSS selector belonging to the wrapping element, to have a reference later on.
To implement, you can send an HTTP GET request to the URL of the page and will get back the HTML source code.
In Node, you can use a tool called CheerioJS to parse this raw HTML and extract the data using a selector. The code looks something like this:
const fetch = require('node-fetch');
const cheerio = require('cheerio');

const url = 'https://example.com/';
const selector = '.example';

fetch(url)
  .then(res => res.text())
  .then(html => {
    const $ = cheerio.load(html);
    const data = $(selector);
    console.log(data.text());
  });
Dynamic content
In many cases, you can’t access the information from the raw HTML code, because the DOM was manipulated by some JavaScript, executed in the background. A typical example of that is a SPA (Single Page Application), where the HTML document contains a minimal amount of information, and the JavaScript populates it at runtime.
In this situation, a solution is to build the DOM and execute the scripts located in the HTML source code, just like a browser does. After that, the data can be extracted from this object with selectors.
Headless browsers
This can be achieved by using a headless browser. A headless browser is almost the same thing as the normal one you are probably using every day but without a user interface. It’s running in the background and you can programmatically control it instead of clicking with your mouse and typing with a keyboard.
A popular choice for a headless browser is Puppeteer. It is an easy to use Node library which provides a high-level API to control Chrome in headless mode. It can be configured to run non-headless, which comes in handy during development. The following code does the same thing as before, but it will work with dynamic pages as well:
const puppeteer = require('puppeteer');

async function getData(url, selector){
  const browser = await puppeteer.launch();
  const page = await browser.newPage();
  await page.goto(url);
  const data = await page.evaluate(selector => {
    return document.querySelector(selector).innerText;
  }, selector);
  await browser.close();
  return data;
}

const url = 'https://example.com';
const selector = '.example';
getData(url,selector)
  .then(result => console.log(result));
Of course, you can do more interesting things with Puppeteer, so it is worth checking out the documentation. Here is a code snippet which navigates to a URL, takes a screenshot and saves it:
const puppeteer = require('puppeteer');

async function takeScreenshot(url,path){
  const browser = await puppeteer.launch();
  const page = await browser.newPage();
  await page.goto(url);
  await page.screenshot({path: path});
  await browser.close();
}

const url = 'https://example.com';
const path = 'example.png';
takeScreenshot(url, path);
As you can imagine, running a browser requires much more computing power than sending a simple GET request and parsing the response. Therefore execution is relatively costly and slow. Not only that but including a browser as a dependency makes the deployment package massive.
On the upside, this method is highly flexible. You can use it for navigating around pages, simulating clicks, mouse moves, and keyboard events, filling out forms, taking screenshots or generating PDFs of pages, executing commands in the console, selecting elements to extract its text content. Basically, everything can be done that is possible manually in a browser.
Building just the DOM
You may think it’s a little bit of overkill to simulate a whole browser just for building a DOM. Actually, it is, at least under certain circumstances.
There is a Node library, called Jsdom, which will parse the HTML you pass it, just like a browser does. However, it isn’t a browser, but a tool for building a DOM from a given HTML source code, while also executing the JavaScript code within that HTML.
Thanks to this abstraction, Jsdom is able to run faster than a headless browser. If it’s faster, why don’t use it instead of headless browsers all the time?
Quote from the documentation:
People often have trouble with asynchronous script loading when using jsdom. Many pages load scripts asynchronously, but there is no way to tell when they’re done doing so, and thus when it’s a good time to run your code and inspect the resulting DOM structure. This is a fundamental limitation.
… This can be worked around by polling for the presence of a specific element.
This solution is shown in the example. It checks every 100 ms if the element either appeared or timed out (after 2 seconds).
It also often throws nasty error messages when some browser feature in the page is not implemented by Jsdom, such as: “Error: Not implemented: window.alert…” or “Error: Not implemented: window.scrollTo…”. This issue also can be solved with some workarounds (virtual consoles).
Generally, it’s a lower level API than Puppeteer, so you need to implement certain things yourself.
These things make it a little messier to use, as you will see in the example. Puppeteer solves all these things for you behind the scenes and makes it extremely easy to use. Jsdom for this extra work will offer a fast and lean solution.
Let’s see the same example as previously, but with Jsdom:
const jsdom = require("jsdom");
const { JSDOM } = jsdom;

async function getData(url,selector,timeout) {
  const virtualConsole = new jsdom.VirtualConsole();
  virtualConsole.sendTo(console, { omitJSDOMErrors: true });
  const dom = await JSDOM.fromURL(url, {
    runScripts: "dangerously",
    resources: "usable",
    virtualConsole
  });
  const data = await new Promise((res,rej)=>{
    const started = Date.now();
    const timer = setInterval(() => {
      const element = dom.window.document.querySelector(selector)
      if (element) {
        res(element.textContent);
        clearInterval(timer);
      }
      else if(Date.now()-started > timeout){
        rej("Timed out");
        clearInterval(timer);
      }
    }, 100);
  });
  dom.window.close();
  return data;
}

const url = "https://example.com/";
const selector = ".example";
getData(url,selector,2000).then(result => console.log(result));
Reverse engineering
Jsdom is a fast and lightweight solution, but it’s possible even further to simplify things.
Do we even need to simulate the DOM?
Generally speaking, the webpage that you want to scrape consists of the same HTML, same JavaScript, same technologies you’ve already know. So, if youfind that piece of code from where the targeted data was derived, you can repeat the same operation in order to get the same result.
If we oversimplify things, the data you’re looking for can be:
- part of the HTML source code (as we saw in the first paragraph),
- part of a static file, referenced in the HTML document (for example a string in a javascript file),
- a response for a network request (for example some JavaScript code sent an AJAX request to a server, which responded with a JSON string).
All of these data sources can be accessed with network requests. From our perspective, it doesn’t matter if the webpage uses HTTP, WebSockets or any other communication protocol, because all of them are reproducible in theory.
Once you locate the resource housing the data, you can send a similar network request to the same server as the original page does. As a result, you get the response, containing the targeted data, which can be easily extracted with regular expressions, string methods, JSON.parse etc…
With simple words, you can just take the resource where the data is located, instead of processing and loading the whole stuff. This way the problem, showed in the previous examples, can be solved with a single HTTP request instead of controlling a browser or a complex JavaScript object.
This solution seems easy in theory, but most of the times it can be really time-consuming to carry out and requires some experience of working with web pages and servers.
A possible place to start researching is to observe network traffic. A great tool for that is the Network tab in Chrome DevTools. You will see all outgoing requests with the responses (including static files, AJAX requests, etc…), so you can iterate through them and look for the data.
This can be even more sluggish if the response is modified by some code before being rendered on the screen. In that case, you have to find that piece of code and understand what’s going on.
As you see, this solution may require way more work than the methods featured so far. On the other hand, once it’s implemented, it provides the best performance.
This chart shows the required execution time, and the package size compared to Jsdom and Puppeteer:
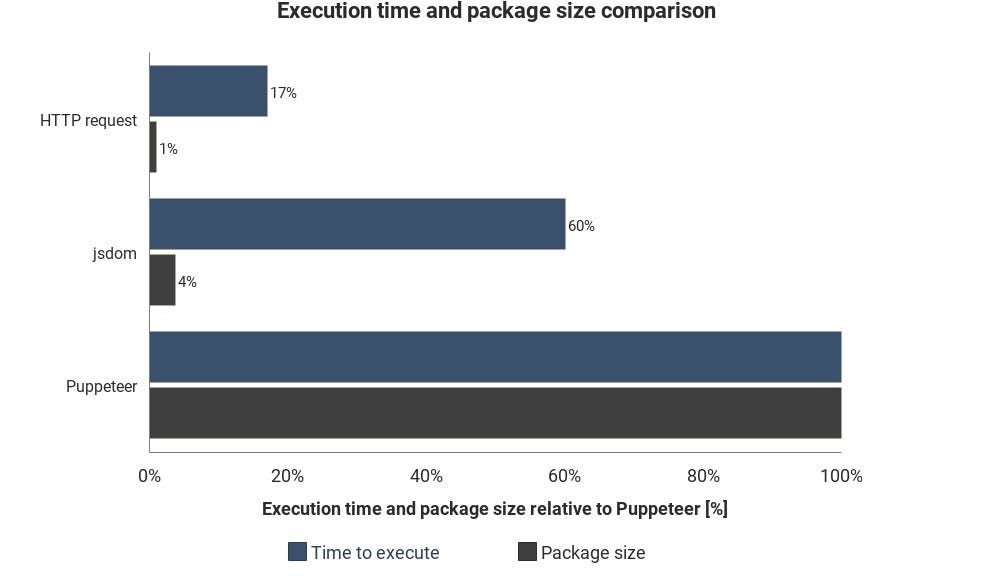
These results aren’t based on precise measurements and can vary in every situation, but shows well the approximate difference between these techniques.
Cloud service integration
Let’s say you implemented one of the solutions listed so far. One way to execute your script is to power on your computer, open a terminal and execute it manually.
This can become annoying and inefficient very quickly, so it would be better if we could just upload the script to a server and it would execute the code on a regular basis depending on how it’s configured.
This can be done by running an actual server and configuring some rules on when to execute the script. Servers shine when you keep observing an element in a page. In other cases, a cloud function is probably a simpler way to go.
Cloud functions are basically containers intended to execute the uploaded code when a triggering event occurs. This means you don’t have to manage servers, it’s done automatically by the cloud provider of your choice.
A possible trigger can be a schedule, a network request, and numerous other events. You can save the collected data in a database, write it in a Google sheet or send it in an email. It all depends on your creativity.
Popular cloud providers are Amazon Web Services(AWS), Google Cloud Platform(GCP), and Microsoft Azure and all of them has a function service:
They offer some amount of free usage every month, which your single script probably won’t exceed, unless in extreme cases, but please check the pricing before use.
If you are using Puppeteer, Google’s Cloud Functions is the simplest solution. Headless Chrome’s zipped package size (~130MB) exceeds AWS Lambda’s limit of maximum zipped size (50MB). There are some techniques to make it work with Lambda, but GCP functions support headless Chrome by default, you just need to include Puppeteer as a dependency in package.json.
If you want to learn more about cloud functions in general, do some research on serverless architectures. Many great guides have already been written on this topic and most providers have an easy to follow documentation.
Summary
I know that every topic was a bit compressed. You probably can’t implement every solution just with this knowledge, but with the documentation and some custom research, it shouldn’t be a problem.
Hopefully, now you have a high-level overview of techniques used for collecting data from the web, so you can dive deeper into each topic accordingly.
Source: https://medium.freecodecamp.org/web-scraping-for-web-developers-a-concise-summary-3af3d0ca4069
Written by
David Karolyi
freeCodeCamp.org
Stories worth reading about programming and technology from our open source community.