You have a static website and you know which framework fits you and your project the best. But how do you integrate the framework into the website? How do you split the design into components? How do you handle routing between pages? How do you define where child pages should display their specific content?
Making a website dynamic is a very exciting step in its development. It feels like when you install a game and you launch it for the first time, or when you buy a new phone and unbox it. Vue.js helps you achieve this moment very quickly. Creating components and putting them together is like building your website out of Lego pieces. Let’s get to it and have fun!
Integrating Vue.js
Having picked the right framework for my website, I can start integrating all the parts together. What are those parts?
- HTML template — markup
- Website logic — Vue.js and its components
- Content for all the components — all services providing data via their APIs
Have you ever heard about JAMstack? It’s a modern web development architecture based on these three parts that I outlined above. There are some additional best practices on their website, but we will get to those later.
Let’s get started with the website development. First, we need to add Vue.js library into our main HTML template. If you plan to have multiple pages, you will also need Vue.js router. Add both before the ending of the Head tag.
...
  <! — development version, includes helpful console warnings →
  <script src="https://cdn.jsdelivr.net/npm/vue/dist/vue.js"></script>
  <script src="https://unpkg.com/vue-router/dist/vue-router.js"></script>
</head>
...
Second, we need to pick an element that wraps up all the Vue.js functionality. Vue.js does not necessarily need to control your whole website, but only a small part of it. However, in our case we want Vue.js to control the whole page. Therefore, we can pick the topmost element and assign an ID to it if it does not have one yet.
...
<body class="is-preload">
  <div id="page-wrapper">
    <header id="header" class="alt">
...
Good job! We now have the main page ready for Vue.js components.
Laying out the components
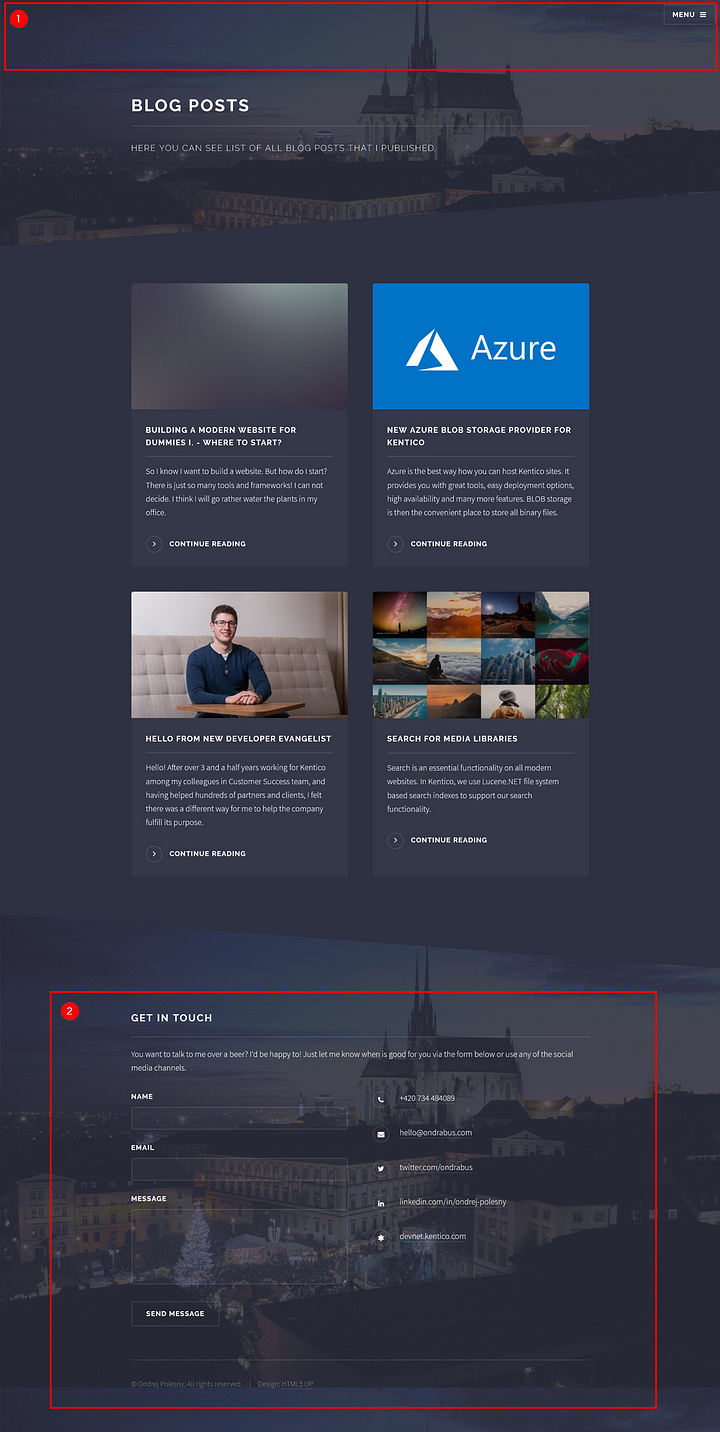
When you start cutting your website into smaller pieces, the process is to some extent always the same regardless of technology or framework used. There are always parts of the page that will be displayed on all pages, like the main menu and footer. These form your master page, or in our case the master template. Let’s take a look at how those parts look like on my design.

- Header including the main menu
- Footer including the contact form
Everything else that is in between is interchangeable based on page context. In other words, the highlighted parts always stay the same. It’s the middle that changes based on the URL.
First of all let’s create two empty files:
- app.js
- components.js
Put them in the folder assets/js (you can pick any other folder if you prefer) and reference them in the website. Add these assets before the ending of the Body tag. If there is any other JavaScript functionality, make sure to include these files before any other that may change the HTML markup.
...
<script src="assets/js/components.js"></script>
<script src="assets/js/app.js"></script>
...
On my website there are 3 pages, so in total I will have 3 URLs and 3 main components on my page:
- / – Homepage
- /blog – Blog page
- /about – About me page
Master template
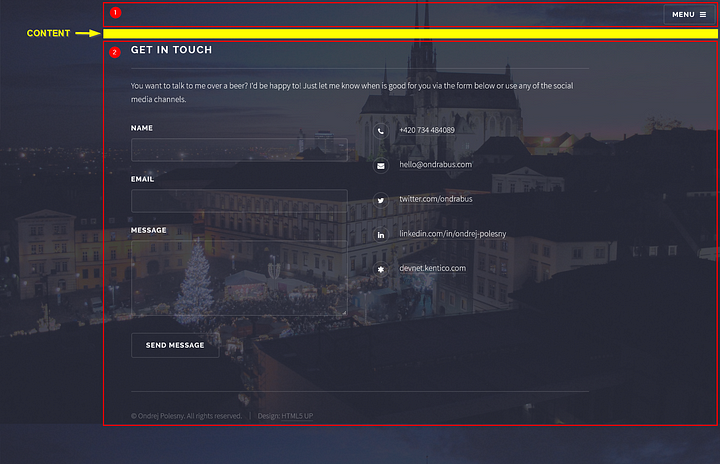
The main HTML file will be used as the master template for the whole website. Therefore we need to remove all page-specific content. We leave only those elements that will be displayed on all pages throughout the website. When I do that and open the page in the browser, I see this:

There is a header with the menu (1), contact form with footer (2) and the empty yellow place is where the content of all my child pages will appear. Remember that we included Vue.js router along with the main Vue.js framework library? The router is going to handle all navigation for us. It will ensure that each child page is rendered in this master template. We need to tell the router where to render them. In your HTML code find a place marked by the yellow stripe and add the following component there:
...
<router-view></router-view>
...
This tells the router to use this place for rendering child pages and their components. We also need to adjust links in main navigation from usual atags to router links. Here is my implementation:
...
 <li><router-link to="/">Home</router-link></li>
 <li><router-link to="/blog">Blog</router-link></li>
 <li><router-link to="/about">About</router-link></li>
...
If there are any other parameters on your a tags, you can use them with router-link tags too. Vue.js router will make sure they appear in the final HTML code.
Congratulations, your master template is finished.
Child pages
Because my website is small and we are aiming for an easy implementation, child pages will not have their physical interpretation. However, if you have a lot of pages and want to separate them using physical files, it is possible. In that case I suggest using a compiler to generate one final minimized JavaScript file of your implementation.
First of all, let’s initialize our Vue.js application and routes in app.js file. Routes are coming directly from the list of pages above. The implementation should look like this:
const router = new VueRouter({
 routes: [
  { path: '/', component: Home },
  { path: '/blog', component: Blog },
  { path: '/about', component: About }
 ]
})
const app = new Vue({
 el: '#page-wrapper',
 router
})
We create the router instance and pass it URLs of all our pages and components names. We do not have those components yet, so I just used names of corresponding pages. We will create components with the same names later.
Every Vue.js application is brought to life by creating an instance of the Vue class and connecting it to an element. In my case it is a div with id page-wrapper — the top level element just under the body tag. The instance also needs to know we want to use Vue.js router. That is why the router instance is passed into the main instance.
The last thing we need to do is to define components for each page. Note that we need to create them before the definition of the Vue application, otherwise they will not be known to Vue.js.
Remember the deleted code from the master template? That is the content of our homepage component. Let’s define it:
const Home = {
 template: `
  <div>
   <section id="banner">
    <div class="inner">
     <div class="logo">
     ...
     </div>
     <h2>Ondrej Polesny</h2>
     <p>Developer Evangelist + dog lover + freelance bus driver</p>
    </div>
   </section>
   <section id="wrapper">
    <div>
     <section id="one" class="wrapper spotlight style1">
      <div class="inner">
       <router-link to="/about" class="image"><img src="images/pic01.png" alt="" /></router-link>
       <div class="content">
        <h2 class="major">Kentico</h2>
        <p>...</p>
        <router-link to="/about" class="special">Continue</router-link>
       </div>
      </div>
     </section>
     <section id="two" class="wrapper alt spotlight style2">
     ...
     </section>
     <section id="three" class="wrapper spotlight style3">
     ...
     </section>
     <section id="four" class="wrapper alt style1">
     ...
     </section>
     <div class="inner">
      <div>
       <h2 class="major">Latest blog posts</h2>
       <p>...</p>
       ... <!-- list of blogs -->
      </div>
     </div>
     <ul class="actions">
      <li><a href="/blog" class="button">See all</a></li>
     </ul>
    </div>
   </section>
  </div>`
}
You see it is a lot of HTML markup and it makes our app.js file quite big and unreadable. Moreover, some content is also displayed on other pages. For example the list of blog articles or texts about me.
Components
This is where components come into the mix. Components represent pieces of reusable content that can be separated out. They can also contain functionality. Examples are gathering content from external services or rewriting content based on user actions. They can also perform some calculations. Let’s take a look at how I optimized the homepage to use components:
const Home = {
 template: `
  <div>
   <banner></banner>
   <section id="wrapper">
    <about-overview></about-overview>
    <section id="four" class="wrapper alt style1">
     <div class="inner">
      <div>
       <h2 class="major">Latest blog posts</h2>
       <p>...</p>
       <blog-list limit="4"></blog-list>
       <ul class="actions">
        <li><a href="/blog" class="button">See all</a></li>
       </ul>
      </div>
     </div>
    </section>
   </section>
  </div>`
}
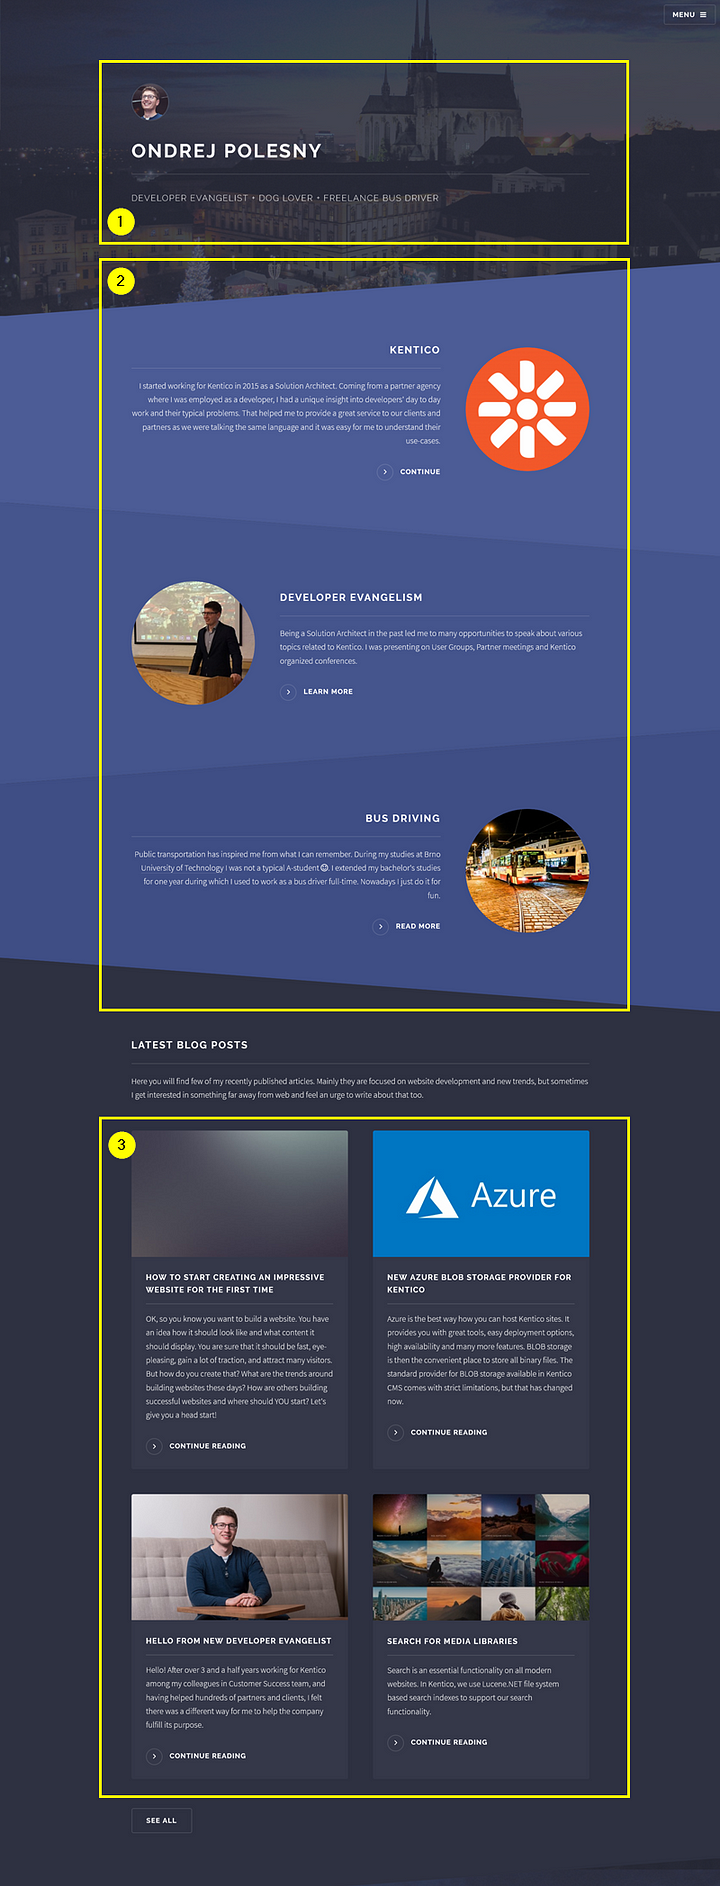
It is important to identify the components correctly. They need to be independent and cover specific functionality or markup. Take a look at how I separated them out:

I identified 3 components:
- Banner (1)
- About overview (2)
- Blog list (3)
Note that some controls are outside of the yellow areas that mark the respective components. For example, look at the Blog list component. You see that the button “See all”, the paragraph introducing the section and its header, are excluded from the component. The reason is that the Blog list component will also be used on the Blog page. These texts will be different and the button “See all” will not be displayed at all. Therefore the component should include only reusable pieces of content and markup.
I added the definitions of these components to the components.js file. They can be used independently, so if you want to separate them further, you can.
Banner is the simplest of these components. It does not contain any functionality, just HTML markup. See how it looks like below:
Vue.component('banner', {
 template: `
  <section id="banner">
   <div class="inner">
    <div class="logo">
     <span class="icon">
      <img src="images/profile-picture.jpg" alt="" />
     </span>
    </div>
    <h2>Ondrej Polesny</h2>
    <p>Developer Evangelist + dog lover + freelance bus driver</p>
   </div>
  </section>`
 })
Every component needs to have a unique name (banner) and a template, which is just HTML markup. Usually components also contain data and other functions they need for their functionality. Take a look at the Blog list component:
Vue.component('blog-list', {
 props: ['limit'],
 data: function(){
  return {
   articles: [
    {
     url: 'https://medium.com',
     header: 'How to start creating an impressive website for the first time',
     image: 'https://cdn-images-1.medium.com/max/2000/1*dVlw9tLq4lVaXrGG0gZc8Q@2x.png',
     teaser: `OK, so you know you want to build a website. You have an idea how it should look like and what content it should display. You are sure that it should be fast, eye-pleasing, gain a lot of traction, and attract many visitors. But how do you create that? What are the trends around building websites these days? How are others building successful websites and where should YOU start? Let's give you a head start!`
    },
    …
   ]
  }
 },
 template: `
  <section class="features">
   <article v-for="article in articles">
    <a :href="article.url" class="image"><img :src="article.image" alt="" /></a>
    <h3 class="major">{{article.header}}</h3>
    <p>{{article.teaser}}</p>
    <a :href="article.url" class="special">Continue reading</a>
   </article>
  </section>`
})
In the scope of the Blog list component, I want to list latest blog posts. I also want to be able to limit the number of posts displayed on the home page to only the 4 latest articles. Thus I introduced a limit property. I will use it later when the content comes from the content service. The limit will be set in markup when using the component: <blog-list limit="4">.
In the template (markup) there is a simple v-for cycle that iterates over an array of articles. The colon :href before any attribute means it will be resolved by Vue.js to a specified variable, for example article URL. Curly brackets {{article.teaser}} have the same effect.
The articles are defined in the data property within an object. Later I will show you how to store this content outside of a component, in a headless CMS. That is a content service in the cloud. But don’t worry, no money will be spent as we will use the free plan of the headless CMS Kentico Cloud.
The last component “About overview” looks very similar. So let’s skip it for now. Let’s take a look at how to glue components and pages together and create two still missing pages — About and Blog.
Creating other pages
These two pages — About and Blog — will be created the same way as we created the Home page. Note that we are not really creating components, but pages. Therefore there will be no Vue.component() definition, but a simple object with one property — template. These objects will go into the app.jsfile. Let’s take a look at the Blog page:
const Blog = {
 template: `
  <section id="wrapper">
   <header>
    <div class="inner">
     <h2>Blog posts</h2>
     <p>Here you can see list of all blog posts that I published.</p>
    </div>
   </header>
   <div class="wrapper">
    <div class="inner">
     <blog-list></blog-list>
    </div>
   </div>
  </section>`
}
You see, this page got really simple as the Blog list component could have been reused.
Remember when we were creating routes for Vue.js router before? We connected each route with a non-existing identifier described as a component.
const router = new VueRouter({
 routes: [
  { path: '/', component: Home },
  { path: '/blog', component: Blog },
  { path: '/about', component: About }
 ]
})
In reality, these components are pages. Pages that we just now created as simple objects and assigned them to constants. Note that name of these constants must match names of components of respective routes. For example, a page on the /blog route needs to be defined as object in the constant Blog.
Finishing up
When you have all your components and pages defined, open your master template and see the results. The website is dynamic even though we did not use any server-side rendering technology. Both routing and rendering of components are done by Vue.js.
One last tip: if you see an incomplete website, chances are you have a typo in one of the JavaScript files. Open up your browser’s console by hitting F12 (or CTRL+SHIFT+C) and switch to the Console tab. You will see the cause of the error there.
Congratulations! You have just made your website dynamic. In the next article I will show you how to separate content from components and create a true microservice architecture with headless CMS.
Other articles in the series:
- How to start creating an impressive website for the first time
- How to decide on the best technology for your website?
- How to power up your website with Vue.js and minimal effort
- How to Mix Headless CMS with a Vue.js Website and Pay Zero
- How to Make Form Submissions Secure on an API Website
- Building a super-fast and secure website with a CMS is no big deal. Or is it?
Written by
Ondřej Polesný
Web development enthusiast with passion for anything new and intriguing. Developer Evangelist, Solution Architect, Developer. Tell me what are your struggles.
freeCodeCamp.org
Stories worth reading about programming and technology from our open source community.