In this tutorial, we’ll cover how to show in-app notifications in your Flutter application. We’ll start off by adding the overlay_support package
overlay_support: ^1.0.0
To use the Overlay functionality we have to wrap our Material app in the OverlaySupportwidget.
class MyApp extends StatelessWidget {
  @override
  Widget build(BuildContext context) {
    return OverlaySupport(
      child: MaterialApp(
          title: 'Flutter Demo',
          home: Scaffold(),
      ),
    );
  }
}
We’ll show modifications for the notification overlay. The library can do a little bit more with toasts as well that you can get into. We’ll cover:
- Basic notification that auto dismisses
- Fixed notification with a button to dismiss
- Message style custom notification
We’ll write all the code in the onPressed callback in the FloatingActionButton of the scaffold so set that up as well.
Widget build(BuildContext context) {
    return OverlaySupport(
      ..
      home: Scaffold(
          floatingActionButton: FloatingActionButton(
          onPressed: () {
            // notification code will go here
          },
          )
      ),
    );
  }
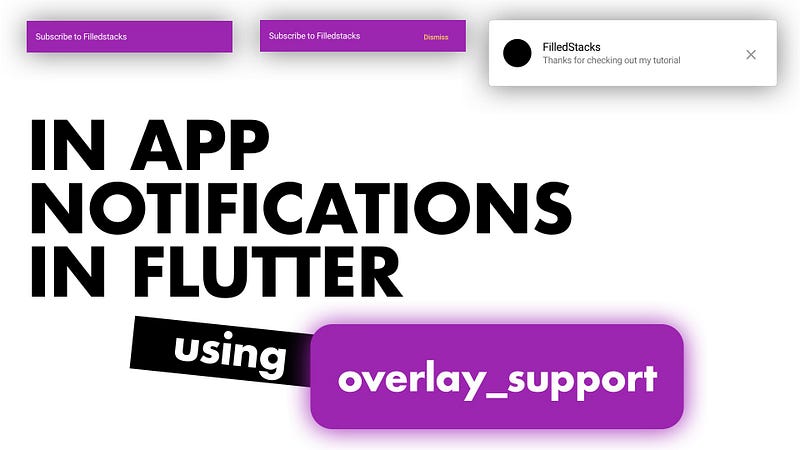
Basic notification
We’ll start off with the basic notification. A purple notification with some text
showSimpleNotification(
    Text("Subscribe to FilledStacks"),
    background: Colors.purple,
  );

Fixed notification with Dismiss button
To make a notification stay without auto dismissing we set autoDismiss to false. We don’t want the notification to stay there all the time so we’ll build a trailing button that the user can tap to dismiss.
showSimpleNotification(
    Text("Subscribe to FilledStacks"),
    background: Colors.purple,
    autoDismiss: false,
    trailing: Builder(builder: (context) {
      return FlatButton(
          textColor: Colors.yellow,
          onPressed: () {
            OverlaySupportEntry.of(context).dismiss();
          },
          child: Text('Dismiss'));
    }),
  );

Custom Notification
To show some custom UI you can use the showOverlayNotification function. It takes a builder as the first positional argument. We’ll return a Card with some side margins, the contents of the card we’ll wrap in a SafeArea since it’ll be displaying at the top of the screen where notches can interfere. The content of the notification will be a basic ListTile with all the properties set.
showOverlayNotification((context) {
    return Card(
      margin: const EdgeInsets.symmetric(horizontal: 4),
      child: SafeArea(
        child: ListTile(
          leading: SizedBox.fromSize(
              size: const Size(40, 40),
              child: ClipOval(
                  child: Container(
                color: Colors.black,
              ))),
          title: Text('FilledStacks'),
          subtitle: Text('Thanks for checking out my tutorial'),
          trailing: IconButton(
              icon: Icon(Icons.close),
              onPressed: () {
                OverlaySupportEntry.of(context).dismiss();
              }),
        ),
      ),
    );
  }, duration: Duration(milliseconds: 4000));

You can build a notification widget that you can pass in the title and message if you have multiple messages to show. Check out the other snippets on the site for more Flutter tutorials.
Dane Mackier
A full stack software developer focused on building mobile products, its tools and architecture. Always reducing boiler plate code and experimenting.