Hello World! with GraphQL — In this tutorial, you will learn how to build a GraphQL server with Nodejs and Express using Apollo Server library 2.0.
When it comes to network requests between a client and a server application, REST (which stands for Representational state transfer) is one of the most popular choices for connecting the two. In the world of REST APIs, everything revolves around the idea of having resources as accessible URLs. We then use CRUD operations (Create, Read, Update, Delete), which are basically HTTP methods such as GET, POST, PUT & DELETE, to interact with the data.
Here is an example of a typical REST request:
// example of a request
https://swapi.co/api/people/

// response of the above request in JSON
{
	"results": [
		{
			"name": "Luke Skywalker",
			"gender": "male",
			"homeworld": "https://swapi.co/api/planets/1/",
			"films": [
				"https://swapi.co/api/films/2/",
				"https://swapi.co/api/films/6/",
				"https://swapi.co/api/films/3/",
				"https://swapi.co/api/films/1/",
				"https://swapi.co/api/films/7/"
			],
    }
		{
			"name": "C-3PO",
			"gender": "n/a",
			"homeworld": "https://swapi.co/api/planets/1/",
			"films": [
				"https://swapi.co/api/films/2/",
				"https://swapi.co/api/films/5/",
				"https://swapi.co/api/films/4/",
				"https://swapi.co/api/films/6/",
				"https://swapi.co/api/films/3/",
				"https://swapi.co/api/films/1/"
			],
		}
  ]
}
The response format for a REST API is not necessarily JSON, but this is the preferred method these days with most APIs. Apart from REST, another way to handle network requests has emerged: GraphQL. Open sourced in 2015, GraphQL is changing the way developers write an API on the server side and handle it on the client side. GraphQL was developed and is actively maintained by Facebook.
Shortcomings of REST
GraphQL is a query language to develop an API. In contrast to REST, which is an architecture or ‘a way of doing things’, graphQL was developed with a concept in mind that a client requests only the desired set of items from the server in a single request.
In REST architecture or like on our above example, when fetching the films Luke Skywalker appeared in in Star Wars movies, we are getting an array of films or the name of homeworld which further consists different API URLs that lead us to details of different sets of JSON data. This is certainly an example of over fetching. The client side, in order to get the details of films in which the character Luke Skywalker appeared, and the name of his home planet, will have to send multiple requests to the server.
With GraphQL, this can be resolved into a single network request. Hop on to the API url: https://graphql.github.io/swapi-graphql/ and see run the following query.
Note: In the example below, you can ignore how the GraphQL API is working behind the scenes. I will be walking you step by step to build your own (maybe the first) GraphQL API later in this tutorial.
{
	allPeople {
		edges {
			node {
				name
				gender
				homeworld {
					name
				}
				filmConnection {
					edges {
						node {
							title
						}
					}
				}
			}
		}
	}
}
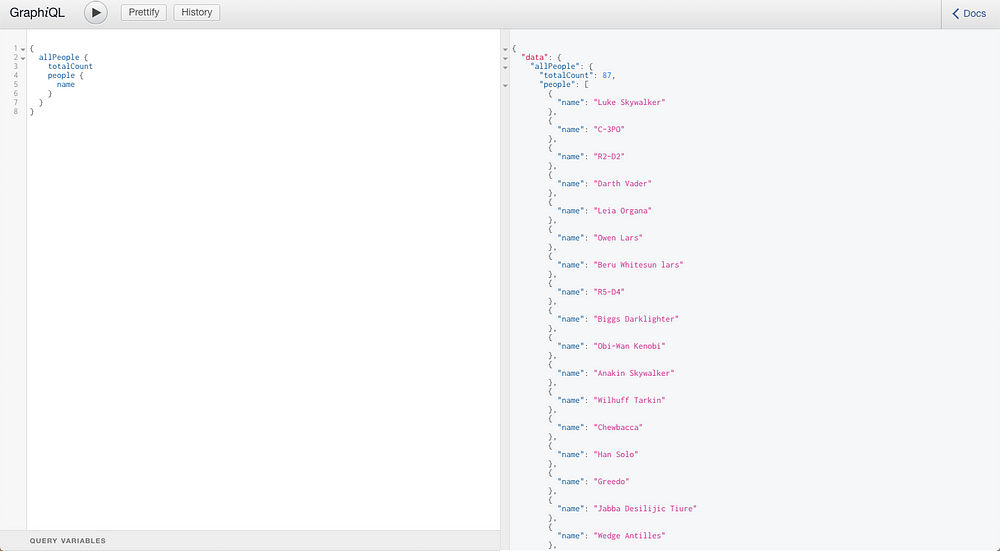
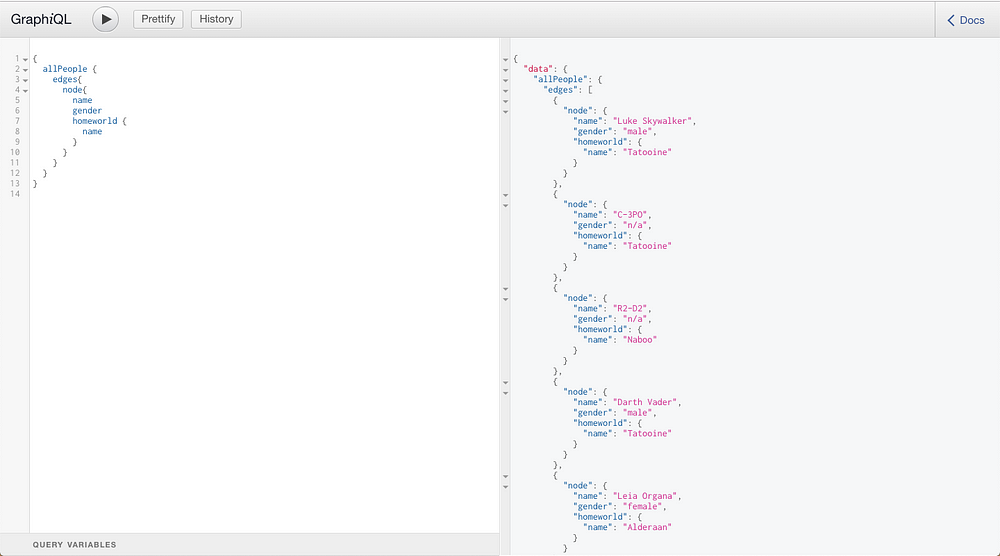
We are going to fetch the data that we need such as the name of the character, their gender, homeworld, and the title of the films they appeared. After running the above query, you will get the following result:
{
	"data": {
		"allPeople": {
			"edges": [
				{
					"node": {
						"name": "Luke Skywalker",
						"gender": "male",
						"homeworld": {
							"name": "Tatooine"
						},
						"filmConnection": {
							"edges": [
								{
									"node": {
										"title": "A New Hope"
									}
								},
								{
									"node": {
										"title": "The Empire Strikes Back"
									}
								},
								{
									"node": {
										"title": "Return of the Jedi"
									}
								},
								{
									"node": {
										"title": "Revenge of the Sith"
									}
								},
								{
									"node": {
										"title": "The Force Awakens"
									}
								}
							]
						}
					}
				},
				{
					"node": {
						"name": "C-3PO",
						"gender": "n/a",
						"homeworld": {
							"name": "Tatooine"
						},
						"filmConnection": {
							"edges": [
								{
									"node": {
										"title": "A New Hope"
									}
								},
								{
									"node": {
										"title": "The Empire Strikes Back"
									}
								},
								{
									"node": {
										"title": "Return of the Jedi"
									}
								},
								{
									"node": {
										"title": "The Phantom Menace"
									}
								},
								{
									"node": {
										"title": "Attack of the Clones"
									}
								},
								{
									"node": {
										"title": "Revenge of the Sith"
									}
								}
							]
						}
					}
				}
			]
		}
	}
}
If the client side of an application is triggering the above GraphQL URL, it will only send one request on the network to get the desired result, thus eliminating any possibility of over fetching or sending multiple requests.
Pre-requisites
To follow this tutorial, all you need is Nodejs and npm installed on your local machine.
- Nodejs
^8.12.0 - npm
^6.4.1
GraphQL in a nutshell
In a nutshell, GraphQL is a syntax that elucidates how to ask for data and is generally used to retrieve data (aka, a query) or make changes to it (aka mutation) from a sever to a client.
GraphQL has few defining characteristics:
- It lets the client specify exactly what data it needs. This is also known as declarative data fetching.
- It is not opinionated about the network layer
- It makes easier to combine several sets of data from multiple sources
- It uses a strongly typed system when declaring the structure of data in the form of both the schema and the query. This helps validating the queries even before the network requests are sent.
Building Blocks of a GraphQL API
A GraphQL API has four building blocks:
- schema
- query
- mutations
- resolvers
Schema is defined at the server in the form of objects. Each object corresponds to data types such that they can be queried upon. For example:
type User {
	id: ID!
	name: String
	age: Int
}
The schema above defines the shape of a user object with a required field iddenoted by the ! sign. Other fields such as thename which is of type stringand age which is of type integer are also included. This also validates the schema when querying for the data.
Queries are what you use to make a request to a GraphQL API. For instance, in our example above, when we are fetching the data related to a Star Wars character. Let us simplify this. To query in GraphQL, it is about asking for specific fields on objects. For example, using the same API as we did above, we fetch the name of all the characters in Star Wars. Below you can see the difference. On left-hand side of the image, is the query and on the right-hand side is the image.
The good thing about GraphQL queries is that they can be nested to go as deep as you’d like. This is hard to do in a REST API. The operation becomes much more complex.
Below is another example of a nested query, a more complex one
Mutations: In REST architecture, to modify the data we either use POST to add data or PUT to update the existing fields with the data. In GraphQL, the overall concept is similar. You will send a query to cause the write operations on the server side. However, this form of the query is called a Mutation.
Resolvers are the link between the schema and the data. They provide functionality that can be used to interact with databases through different operations.
In this tutorial, you will learn how to setup a GraphQL server with Nodejs using the same building blocks we have just learned.
Hello World! with GraphQL
Lets now write our first GraphQL server. For this tutorial, we are going to use Apollo Server. We need to install three packages in total for the Apollo Server to work with our existing Express application as a middleware. The good thing about Apollo Server is that it can be used with several popular frameworks for Node.js: Express, Koa, and Hapi. Apollo itself is kept library-agnostic, so it is possible to connect it with a lot of third-party libraries in client and server applications.
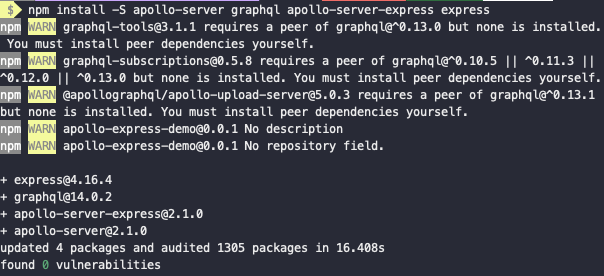
Open your terminal and install the following dependencies:
# First create a new empty directory
mkdir apollo-express-demo

# Then initialize it
npm init -y

# Install required dependencies
npm install --save graphql apollo-server-express express
Let us understand briefly what these dependencies do.
graphqlis a support library and is a required module for our purposeapollo-server-expressis added to an existing application and is a corresponding HTTP server support packageexpressweb framework for Nodejs
You can take a look at the following image of all the dependencies I installed without any error.
Create a new file called index.js at the root of your project with the following code.
const express = require('express');
const { ApolloServer, gql } = require('apollo-server-express');

const typeDefs = gql`
	type Query {
		hello: String
	}
`;

const resolvers = {
	Query: {
		hello: () => 'Hello world!'
	}
};

const server = new ApolloServer({ typeDefs, resolvers });

const app = express();
server.applyMiddleware({ app });

app.listen({ port: 4000 }, () =>
	console.log(`? Server ready at http://localhost:4000${server.graphqlPath}`)
);
This is our initial server file in which we start by simply requiring the expressmodule. The gql is a template literal tag that is used for writing GraphQL schema as types. The schema consists of type definitions with a mandatory Query type for reading data. It can further have fields and nested fields representing other data fields. In our above example, we are defining typeDefs to write a graphQL schema.
Then resolvers come into picture. Resolvers are used to return data for the fields from a schema. We are defining one resolver in our example which maps the function hello() to implement on our schema. Next, we create a server that uses the ApolloServer class to instantiate and start the server. Since we are using Express, we need to integrate the ApolloServer class. We are passing it by the method applyMiddleware() as theapp to add the Apollo Server’s middleware. app here represents the existing application and is an instance of Express.
Lastly, we bootstrap the server by using app.listen() which is provided by the Express module itself. To run the server, open up your terminal and run the command node index.js. Now, from a browser window, visit the url: http://localhost:4000/graphql to see it action.
Apollo Server sets up GraphQL Playground for you so that you can start running queries and exploring schemas quickly as shown below.
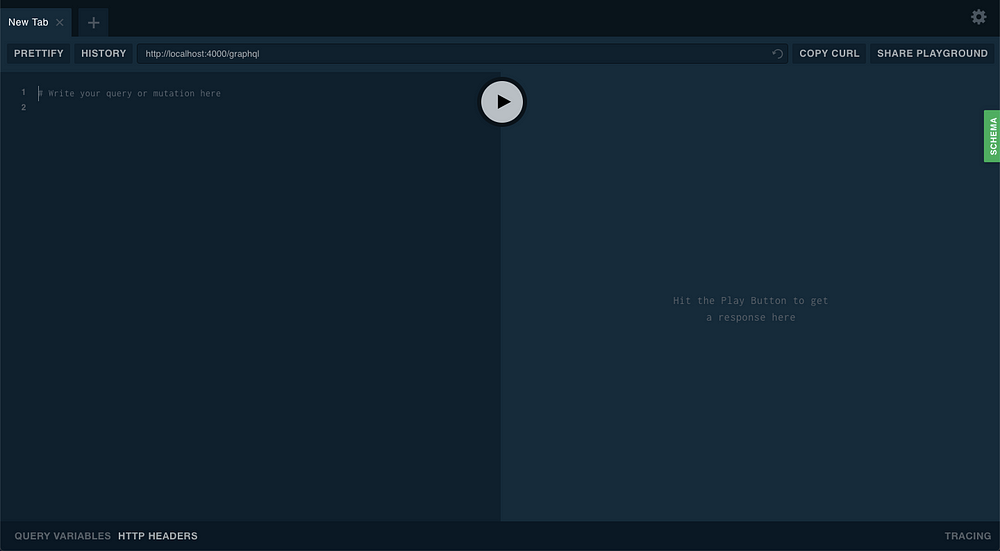
To run a query, type the following query on the left-hand side which is the editable space and then press the ▶ (play) button in the middle.

The schema tab on the right-hand side describes the data type of our query hello. This is coming straight from the typeDefs we defined in our server.

Voila! You just created your first GraphQL server. Now let us extend our current knowledge for the real world.
Building an API with GraphQL
So far we have put together all the modules and whatever necessary terminology that comes with it. In this section, we are going to create a small Star Wars API for our own demonstration purpose using Apollo Server. You might have guessed by now that Apollo server is a library that helps you to connect a GraphQL schema to an HTTP server using Nodejs. It is not bound to only a specific Node framework, for example, we used ExpressJS in the previous section. It supports Koa, Restify, Hapi, and Lambda too. For our API, let’s continue to use Express.
Compiling with Babel
If you want to start from scratch, go ahead and.install all the libraries from the section Hello World! With GraphQL. Here are dependencies the we installed in the previous section:
"dependencies": {
		"apollo-server-express": "^2.1.0",
		"express": "^4.16.4",
		"graphql": "^14.0.2"
	}
I am going to use the same project and the same file index.js to bootstrap the server. But before we start building our API, I want you to show you how to use ES6 modules in our demo project. Working with front-end libraries like React and Angular which already have support for ES6 features such as import and export default statements. Nodejs version 8.x.x has way around this. All we need is a transpiler which allows us to write JavaScript using ES6 features. You can totally skip this step and use the good old require() statements.
What is a transpiler though?
Transpilers are also known as ‘source-to-source compilers’ that read code from source written in one programming language and produce an equivalent code in another language.
In the case of Nodejs, we are not switching programming languages, rather we need to use new language features that are not supported by the LTS version of Node I am using. I am going to setup Babel compiler and enable it in our project by going through the following configuration process.
First, you will have to install few dependencies and do mind -D flag as we only need these dependencies for our development environment.
Once you have installed them, add a .babelrc file to the root of the project and add the following config:
{
	"presets": [env]
}
The last step in the configuration process is to add a dev script in package.json. This will take care of running the babel compiler on its own (automate) once there is a change. This done by babel-watch that also takes care of re-starting Nodejs web server.
"scripts": {
	"dev": "babel-watch index.js"
}
To see it action add the following code to your index.js and see if everything is working fine.
import express from 'express';

const app = express();

app.get('/', (req, res) => res.send('Babel Working!'));

app.listen({ port: 4000 }, () =>
	console.log(`? Server ready at http://localhost:4000`)
);
From terminal write npm run dev. If there are no errors, you will get the following:
You can also visit http://localhost:4000/ in a browser window to see it action.
Adding a Schema
We need a schema to start our GraphQL API. Let us create a new file called api/schema.js inside the directory api. Add the following the schema.
import { gql } from 'apollo-server-express';

const typeDefs = gql`
	type Person {
		id: Int
		name: String
		gender: String
		homeworld: String
	}

	type Query {
		allPeople: [Person]
		person(id: Int!): Person
	}
`;

export default typeDefs;
Our schema consists of two queries in total. The first is allPeople through which all characters in our API can be fetched and listed. The second query person is to retrieve one person using their id. Both of these query types are dependent on a custom type called Person object which contains four properties.
Add a Resolver
We have already learned about the importance of a resolver. It is based on a simple mechanism that it has to link the schema and the data. Resolvers are functions that contain the logic behind a query or mutation. They are used then to retrieve data and return it on the relevant request.
If you have built servers before using Express, you can think of a resolver as a controller where each controller is built for a specific route. Since we are not using any database behind our server, we must provide some dummy data to mock our API.
Create a new file called resolvers.js and add the following code.
const defaultData = [
	{
		id: 1,
		name: 'Luke SkyWaler',
		gender: 'male',
		homeworld: 'Tattoine'
	},
	{
		id: 2,
		name: 'C-3PO',
		gender: 'bot',
		homeworld: 'Tattoine'
	}
];

const resolvers = {
	Query: {
		allPeople: () => {
			return defaultData;
		},
		person: (root, { id }) => {
			return defaultData.filter(character => {
				return (character.id = id);
			})[0];
		}
	}
};

export default resolvers;
First, we define the defaultData array which contains details of two characters from Star Wars. Both of these objects inside the array have four properties as per our schema. Next is our resolvers object which contains two functions. allPeople() here can be used later to retrieve all the data inside thedefaultData array. The person() arrow function, uses an argument id to retrieve the person object with the requested ID. This we have already defined in our query.
You have to export both resolvers and schema objects to use them with Apollo Server middleware.
Implementing the Server
Now that we have defined our schema and resolver, we will implement the server inside the file index.js. Start by importing Apollo Server from apollo-server-express. We also need to import our schema and resolvers object from the api/ folder. Then, use GraphQL middleware from the Apollo Server Express library to instantiate the GraphQL API.
import express from 'express';
import { ApolloServer } from 'apollo-server-express';

import typeDefs from './api/schema';
import resolvers from './api/resolvers';

const app = express();

const PORT = 4000;

const SERVER = new ApolloServer({
	typeDefs,
	resolvers
});

SERVER.applyMiddleware({ app });

app.listen(PORT, () =>
	console.log(`? GraphQL playground is running at http://localhost:4000`)
);
Lastly, we bootstrap our Express server using app.listen(). You can run the server now executing the command from the terminal npm run dev. Once the Node server starts, it will prompt a success message indicating the server has started.
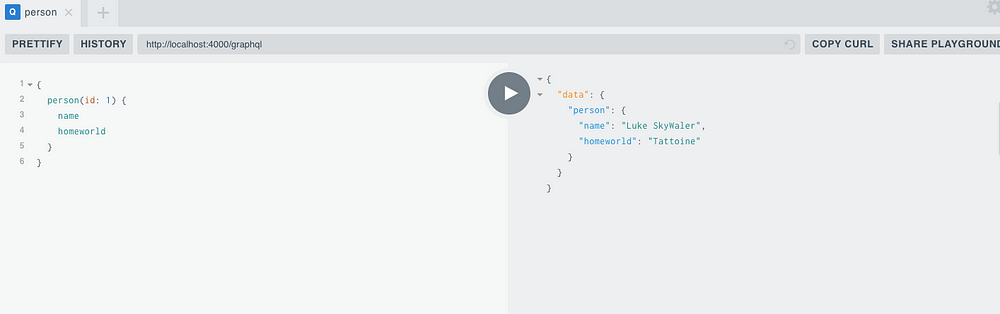
Now to test our GraphQL API, hop on to http://localhost:4000/graphql URL in a browser window and run the following query.
{
  allPeople {
    id
    name
    gender
    homeworld
  }
}
Hit the play button and you will see a familiar result on the right side section like below.

This is all happening because our query type allPeople has custom business logic to retrieve all the data (in our case the mock data we are providing as an array inside resolvers.js) using a resolver. To fetch a single person object try running another query like this. Remember you have to provide the ID.
{
	person(id: 1) {
		name
		homeworld
	}
}
Run the above query, and as a result, you can have the values of each field/property you have mentioned to query up on. Your result will be similar to the following.

Great! I am sure you must have got hold of how to create a GraphQL query and run it. Apollo Server library is a powerful one. It also enables us to edit the playground. Suppose we want to edit the theme of the playground? All we have to do is provide an option when creating ApolloServer instance, in our case the SERVER.
const SERVER = new ApolloServer({
	typeDefs,
	resolvers,
	playground: {
		settings: {
			'editor.theme': 'light'
		}
	}
});
The playground property has many features such defining a default endpoint for the playground to changing the theme. You can even enable the playground in the production mode. More configurable options can be found in the official documentation of Apollo Server here.
After changing the theme we get the following.
Conclusion
If you completed this tutorial step by step, Congratulations!?
You have learned how to configure an Express server with Apollo library to setup your own GraphQL API. Apollo Server is an open source project and is one the most stable solution to create GraphQL APIs for full-stack applications. It also supports client-side out of the box for React, Vue, Angular, Meteor, and Ember as well as Native mobile development with Swift and Java. More information about this can be found here.
The complete code for the tutorial at this Github repository ?
Starting a new Node.js project, or looking for a Node developer?
Crowdbotics helps business build cool things with Node(among other things). If you have a Node project where you need additional developer resources, drop us a line. Crowbotics can help you estimate build time for given product and feature specs, and provide specialized Node developers as you need them. If you’re building with Node, check out Crowdbotics.
Thanks to William Wickey for help with editing.
Source:
Written by
Aman Mittal
??Fullstack Developer ❤️ Nodejs ReactNative | ? Blogger & Author | Subscribe ?https://upscri.be/e51a31/⚛️ + ?
Crowdbotics
Turn ideas and specs into working code.